1. Typing on Your Screen
The Touch Keyboard mode of the Tablet
PC Input Panel lets you enter text directly onto your screen instead of
using a physical keyboard. The content you enter appears in the
document of your currently running program.
1.1. Type Your Content
Make sure that the program into which you want to insert your text is running. Then click the Start button, and choose Tablet
PC Input Panel from the Tablet PC submenu. If the Input Panel is
already running but is minimized, click or tap the Input Panel tab.
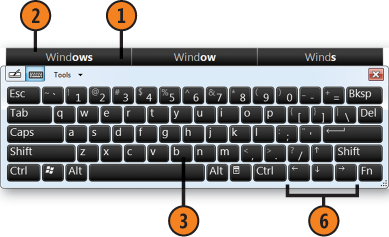
Click the Touch Keyboard button.
Tap or click each character to enter it. If the correct word appears among any suggested words, click the word to insert it, and then continue typing the next word.
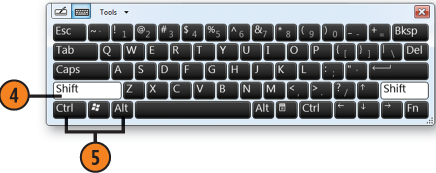
To
modify the keyboard, tap or click a modifier key—for example, the
Shift, Caps, or Fn (Function) key. Tap or click the key a second time to
turn off the change.
To
enter keyboard shortcuts, tap or click the Alt and/or the Ctrl key and
then the assigned key. The Alt and/or Ctrl key will be turned off
automatically when the keyboard shortcut is completed.
Tap
or click the navigation and editing keys to use them just as you would
on a standard keyboard, or use gestures to scroll in your document.


Tip:
Windows 7 has another On-Screen
Keyboard that isn't part of the Tablet PC Tools and that is available
in all editions of Windows 7 as part of the Accessibility Options. To
access this keyboard, click On-Screen Keyboard in the Ease Of Access
folder on the Start menu.
2. Writing Quick Notes
Just like those little sticky notes that clutter up your desk or parade around the edges of your computer screen, the Sticky
Notes program provides a great way to quickly type a reminder, an idea,
an address, or a phone number. There's an endless supply of these notes
that you can scatter around the Desktop; you can change their colors to
classify them, and you can make them vanish when you've finished with
them.
2.1. Write and Read Your Notes
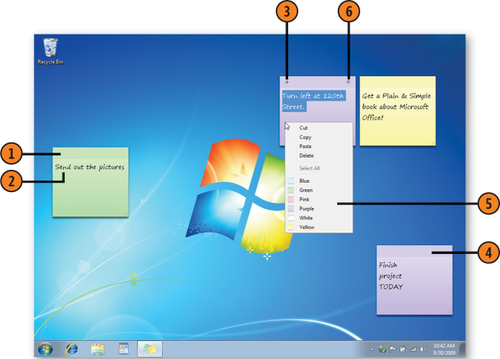
If Sticky Notes isn't already running, click the Start button, type stic in the Search box of the Start menu, and choose Sticky Notes from the menu to start the program.
Type the text of your note. The note is saved automatically until you delete it.
If you want to create another note, click New Note, and type your content.
Drag the sticky note to where you want it.
To
change the color of a note, right-click it and choose the color you
want from the shortcut menu. You can also use the shortcut menu to copy
or delete selected text or to paste text from another location.
Point to a note you no longer want, and click Delete.

Tip:
To temporarily hide your notes without deleting them, click the Sticky Notes icon on the taskbar to minimize all the notes. To hide the notes, even between sessions, right-click the Sticky
Notes icon and choose Close Window from the shortcut menu. To see your
notes again, choose Sticky Notes from the Start menu.