You primarily use four tools to manage Windows Vista
deployment: Windows System Image Manager (Windows SIM), Windows
Preinstallation Environment (Windows PE), ImageX, and the System
Preparation Tool (Sysprep).
Other tools and
utilities perform minor roles in Windows deployment, such as custom Help
authoring, image file management, and Package Manager. Some of these
tools are available in the Windows AIK (Windows SIM and ImageX) or most
are built in to Windows Vista (Sysprep and Package Manager).
Prior to
creating customized installations of Windows Vista, you will need to set
up the preinstallation environment. You’ll need systems to use for
creating the installation image, a technician computer for creating
answer files and scripts, and storage for completed images.
Planning Installation
The number of
installations you will perform will help you determine how to design the
installation process. If you have a fewer than one hundred systems to
install, for instance, you might choose to create a custom answer file
and use it with the Windows Vista DVD to install your systems. If,
however, you have one hundred or more systems to deploy, you might
choose to create a custom network installation point with customized
answer files in place to support rapid deployment. Even larger
environments might make use of a solution such as the BDD 2007 or the
Microsoft Systems Management Server (SMS) 2003 Operating System
Deployment (OSD) Feature Pack to support hundreds or even thousands of
installations.
Low-Volume Deployment Environment
Low-volume
installations can use DVDs or network shares for deployment. Use Windows
SIM to create unattended answer files for use with Windows DVDs.
Placing the answer files on USB flash drives or other portable media
will cause Windows Setup to detect and use the custom answer file during
installation.
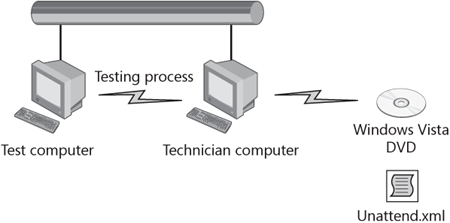
The
customization lab for simple answer-file development can be a single
technician computer and perhaps a test system to test the deployment
answer file, as shown in Figure 1.

Middle-Volume Deployment Environment
For larger
organizations, particularly medium-size organizations that have from
about fifty to several hundred computers, a networkbased preinstallation
environment is recommended. In this environment, the Windows Vista
image is copied to a network location and custom answer files are stored
with the image. Setup is either launched directly from the distribution
share or from a Windows PE boot disk that has been designed to start
the network installation.
The installation
environment for middle-volume deployment might include a technician
computer, a master computer (for creating the deployment image), one or
more test computers, and a server for storing the deployment images (Figure 2).

High-Volume Deployment Environment
Very large
organizations will need more extensive distribution infrastructure to
fully automate the deployment process. Using SMS 2003 OSD or BDD 2007 is
common in these organizations (Figure 3).

Setup
and maintenance of the SMS OSD or the BDD 2007 solution requires a
formal project team with well defined roles. OSD comes with extensive
documentation for its configuration and use.
Configuring the Technician Computer
Once you’ve decided on
the design of the deployment environment, the installation can begin.
Using Windows SIM requires a dedicated technician computer and is
necessary for all three of the scenarios . A master computer for image development and one or more test
computers are also requirements for all three scenarios. Servers and
deployment infrastructures depend on the size of the environment.
The technician computer is
the computer in your lab on which you install the Windows AIK and create
answer files, distribution shares (a folder structure that contains the
source files necessary to install your custom Windows Vista
configuration), configuration sets, and custom Windows PE images.
Windows SIM is the primary tool that you use to create and modify answer
files.
To build a technician computer, you need:
An x86- or x64-based computer running Windows XP, Windows Vista, or a Windows Server 2003 operating system
Windows AIK
A CD or DVD burner and software to create portable media
The Microsoft .NET Framework 2.0 and MSXML 6.0 (provided with the Windows AIK)
Network access to download updates, share the distribution share, and distribute configuration sets on the network
To install the Windows AIK
1. | From the Windows AIK media or a folder containing the Windows AIK, run waikplatform.msi, where platform is either x86 or amd64.
|
2. | Accept
the EULA and choose default location for installation files. You must
use the default installation location if you’re using BDD 2007.
|
3. | Complete the installation wizard to install the Windows AIK.
|
Note
The
Windows AIK is also provided on both the Microsoft Download Center and
the Companion DVD for this Resource Kit as a DVD image (.img) file which
you can either burn to DVD media or mount using a third-party .iso
mounting utility. When the Windows AIK DVD is inserted into your DVD-ROM
drive, a welcome screen leads you through the installation process,
including the installation of prerequisites such as the .NET Framework
2.0 and MSXML 6.0. |
The Windows AIK installs in
C:\Program Files\Windows AIK by default. The following list describes
each of the installation folder’s subfolders:
\Docs Contains online help files (.chm) and white papers
\Recovery Contains Windows Recovery–specific files
\Samples Contains all Windows AIK samples
\SDKs Contains software development kit (SDK) resources
\Tools Contains all deployment tools, including Windows SIM, Windows PE, and ImageX
Note
The Windows Installer file waikplatform.msi
includes the Windows AIK tools. The file winpe.cab actually includes
the Windows PE source files. To install Windows PE, winpe.cab must be in
the same folder as the .msi file. |