2. Deploying the Application
Now you can deploy the application to Windows Azure. You must first create a hosted service in Windows Azure to which you will deploy the image manager ASP.NET application. Before you can do this, though, you’ll need to amend the DataConnectionString to point to your Windows
Azure instance in the cloud (as opposed to its current configuration
for your local development storage). You’ll then deploy the ASP.NET
application to Windows Azure by publishing the service—similar to the
way you would deploy other types of applications to Azure.
2.1. Deploy the ASP.NET Application to Windows Azure
Open your Visual Studio project, right-click the web role (for example, ImageBlobStorage), and select Properties.
Amend the DataConnectionString
Value field by clicking the ellipsis to the right of the field. Click
Enter Storage Credentials, enter your account name and account key, and
then select Use Default HTTP Endpoints (or Use Default HTTPS Endpoints).

After you’ve amended the DataConnectionString field, your Windows Azure application is configured for use in the cloud.
Right-click
the cloud project, select Publish, and then select Create Service
Package Only. Windows Explorer invokes with the two files you’ll need to
deploy to the cloud.
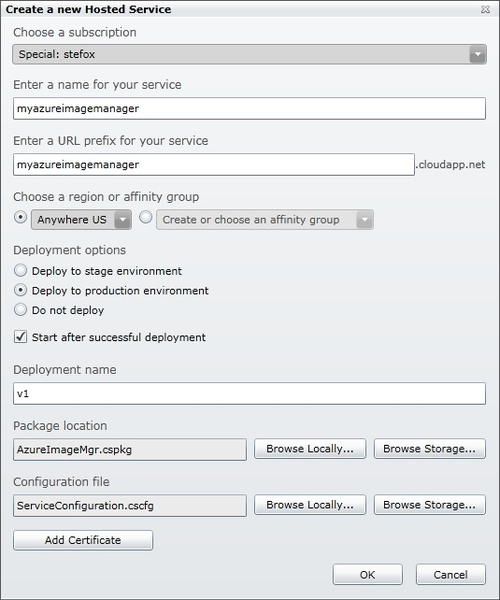
Click Hosted Services, Storage Accounts & CDN, and then click the New Hosted Service button.
Enter
a name for the service, a URL prefix, and a deployment region, and then
select Deploy To Production Environment. Enter a deployment name, and
then browse to the cloud service files you just built and published. The
dialog box should look similar to the one in the following image.

Click OK. Windows Azure will require a few minutes to deploy the new ASP.NET web role.
In the DNS Name field, click the URI that was created for you to load the newly deployed ASP.NET Windows Azure application. The following image shows the Windows Azure portal.

You can now add images to BLOB storage by using the newly deployed Windows Azure application.
The BLOB container is empty, so add a few images to the container, as illustrated in this image.

With just this simple application, you now have the core bridgework and programmatic knowledge to move binary resources into Windows Azure BLOB storage. Although this exercise focused on images, you’re certainly not
limited to this type of file; you can add many types of files in
Windows Azure for use in SharePoint (and for that matter, for use in
many other applications).
3. Integrating the Application with SharePoint
In the next exercise, you’ll build a simple Web Part that integrates the ASP.NET application you just built with SharePoint by using an IFRAME.
Although it integrates on an application level, the code is not fully
integrated; as you know, IFRAME loads a view of the application.
3.1. Integrate an ASP.NET Application with SharePoint by Using IFRAME
Open the Visual Studio solution you created in the first exercise. Right-click the solution and select Add | New Project.
Navigate to the SharePoint 2010 installed templates and select Empty SharePoint Project.
Provide a name for the project (for example, AzureWebPartProject), choose Deploy As A Farm Solution in the SharePoint Customization wizard, and click Finish.
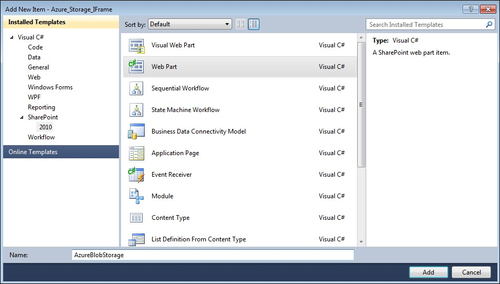
Right-click the newly created project, select Add | New Item, and select Web Part.
Provide a name for the Web Part (such as AzureBlobStorage).

Click Add. Rename the Feature1 node to AzureBlobStorageFeature.
Right-click the Web Part class file (for example, AzureBlobStorage.cs)
and amend the code with the bolded code in the snippet below. Note that
the src property will point to your Windows Azure ASP.NET application (for example, http://myazureimagemanager.cloudapp.net):
using System;
using System.ComponentModel;
using System.Web;
using System.Web.UI;
using System.Web.UI.WebControls;
using System.Web.UI.WebControls.WebParts;
using Microsoft.SharePoint;
using Microsoft.SharePoint.WebControls;
using System.Text;

namespace Azure_Storage_IFrame.AzureVideoManager
{
    [ToolboxItemAttribute(false)]
    public class AzureVideoManager : WebPart
    {
        StringBuilder azureIFrame = new StringBuilder();

        protected override void CreateChildControls()
        {
            azureIFrame.AppendLine("<iframe id='azureVideoManager'
frameborder=0 scrolling=no width=400px
height=800px src='http://myazureapp.cloudapp.net/'></iframe>");
            this.Controls.Add(new LiteralControl(azureIFrame.ToString()));
        }
    }
}
If you want, you can now amend the .webpart and elements.xml files, to provide a more intuitive title, description, and custom group location in SharePoint for the Web Part.
Press F6 to build the SharePoint project, and then right-click the project and select Deploy.
Navigate to your SharePoint site. Select Site Actions and then Edit Page.
Click Insert | Web Part, and then navigate to the newly added Web Part.
Click Add. The Windows Azure application now appears in SharePoint.

Although you used an IFRAME to loosely couple SharePoint with Windows
Azure BLOB storage, you can also create a Web Part project and deploy
it into SharePoint as a Web Part. If you choose this path, you will need
to ensure that you add the data connection configuration information as app settings in the web.config file for your SharePoint site. For more information, see http://blogs.msdn.com/steve_fox.