Fireworks is not Photoshop. There—we’ve said it. If
you have large images that require major manipulation, chances are you
should do that kind of heavy-duty work in Photoshop first. Every job has
a correct tool. That said, Fireworks comes with a decent set of
standard retouching tools, including the Rubber Stamp tool (
 ). These tools can handle most basic retouching requirements. The Rubber
Stamp (also known as the Clone Stamp) tool copies pixel detail from one
location in a bitmap image and pastes it into another (presumably
damaged or unsightly) area. Maybe there is a scratch in some packaging
or a fly-away thread in some clothing. Maybe you need to smooth out skin
tones in a photo or remove an unwanted highlight in a shiny object.
These are all good examples of when to use the Rubber Stamp tool.
Here are the general steps to using the Rubber Stamp tool:
1. | Click an area to designate it as the source (the area you want to clone). The sampling pointer becomes a crosshair pointer.
|
2. | Move
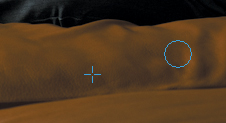
to a different part of the image, and drag the pointer. Two pointers
appear. The first is the source and is in the shape of a crosshair.
Depending on the brush preferences you’ve selected, the second pointer
is a rubber stamp, a crosshair, or a blue circle. As you drag the second
pointer, pixels beneath the first pointer are copied and applied to the
area beneath the second.
|
Note
To designate a different area of pixels to clone, Alt-click (Windows) or Option-click (Mac) another area of pixels.
Tip
You can change the
cursor display for many editing tools by choosing Edit > Preferences
(Windows) or Fireworks > Preferences (Mac) and then selecting the
Edit category. Select or deselect the cursor options to change how the
cursor is represented.
Now you will test this
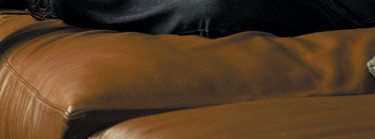
process. In the file we’ll open, the overall image is fine, but there
are some distracting wrinkles in the sofa cushion where the actor is
seated. You’re going to smooth over that area using the Rubber Stamp
tool.
1. | Choose File > Open, and select the Mark_actor02.jpg file.
|
2. | Click Open.
|
3. | Zoom
in, to focus in on the cushion
area. When retouching, it’s always good to get close to your subject
matter.

|
4. | Select the Rubber Stamp tool from the Bitmap tools area of the Tools panel.
Notice that the Properties panel updates, displaying attributes for the
Rubber Stamp tool. You can set the brush size and the edge softness of
the brush (100 is soft, 0 is hard). You can also decide whether you want
to keep your brush aligned with the original source of sampling and if
you want to sample from all the layers/objects in your document, or just
the active object.
|
5. | In the Properties panel, set your brush size to 28 pixels and the edge to 100%. Leave the Opacity setting at 100.
|
6. | Deselect
the Source Aligned option. This will ensure that the sampling always
begins at the same source point, no matter where you begin your actual
rubber-stamping.
|
7. | Locate
an area on the cushion that is mostly smooth and similar in brightness
to the wrinkled area. Hold down Alt (Windows) or Option (Mac), and click
to sample the pixels from this area.
|
8. | Move the cursor over to the beginning of the wrinkled area.
|
9. | Click
and hold the mouse button, and then begin painting carefully over the
area. Continue painting until the large wrinkles are gone. Some
variation in tone is fine; you want the retouching to look as realistic
as possible. If necessary, release the mouse button and repeat the
process to get farther to the right or lower down in the wrinkles.
Because the Rubber Stamp tool duplicates the exact pixels, the texture
and tone of the leather remain visible.

Tip
If you notice that the area you
are cloning seems much too light or dark, stop stamping, press Ctrl+Z
(Windows) or Command+Z (Mac) to undo the painting, and resample
(Alt-click on Windows or Option-click on Mac) from a more suitable area.
|
Retouching on a separate bitmap object
Cloning as we’ve described is a
permanent (destructive) process; you are literally replacing pixels in
one area with pixels from another. If you save and close the file, those
changes become a part of the image.
Many professionals prefer to do
this type of retouching on a separate layer. In this way, they avoid
the potential for permanently ruining (or even just changing) an
original image. Fireworks lets you do this kind of work in an empty
bitmap object, even in the same layer as the original artwork.
Look at the actor’s face.
He’s got a couple of creases on his forehead, which make him look a
little older and more tired than perhaps he really is. You are going to retouch
those wrinkles as a separate object, first creating the necessary empty
bitmap object. This way, you can show or hide the wrinkles, depending
on your plans for the image.
An empty bitmap object is an
area containing no pixel data. It gives you the opportunity to add new
pixel information as a separate, unique object. Once you create this
object, you must add pixel data to it in your next step, or the object
will be removed from the Layers panel. You might use this object if you
are planning to use the Brush or Pencil tools to add colored bitmap
lines. In this case, we’ll be using it as a place to hold retouching
data. The beauty of this technique is that your original image is not
altered in any way.
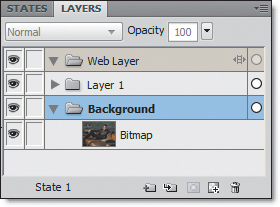
1. | Open
the Layers panel, and, if necessary, resize the panel so you can see
all the elements. You should see the Web Layer, Layer 1, and Background
layers. When you open a single image such as this one, Fireworks places
the photo as an object on the Background layer, and also creates an
empty layer called Layer 1.

|
2. | Select the photo in the Layers panel.
|
3. | Double-click the name Bitmap under the Background layer, and type photo to rename it.
Tip
Naming layers and objects helps you identify them as you work. Although not necessary, it’s a good practice to follow.
|
4. | Click the New Bitmap Image icon (
 ). A transparent (empty) Bitmap object will appear above the photo object.
|
Instant face-lift
Next, you will use the Rubber Stamp tool and the new bitmap object to take years off the actor’s face.
1. | Select the Zoom tool, and draw a selection around the actor’s face.
|
2. | Switch to the Rubber Stamp tool.
|
3. | In the Properties panel, set Size to 5, and leave Edge set to 100% for a nice subtle blend.
|
4. | Select both the Source Aligned and Use Entire Document options.
When Use Entire Document is selected,
Fireworks samples from all visible pixels on any layer or object in the
design. When the option isn’t selected, Fireworks samples only from the
current object, which, as a new bitmap, has no actual pixels...yet.
|
5. | Move the cursor above the top wrinkle at the left.
|
6. | Hold down Alt (Windows) or Option (Mac) and click once to sample the skin tone above the wrinkle.
|
7. | Move the cursor straight down until it is directly over the first wrinkle.
|
8. | Hold down the mouse button, and begin painting carefully toward the right, following the entire wrinkle.
|
9. | When you are happy with the result, repeat steps 5–8 to remove the second wrinkle.
|
10. | Turn
off the retouching (Bitmap) layer by clicking the eye icon beside the
layer name. The wrinkles return. Turn the layer back on, and the
wrinkles vanish.
|
You might also notice a blue
rectangle appear on the canvas, surrounding the retouching work. This is
how Fireworks indicates a selected object.
Rubber-stamping can take a
bit of practice, which is another reason to perform the retouching on a
separate object. If your results aren’t as good as you would like, you
can just delete the bitmap object by selecting it and then dragging it
to the Layers panel trash can icon.
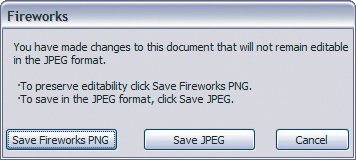
One other item of note:
because you are adding additional objects to a photo, you will most
likely want to save this file as a Fireworks PNG file in order to
maintain the objects and their editability. In fact, if you press Ctrl+S
(Windows) or Command+S (Mac) at this time, Fireworks displays a dialog
box explaining the choices you have and the repercussions of each.

Because the roots of
Fireworks lie in the vector world—much like Adobe Illustrator—each layer
can contain multiple objects. This concept may seem a little
disconcerting if your experience is primarily with Photoshop, which is a
layer-oriented application, but in fact, this object-oriented
approach gives you much more control and flexibility over your designs.
You can also create sublayers within a layer, which emulate the
layer-groups workflow of Photoshop.