2. The Eyes Have It
Eyes offer excellent opportunities for creative treatment, as shown in Figure 5.
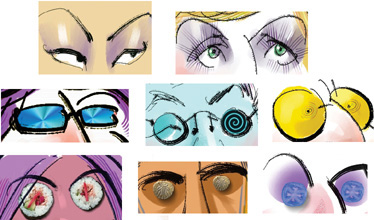
The two samples at the top of Figure 5
were painted with no special effects, if you don’t count the
Scratchboard Rake eyelashes. The middle row shows some of the fun that
can be had with eyeglasses. If there are no leaks, the Paint Bucket can
be used for gradient fills, and it’s not necessary to give both lenses
the same treatment. The big yellow lenses on the right also have
Scratchboard Rake strokes around a “beady” eye to suggest a wild or
confused expression.
In the bottom row, you’ll recognize the sushi
eyes from an Image Hose nozzle. The sand dollars and tomato slices were
made in a very different way with a Painter feature I haven’t mentioned
until now. Open the Image Portfolio from the Window menu. Like the
Selection Portfolio we used in Lesson 6, it is a library of items that
can be dragged onto the canvas, but these items are images that create
their own layers. The default collection is shown in Figure 6.
You can easily make a new item for the Image Portfolio by dragging any
selection from your canvas over to it, where you’ll be prompted to give
the new image a name. As usual for all Library collections, the Mover
utility in the popup menu lets you create new libraries and swap items
between them. Use the Open Library command to load the custom Portfolio
Rhoda Favorites from the Palettes and Libs folder for the next project.
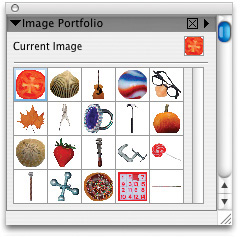
Figure 7
shows a photo of Nick, a good-looking young fellow even without the
spike under his lower lip, and the first stage of my caricature. You can imitate my style if you wish or (even
better) use your own approach. But I invite you to practice using some
of the Image Portfolio items as you work.

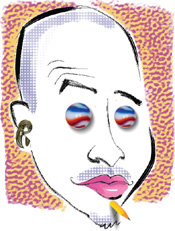
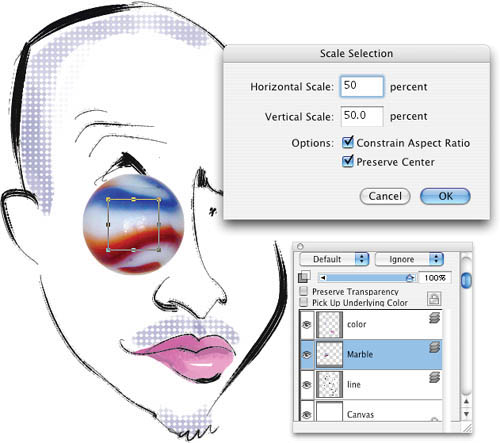
By the time we get to Figure 8,
I’ve added pink lips and bluish five o’clock shadow on the color layer.
A marble has been dragged into place from the Image Portfolio,
automatically creating its own layer. Now you can see why I include the
Scale command on my custom palette. It saves time navigating through
Effects > Orientation > Scale. This command allows you to type in
the size percentage you want or drag a corner of the bounding box so you
can (um) eyeball the amount of change.
You can use Create Drop Shadow to enhance the 3D
look of the marble. The Layers Palette has created a group for Marble
and Shadow, so the shadow occupies its own layer and can be manipulated
independently. This feature (which is not available in Photoshop!) will
come in handy very soon. For the second eye, all I have to do is switch
to the Layer Adjuster tool (same as Photoshop’s Move tool), hold down
the Option/Alt key, and drag a copy of the Marble and Shadow group to
its new location. A size reduction (85%) creates a forced perspective,
moving the second eye back in space.
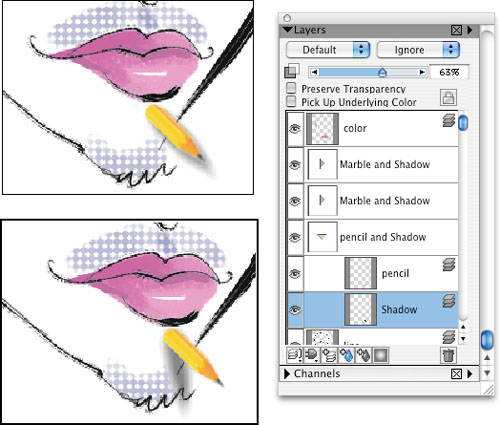
The Pencil in the custom Image Portfolio is an
excellent shape for adding that lip spike, and it’s especially
appropriate because Nick is an artist. Use the Scale command to reduce
its size to about 25% and change the angle of the Pencil with Effects
> Orientation > Rotate. Now create a drop shadow. The top left
section of Figure 9
has the Pencil in position, with just a little erasing done at the
blunt end to simulate insertion (yechh!) into the flesh. The Layers
Palette at this stage has the Pencil and Shadow group opened, with
Shadow selected. Now you’ll see how useful it is to have the shadow on
its own layer. Use the Rotate command to change the drop shadow into a
cast shadow for a much more convincing effect, also shown in the figure.
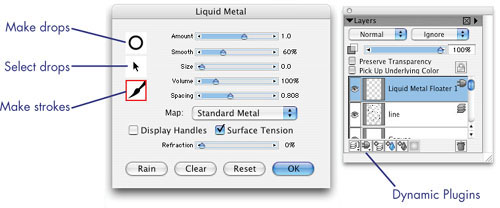
3. Plug In That Earring
The
only thing missing now is Nick’s earring. By now it shouldn’t surprise
you that Painter has a feature for creating realistic metallic
brushstrokes, and here’s the perfect opportunity to use it. We’ll
explore another unique set of special effects, the Dynamic Plugins. They
reside in the Layers Palette and have an electric plug icon. Choose
Liquid Metal from the Dynamic Plugins popup list (glance at some of the
other choices for future reference). Figure 10
shows the Liquid Metal dialog box (which must remain open while you are
creating Liquid Metal effects) and the new layer to accommodate those
strokes. Practice making some strokes with the Brush icon selected, and
switch to the circle icon to make metallic droplets. Notice the tendency
for droplets to attract each other and run together! The Undo command
won’t work here, so if you want to remove a stroke or a droplet, use the
arrow icon to select it and then hit the Delete/Backspace key. Strokes
are actually made up of a sequence of droplets. You can see them
individually by enabling Display Handles. Even after you click OK, a
Plugin layer remains dynamic; that is, you can access the original
controls by simply double-clicking the item in the Layers Palette. You
can use Convert to Default Layer if you need to apply other brushes and
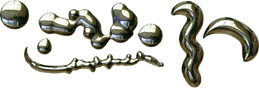
effects. Figure 11 shows some test strokes and droplets.
The finished caricature in Figure 12
took longer than five minutes, I admit. That background was done with a
Pastel variant and a texture not included on my custom palette, Square
Hard Pastel with Pebble Board paper. How did I get the two-tone effect?
Good question. I chose a dark pink sampled from the lips to roughly fill
the area around the head, then I used the Invert Paper command in the
Paper Palette popup menu. (Invert in this case means the light and dark areas are swapped). Yellow sampled from the pencil is the color used on the second pass.