IT tutorials
 
Graphics
 

Corel Draw 10 : Working with Symbols - Adding symbols to a document, Creating your own symbols

6/25/2013 8:34:43 PM
- Free product key for windows 10
- Free Product Key for Microsoft office 365
- Malwarebytes Premium 3.7.1 Serial Keys (LifeTime) 2019

In CorelDraw, you can add symbols to your documents from fonts such as Wingdings and Zapf Dingbats. And you can take any graphic that you've created and save it in a symbol collection for later reuse.

1. Adding symbols to a document

There are two ways that a symbol character—or any other text character, such as a number or foreign language character—can be added to a document: embedded within artistic or paragraph text or placed as a separate object. Within text, symbols can be colored and formatted with the same commands used for normal text characters. When placed as objects, symbols can be resized, extruded, and manipulated like any other object.

To add symbols to a document:
1.
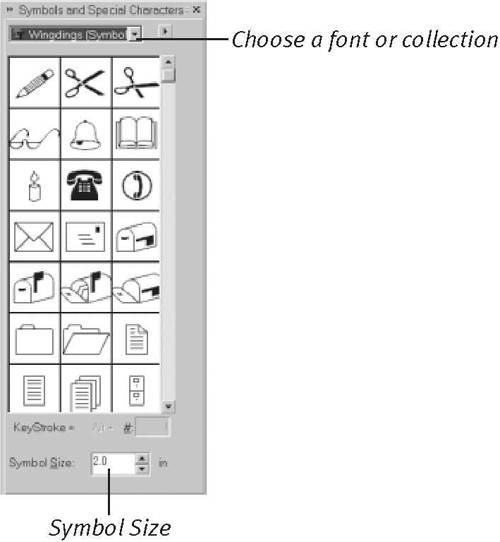
Choose Tools > Symbols and Special Characters, choose Window > Dockers > Symbols and Special Characters, or press .

The Symbols and Special Characters docker opens (Figure 1).

Figure 1. You select fonts, symbol collections, and specific symbols in this docker.


2.
Select a font or symbol collection from the drop-down list.

3.
Scroll down until you find the symbol you want.

4.
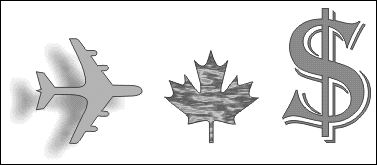
To add a symbol to your document as a separate graphic object, click the symbol and drag it onto the document (Figure 2).

Figure 2. When placed as objects, you can embellish symbols by adding a drop shadow, a texture, or color, for example.


or


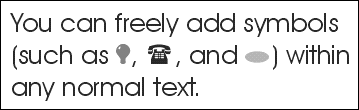
To add a symbol as text to an existing text string, position the insertion marker within the text string and double-click the symbol in the docker window (Figure 3).

Figure 3. You can embed symbols within artistic or paragraph text.


Tips

  • You can set the size of a symbol using the Symbol Size text box.
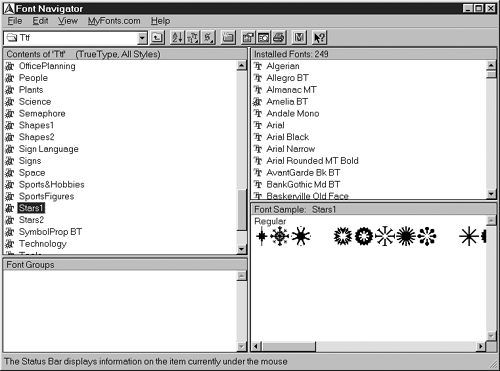
  • Very few symbol fonts are installed when you set up CorelDraw. To examine or install these fonts, use the Bitstream Font Navigator program (Figure 4) that can be found in the Productivity Tools folder on your hard disk.

    Figure 4. You can preview and install additional fonts using the included Bitstream Font Navigator.


2. Creating your own symbols

You can also create custom symbols and add them to any existing symbol collection or start a new collection of your own.

To create a custom symbol:
1.
Use the Pick Tool to select the object that you want to turn into a symbol.

2.
Choose Tools > Create > Symbol.

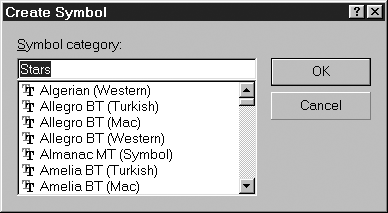
The Create Symbol dialog box appears (Figure 5).

Figure 5. Select an existing font or symbol category, or create a new one.


3.
Select the symbol category in which you want to place the new symbol or type a new category name in the text box.

4.
Click OK.

The new symbol and/or category is now available from within the Symbols and Special Characters docker.

Tips

  • Any graphic you elect to make into a symbol must be composed of only one object (see the Help file for eligible shapes). To make a multi-object graphic into a single object, ungroup it (if it is grouped), and choose Arrange > Combine.

  • If you attempt to add your symbol to an existing font, CorelDraw will create a variation of the font with the word “(Symbol)” appended to it.

 
Others
 
- Adobe Dreamweaver CS5 : Working with Web Page Tables - Creating a Nested Table
- Adobe Dreamweaver CS5 : Working with Web Page Tables - Using a Tracing Image
- Adobe Dreamweaver CS5 : Working with Web Page Tables - Changing Cell, Row, or Column Properties
- Adobe Photoshop CS5 : Intermediate Selection Techniques (part 4) - Refine Edge Command
- Adobe Photoshop CS5 : Intermediate Selection Techniques (part 3) - Creating a Path with the Pen Tool
- Adobe Photoshop CS5 : Intermediate Selection Techniques (part 2) - Quick Mask Mode
- Adobe Photoshop CS5 : Intermediate Selection Techniques (part 1) - Color Range Command
- Adobe Flash Catalyst CS5 : Managing the Library - Viewing the Library panel (part 2) - Preview files in the Library panel
- Adobe Flash Catalyst CS5 : Managing the Library - Viewing the Library panel (part 1) - Add assets to the Library panel
- Adobe After Effects CS5 : Expressions - Time Remapping Expressions
 
 
Top 10
 
- Microsoft Visio 2013 : Adding Structure to Your Diagrams - Finding containers and lists in Visio (part 2) - Wireframes,Legends
- Microsoft Visio 2013 : Adding Structure to Your Diagrams - Finding containers and lists in Visio (part 1) - Swimlanes
- Microsoft Visio 2013 : Adding Structure to Your Diagrams - Formatting and sizing lists
- Microsoft Visio 2013 : Adding Structure to Your Diagrams - Adding shapes to lists
- Microsoft Visio 2013 : Adding Structure to Your Diagrams - Sizing containers
- Microsoft Access 2010 : Control Properties and Why to Use Them (part 3) - The Other Properties of a Control
- Microsoft Access 2010 : Control Properties and Why to Use Them (part 2) - The Data Properties of a Control
- Microsoft Access 2010 : Control Properties and Why to Use Them (part 1) - The Format Properties of a Control
- Microsoft Access 2010 : Form Properties and Why Should You Use Them - Working with the Properties Window
- Microsoft Visio 2013 : Using the Organization Chart Wizard with new data
Technology FAQ
- Is possible to just to use a wireless router to extend wireless access to wireless access points?
- Ruby - Insert Struct to MySql
- how to find my Symantec pcAnywhere serial number
- About direct X / Open GL issue
- How to determine eclipse version?
- What SAN cert Exchange 2010 for UM, OA?
- How do I populate a SQL Express table from Excel file?
- code for express check out with Paypal.
- Problem with Templated User Control
- ShellExecute SW_HIDE
programming4us programming4us