1. Welding an Edge to a Typed Character
CorelDRAW has a number of operations you can access
from the property bar (and from the Shaping docker) when more than one
object is selected; you’ll achieve more dramatic objects that are the
result of overlapping objects. These operations can weld two shapes into
a single one and can trim the bottom object using the top object. These
two operations—Weld and Trim—are used in the following sections to add
only part of the gear you created to the rounded side of a capital “D.”
Shaping the PolygonYou
can substitute any available font you like in the following steps, but
if you own Futura XBlk BT—the filename is tt0148m_.ttf and it’s in the
Fonts folder on the CorelDRAW installation DVD—install it if you haven’t
done so already. It’s a very good workaday typeface with scores of
design uses, because it’s very plain and extremely bold, ideal for
adding a few gear notches without ruining its legibility. Drag
and drop a copy of the gear for future use; with the Pick tool, drag
the gear off the page, but before releasing the mouse button, tap the
right button to leave a duplicate of the gear. Zoom into the original gear shape, choose the Text tool, and then click an insertion point directly over the gear, hold SHIFT, and type D. Choose
the Pick tool, and then with the character still selected, choose
Futura XBlk BT from the Font list drop-down on the property bar. You can
also highlight “24 pt” to the right of the font name and then type 300
in the Font size box. There are approximately 72 points to an inch in
typesetting, so a ballpark estimate of the character’s size makes it
approximately the size of the gear. Click over the No Fill color well on
the Color Palette to remove the fill of the character, and then
right-click over the black color well to give the character a black
outline. Now you can see both objects to reposition the “D”.

With the Pick tool, move the “D” so that its right side aligns to the gear. If necessary, hold SHIFT
and then drag a selection handle away from or toward the center of the
“D” to proportionately enlarge or shrink the “D” so that its right curve
lies just a fraction outside of the gear. Choose
the Pen tool from the pen group on the toolbox; drag on the icon of the
current tool to access any other tool in the nested group. Click points
around the left side of the gear to make an object, shown next, that
surrounds the left side of the gear, encompassing the hole in the
character “D”. You’re going to remove these areas using this object and
the Trim operation.
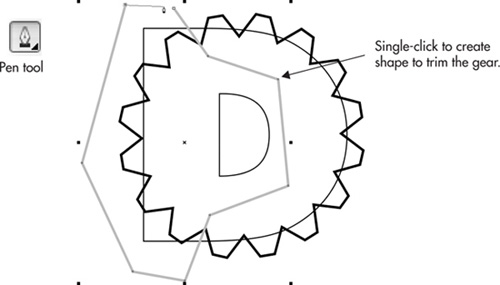
With the Pick tool, select the shape first, and then select the gear, holding SHIFT and clicking one object at a time. On the property bar, click the Trim icon. By default, the shape that trims the bottom shape remains in the document, but it’s now unnecessary. Select it and then press CTRL+X to delete it. Select both objects by marquee-dragging with the Pick tool, and then click the Weld icon on the property bar.

2. A Brief Excursion into Gradient Fills
A linear gradient fill for the characters might make
them look a little more metallic and will add to the complexity of the
logo with a minimum of effort. For this example, let’s do a little
hands-on with the Interactive Fill tool and use the default Linear
fountain fill style.
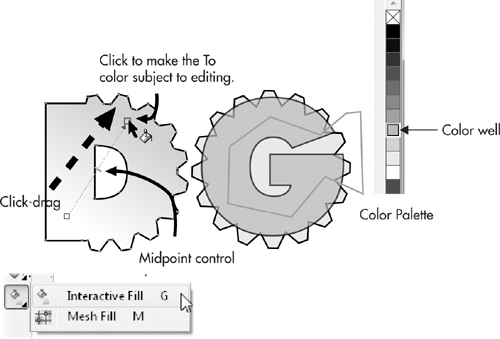
Adding Visual Complexity Using Fountain FillsChoose the Interactive Fill tool from the toolbox. Click
the “D” gear shape to select it, and then click-drag up and to the
right (drag toward about 2 o’clock on the gear shape) and release the
mouse button. By default, the “To” color of the Linear fountain fill is
the place where you released the mouse. You work “From” your click-drag
start point “To” your destination within the object. Let’s
say you’re not thrilled with the From and To colors in the fountain
fill. To change a color, while the Interactive Fill tool is still
selected and you can still see the control handles for the fill above
the gear drawing, click the tiny From color marker—it’s marked with the
color you chose in the previous tutorial. Now the color is highlighted
and available for editing. Click a light gray color well on the Color
Palette. Then click the To color marker and click a medium to dark gray
color well on the Color Palette. Tip
If you’re careful, you can
drag a color well color and drop it on the selected From and To color
markers above the object to recolor them.
Now
let’s say that the color transition between From and To in the fountain
fill isn’t dramatic enough, but you do like the two colors. Adjust the
midpoint of the fill by dragging on the midpoint control, shown in Figure 1. You drag it toward the From color marker to emphasize the To color in the fill, and vice versa.
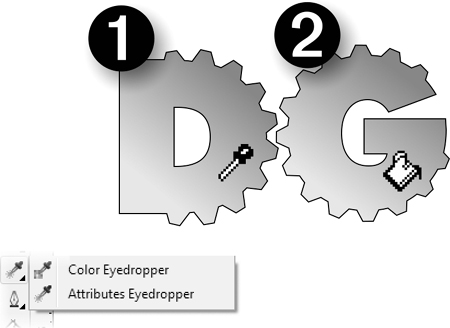
To quickly add the same sort of
fill to the “G” gear, choose the Attributes Eyedropper tool from the
toolbox. Click over the D gear to sample its properties, and then click
over the G gear to apply the sampled properties, as shown
next—occasionally, you luck out in Life, and some things are simple...
Press CTRL+S to save your work up to
this point. In fact, just make it a practice to save your work every 10
minutes or so; it’s only two keystrokes.
Tip
With the exception of the
Text tool, pressing the SPACEBAR toggles your current tool to the Pick
tool; a second press of the SPACEBAR toggles you back to the last tool
you were using.
|