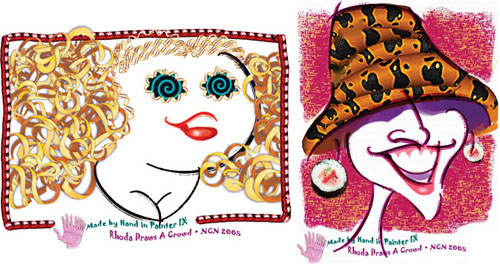
Is there a practical use for painting with patterns, gradients, and pieces of food? Figure 1
should help answer that question. These are caricatures I created live
with Painter IX at the 2005 convention of NCN (National Caricaturists
Network). Celestia’s big masses of curly blonde hair were quickly
scribbled in with the linguini pattern (sorry, that’s Double Helix). I
used Double Helix again to make eye “sockets,” which were then filled
with a gradient. Karena wore a faux animal skin hat, so I painted
several strokes of the Boa pattern to simulate it. And yes, each earring
was done with a tap of the Sushi nozzle loaded in the Image Hose. So
for someone doing business as Rhoda Draws A Crowd and creating live
digital caricature entertainment at events, it’s very practical.
Even if you have no intention of becoming a
professional caricature artist, you’ll get better acquainted with
Painter and develop critical observation skills by exploring this art
form. Figure 2
has recent samples of my five-minute caricatures. There you’ll find more examples, some as layered RIFF files, some
with photos of the victims (sorry, I meant subjects)
for comparison. Practice making caricatures with faces in the People
> Heads folder. Most of these folks are already funny looking, so
you’ll have a leg up (or should I say “a nose up”).

1. Exaggerate and Simplify
A
successful caricature expresses the essence of a person’s face. Find at
least one feature that is distinctive and “push” it. If the nose is
long, make it longer. If the chin is weak, reduce it further. If the
eyes are close together, move them in even tighter. Organization of the
features in relation to each other is important, too. As with most other
art projects, simplification is advised—leave out unnecessary details.
My digital caricature style has evolved over
several years. After experimenting with many of Painter’s flamboyant
brushes and effects, I have simplified my technique. (The need to
produce a finished drawing every five minutes, as entertainment for
large groups, is a powerful motivation to simplify!) I prepare a
template with two layers, and I begin by laying down the basic line
elements with Dry Ink, that wonderful edgy variant from the Calligraphy
category that you’ve been using for your warm-up exercises. (If you
haven’t, it’s not too late to start.) The second layer is for color,
using Gel or Multiply mode for transparency. Dry Ink also works for
splashing in the hair color or a facial tone quickly. Shading or
additional color (rosy cheeks, eye shadow, and so on) is done with a
Chunky Oil Pastel and a Blender variant. I chose Basic Paper for a
smooth texture and Small Dots for beard stubble. Streaks in hair and
glamorous eyelashes are created with a customized Scratchboard Rake.
|
The Scratchboard Rake, a variant in the Pens
category, makes several parallel strokes. I added Color Variability
using 10% variation for each setting: Hue, Saturation, and Value. There
is a controls section for Rake variants, where you can change other
behaviors. I saved my customized Scratchboard Rake as a new variant with
the Save Variant command in the Brush Selector Bar popup menu.
|
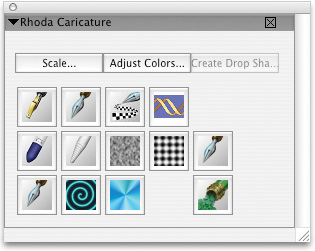
It’s called Rhoda
Caricature and is shown in Figure 3.
I don’t use all the tools and commands on every drawing, but most
situations are covered. Notice the inclusion of specific papers,
gradients, and my favorite pattern. Three of the brush variants are from
the Pens group, so they have identical icons, but I know which is which
by their positions in the palette. Recall that items can be rearranged
with the Shift key engaged. Commands are added to a custom palette with
the Add Command option in the Custom Palette menu.
Look at Figure 1
again, and pay special attention to the woman with dreadlocks. Save
time and amaze your friends when you use Pens > Barbed Wire 7 to make
this type of hairdo in a few seconds. Let’s examine this variant along
with its cousin, Nervous Pen. Make a few test strokes and scribbles with
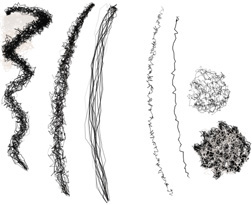
each of them. Figure 4
shows three Barbed Wire 7 strokes on the left followed by two Nervous
Pen strokes. The upper circular scribble was made with the Nervous Pen.
The lower scribble was done with Barbed Wire in black and Nervous Pen
strokes added using white.
Barbed Wire appears to be a bundle of Nervous
Pen strokes. The number of strands in these variants is determined with
the Feature slider, available in the Property Bar. A higher Feature
value results in fewer strands. The tangled, jangled quality of these
brushes is a function of Jitter, which you saw earlier in this lesson.
This time you won’t see the Jitter control in the Property Bar, but you
will find it in the Random section of the Brush Controls palette.
Did
your strokes have some variation in complexity or “tangledness”? The
amount of Jitter responds to the speed of your stroke, with slower
strokes producing dense tangles, while faster strokes stretch and smooth
out the tangles. Are you guessing that the Expression variable for
Jitter is Velocity? Then you’ll be as surprised as I was when I saw None
in the Expression field. Caffeine would have made more sense than that,
but it’s not an option.