1. Adding a Photo to Contacts
From the New Contact screen we've been working in, just touch the Add Photo button next to the First Last tab.
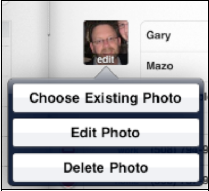
If you are changing a photo, when you are in "edit contact" mode, you'll see edit at the bottom of the existing photo.
After you touch the add photo
button, you'll see that you can choose an existing photo. If there's a
photo already in place, you can edit or delete it as well.
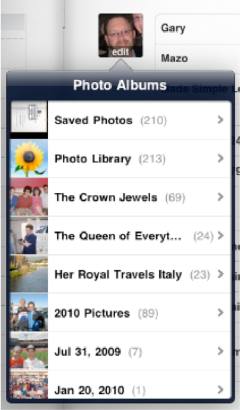
To choose an existing photo, select the Photo Album
where the picture is located and touch the corresponding tab. When you
see the picture you want to use, just touch it.
You'll notice that the top and bottom of the photo
become grayed out and that you can manipulate the picture by moving it,
pinching to zoom in or out, and then arranging it in the picture window.
Once the picture is sitting where you want it, just touch the Use button in the upper right corner and that picture will be set for the contact.

|
If you just moved into a new
neighborhood, it can be quite daunting to remember everyone's name. A
good practice to follow is to add the word "neighbor" into the Company
name field for every neighbor you meet. Then, to instantly call up all
your neighbors, simply type the letters "neigh" to find everyone you've
met! |
2. Searching Your Contacts
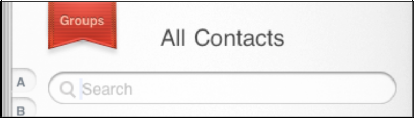
Let's say you need to find a specific phone number or e-mail address. Just touch your Contacts icon as we did above and you'll see a search box at the top of your All Contacts list, as in Figure 1.
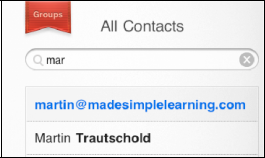
Enter the first few letters of any of these three searchable fields:
First Name
Last Name
Company Name
The iPad begins to filter immediately and displays only those contacts that match the letters typed.
|
To further narrow the search, hit the space key and type a few more letters.
|
|
When you see the correct name, just touch it and that individual's contact information will appear.
2.1. Quickly Jump to a Letter by Tapping and Sliding on the Alphabet
If you hold your finger on the alphabet on the left edge of the screen and drag it up or down, you can jump to that letter.
2.2. Search by Flicking
If you don't want to manually input letters, you can
just move your finger and flick from the bottom up and you'll see your
Contacts move quickly on the screen. Just continue to flick or scroll
until you see the name you want. Tap the name and the contact
information will appear.
2.3. Search Using Groups
If you have your contacts sorted by groups on your PC
or Mac and you sync your iPad with the computer, those groups will be
synced to your iPad. Just touch the Groups tab at the top left of the All Contacts window and select which group you'd like to search within.
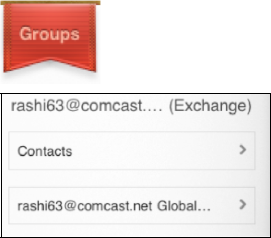
This example shows two groups—one is from a Microsoft
Exchange account (i.e., a company e-mail account), and one from regular
contacts.
If you have an Exchange ActiveSync account and your
company has enabled it, your Exchange Global Address List shows up here,
under Groups, as well. You can search to find anyone in your company
there.
NOTE
You can't create groups on the iPad, they must be created on your computer and synced to your iPad.