7. Saving and Distributing a Custom Console
If you plan to distribute a console, it is recommended that you
save the console in user mode. To change a console’s mode, choose
Options on the File menu. By default, new consoles are saved in
author mode, which enables adding and removing snap-ins,
viewing all portions of the console tree, and saving customizations.
User mode, by contrast, restricts the functionality of the console so
that it cannot be changed. Three types of user modes are described in
Table 1. User Mode – Full Access is
commonly selected for a console provided to skilled administrators
with diverse job tasks requiring broad use of the console snap-ins.
User Mode – Limited Access (multiple window and single window) is a
locked-down mode and is, therefore, selected for a console provided to
administrators with a more narrow set of job tasks.
Table 1. MMC Console Modes
| MODE | USE WHEN |
|---|
| Author | You want to continue customizing the
console. |
| User Mode – Full Access | You want users of the console to be able to
navigate between and use all snap-ins. Users cannot add or
remove snap-ins or change the properties of snap-ins or the
console. |
| User Mode – Limited Access, multiple
window | You want users to navigate to and use only the
snap-ins that you have made visible in the console tree, and
you want to preconfigure multiple windows that focus on
specific snap-ins. Users cannot open new
windows. |
| User Mode – Limited Access, single
window | You want users to navigate to and use only the
snap-ins that you have made visible in the console tree within
a single window. |
After a console is no longer saved in author mode, you—the
original author—can make changes to the console by right-clicking the
saved console and clicking Author.
Consoles are saved with the .msc file extension. The default
location to which consoles are saved is the Administrative Tools folder, but not the folder in
Control Panel. Rather, they are saved in the Start menu folder of your
user profile:
%userprofile%\AppData\Roaming\Microsoft\Windows\StartMenu.
This location is problematic, because it is secured with
permissions so that only your user account has access to the console.
The best practice is to log on to your computer with an account that
is not privileged and then run administrative tools, such as your
custom console with alternate credentials that have
sufficient privileges to perform administrative tasks. Because two
accounts will be involved, saving the console to the Start menu
subfolder of one account’s user profile means additional navigation,
at a minimum, and access-denied errors in a worst-case
scenario.
Save your consoles to a location that can be accessed by both
your user and your administrative credentials. It is recommended that
you save consoles to a shared folder on the network so that you can
access your tools when you are logged on to other computers.
Optionally, the folder can be made accessible by other administrators
to create a centralized store of customized consoles. You can also
save consoles to a portable device such as a USB drive, or you can
even send a console as an email attachment.
It is important to remember that consoles are basically a set of
instructions that are interpreted by Mmc.exe—instructions that specify which snap-ins to add
and which computers to manage with those snap-ins. Consoles do not
contain the snap-ins themselves. Therefore, a console will not
function properly if the snap-ins it contains have not been installed;
be sure you have installed appropriate snap-ins from the RSAT on
systems on which you will use the console.
7.1. Practice Creating and Managing a Custom MMC
7.1.1. Practice Creating and Managing a Custom MMC
In this practice, you create a custom MMC. You add, remove,
and reorder snap-ins, and then prepare the console for
distribution to other administrators.
EXERCISE 1 Create a Custom
MMC
In this exercise, you create a custom MMC with the Active
Directory Users And Computers, Active Directory Schema, and
Computer Management snap-ins. These tools are useful for
administering Active Directory and domain controllers.
Log on to SERVER01 as Administrator.
Click the Start button and, in the Start Search box,
type mmc.exe and press
Enter.
An empty MMC appears. By default, the new console window
is not maximized within the MMC. Maximize it to take advantage
of the application’s full size.
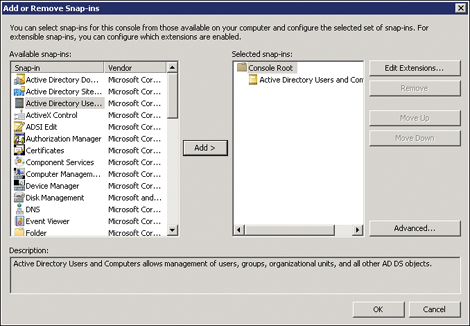
On the File menu, click Add/Remove Snap-in.
The Add Or Remove Snap-ins dialog box, shown in Figure 3,
appears.
If you do not see the snap-ins listed that you want, be
sure you’ve installed the RSAT.
In the Add Or Remove Snap-ins dialog box, select Active
Directory Users And Computers from the Available Snap-ins
list.
Click Add to add the snap-in to the Selected Snap-ins
list.
Notice that the Active Directory Schema snap-in is not
available to add. The Active Directory Schema snap-in is
installed with the Active Directory Domain Services role with
the RSAT, but it is not registered, so it does not
appear.
Click OK to close the Add Or Remove Snap-ins dialog
box.
Click the Start button. In the Start Search box, type
cmd.exe.
Open Command Prompt using the Run As Administrator
option, and then type regsvr32.exe
schmmgmt.dll.
This command registers the dynamic link library (DLL) for the Active
Directory Schema snap-in. This is necessary to do one time on
a system before you can add the snap-in to a console.
A prompt appears that indicates successful registration.
Click OK.
Return to your custom MMC and repeat steps 2–6 to add the
Active Directory Schema snap-in.
On the File menu, click Add/Remove Snap-in.
In the Add Or Remove Snap-ins dialog box, select
Computer Management from the Available Snap-ins list.
Click Add to add the snap-in to the Selected Snap-ins
list.
When a snap-in supports remote administration, you are
prompted to select the computer you wish to manage, as shown
in Figure 4.
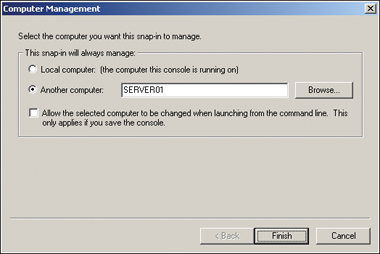
To manage the computer on which the console is
running, select Local Computer. This does not refer solely
to the computer on which you are creating the console. If you launch the
console from another computer, the console will manage
that computer.
To specify a single computer that the snap-in should
manage, select Another Computer. Then enter the computer’s
name or click Browse to select the computer.
Click Another Computer and type SERVER01 as the computer name.
Click OK to close the Add Or Remove Snap-ins dialog
box.
On the File menu, click Save. Save the console to your
desktop with the name MyConsole.msc.
EXERCISE 2 Add a Snap-in to an
MMC
In this exercise, you add Event Viewer to the console you
created in Exercise 1. Event Viewer is useful for monitoring
activity on domain controllers.
Open MyConsole.msc.
If you did not save the console to your desktop in
Exercise 1, and instead saved the console to the default
location, you will find it in the Start\All
Programs\Administrative Tools folder.
On the File menu, click Add/Remove Snap-in.
In the Add Or Remove Snap-ins dialog box, select Event
Viewer from the Available Snap-ins list.
Click Add to add the snap-in to the Selected Snap-ins
list.
You are prompted to select a computer to manage.
Click Another Computer and type SERVER01 as the computer name.
Click OK to close the Add Or Remove Snap-ins dialog
box.
Save and close the console.
EXERCISE 3 Manage the Snap-ins of an
MMC
In this exercise, you change the order of snap-ins and
delete a snap-in. You also learn about extension snap-ins.
On the File menu, click Add/Remove Snap-in.
In the list of Selected snap-ins, select Event
Viewer.
Select Active Directory Schema.
In the list of Selected snap-ins, select Computer
Management.
Click Edit Extensions.
Extensions are snap-ins that exist within another
snap-in to provide additional functionality. The Computer
Management snap-in has many familiar snap-ins as extensions,
each of which you can enable or disable.
Click Enable Only Selected Extensions.
Deselect Event Viewer. You have already added Event
Viewer as a stand-alone snap-in for the console.
Click OK to close the Extensions For Computer Management
dialog box.
Click OK to close the Add Or Remove Snap-in dialog
box.
Save and close the console.
EXERCISE 4 Prepare a Console for
Distribution to Users
In this exercise, you save your console in user mode so that
users cannot add, remove, or modify snap-ins. Keep in mind that
MMC users are typically administrators
themselves.
On the File menu, click Options.
In the Console Mode drop-down list, select User Mode –
Full Access.
Save and close the console.
Open the console by double-clicking it.
Click the File menu. Note that there is no Add/Remove
Snap-in command.
Right-click the console and click Author.
Click the File menu. In author mode, the Add/Remove
Snap-in command appears.