| Solution: | Click the Upload Form Template link under the InfoPath Form Services section. |
Forms that have code-behind or that require full
trust cannot be published directly to SharePoint. These forms must be
published to a network location and then uploaded to InfoPath Form
Services.
To upload a form to InfoPath Form Services, follow these steps:
1. | Launch Central Administration
|
2. | Click General Application Settings.
|
3. | Click
the Upload Form Template link under the InfoPath Form Services section.
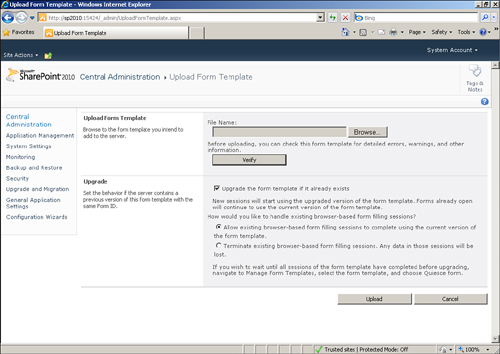
The Upload Form Template page appears, as shown in Figure 1.

|
4. | Click the Browse button to locate the form.
|
5. | Optionally, click Verify to verify the form can be uploaded without any conflicts or errors.
|
6. | Leave
the Upgrade selection checked to upgrade any existing forms. If you
uncheck this option, the new form will replace any existing form.
|
7. | Leave
the Allow Existing Sessions to Complete option selected so that users
are not interrupted. Otherwise, select the Terminate option to
essentially end all current user sessions.
|
Tip
Terminating existing sessions is harsh in a
production environment and might cause user frustration. It is always
good practice to allow existing sessions to complete. An alternative
option is to quiesce the form first, which allows all sessions to end
but doesn’t allow any new sessions to initiate.
What Happens When a Form Is Uploaded?
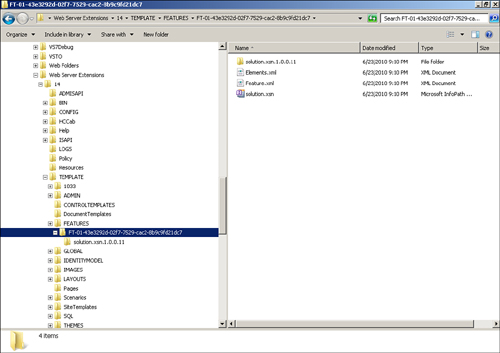
When a form is uploaded, it generates a feature for
your SharePoint farm. The feature files are generated in the SharePoint
14 hive under TEMPLATESFEATURES, as shown in Figure 2. The feature folder is prefixed with FT for form-template.

The feature is deployed globally to your site
collections and can be activated just like any other feature. The form
feature appears in the Site Collection Features list, as shown in Figure 3.