Before installing the first
Exchange Server 2010 server into an existing Exchange Server 2003
environment, a number of prerequisites have to be met:
All domains in the existing Active Directory forest containing Exchange Recipients have to be running in native mode.
The Active Directory forest has to be running on a Windows Server 2003 forest functionality level.
Each site in Active Directory should have at least one Domain Controller, and the Global Catalog server needs to be on a Windows Server 2003 SP2 level.
Although not required, it is recommended to have 64-bit type Domain
Controllers and Global Catalog Servers for best performance.
The Schema Master of the Active Directory needs to be a Windows Server 2003 SP2 or Windows Server 2008 server. This can be either a 64-bit or an 32-bit server.
All Exchange 2003 servers must have Service Pack 2 installed.
In addition to that, the server where Exchange Server will be installed also needs to meet the following prerequisites:
The server needs to be a 64-bit computer.
Windows Server 2008 SP2 or Windows Server 2008 R2 64-bit needs to be installed.
Internet Information Server needs to be installed.
Windows Remote Management (WinRM) 2.0 needs to be installed.
PowerShell 2.0 needs to be installed.
.NET Framework 3.5 SP1 needs to be installed.
Depending on the version
of Windows 2008 you're using (i.e. Service Pack 2 or R2), a number of
hotfixes will also need to be installed. I would strongly recommend that
you bring your server up to date with the latest hotfixes from
Microsoft Update, preferably before you perform this installation.
To make the process of
installing prerequisites as painless as possible, the Exchange Server
product group has created a series of XML files that can be used to
automatically install Internet Information Server on your computer,
together with the other prerequisites for Exchange Server 2010. These
files are located on your installation media in the "scripts" directory.
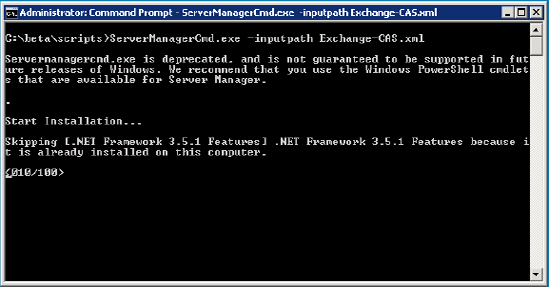
To install the
Internet Information Server (and other prerequisites) in a configuration
needed to support, for example, an Exchange Server 2010 Client Access Server, you can use the "Exchange-CAS.xml" file with the following command:

If you are using Windows
Server 2008 R2, you will get a warning about ServermanagerCmd.exe being
deprecated under Windows Server 2008 R2, but it still works fine – go
ahead and run it.
1 Exchange Server 2010 order of installation
Although Exchange
Server 2010 can be installed into an existing Exchange Server 2003
environment – in the same forest and the same domain – there are some
issues with compatibility, and you have to take the installation order
of the Exchange Server 2010 servers into account.
First – Exchange Server 2010 Client Access Server.
The Client Access Server can work with an Exchange Server 2003 Mailbox
Server as well as an Exchange Server 2010 Mailbox Server.
Second – Exchange Server 2010 Hub Transport Server.
Between the Hub Transport Server and the Exchange 2003 (front-end)
server, a so called "Interop Routing Group Connector" will be created to
enable SMTP messages to be sent back and forth between the two
environments.
Third – Exchange Server 2010 Mailbox Server role.
After you've installed the Mailbox Server role and established a proper
Public Folder replication between Exchange Server 2003 and Exchange
Server 2010, you can start moving mailboxes to the new Mailbox Server.
The
Exchange Server 2010 Edge Transport Server role can be installed at any
time during the upgrade, but the Edge Transport Server features are
only fully available when the Exchange Server Hub Transport Server is
installed.
NOTE
An in-place upgrade to Exchange Server 2010 is NOT supported in any scenario!
2 Installing Exchange Server 2010
Although you will need to
install each of the Exchange Server 2010 server roles in a specific
order, these roles can of course be combined on one machine.
Installing Exchange Server 2010
into an existing Exchange Server 2003 environment is pretty
straightforward. The process can be broken down into the following easy
steps:
Exchange Server readiness check (as part of the Best Practices Analyzer).
Upgrading the Active Directory Schema.
Upgrading the Exchange organization.
Upgrading the Active Directory domain.
Installing the first Exchange Server 2010 server.
When you start the GUI
setup application of Exchange Server 2010 (setup.exe), all these steps
will be performed automatically in the correct order. I'll go through
them in more detail here because you can use the command-line version of
setup if you want to fully control the options and execution of the
setup program.
NOTE
The
first step, running the Exchange Server Best Practices Analyzer
readiness check, was not available during the beta timeframe of Exchange
Server 2010. It will be made available in a future release.
2.1 Upgrading the Active Directory
The first step in changing
your configuration for Exchange Server 2010 is upgrading the Active
Directory schema to the Exchange Server 2010 level. You can achieve this
by opening a command prompt on the Active Directory schema master from
the Exchange Server 2007 installation media, and running the following
commands:

The first command, with /PrepareLegacyExchangePermissions,
grants new permissions to ensure that the Recipient Update Service in
Exchange Server 2003 continues to run correctly after the schema change
to Exchange Server 2010 (which is performed in the next step). The /PrepareLegacyExchangePermissions must be performed before the actual upgrade of the Schema, which is what the second command does.
If you want to change the
Schema on a computer that's not the Schema Master, you have to make sure
that the LDIFDE application is available on that computer. You can
install this by opening a command prompt and entering the following:

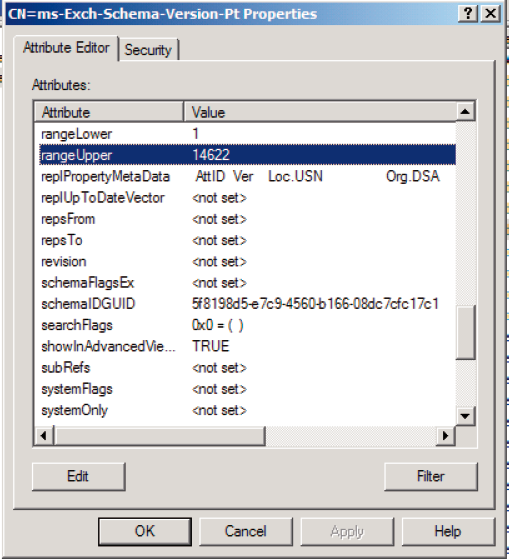
You can check what version
your schema is, or check if the upgrade was successful, using a tool
like ADSIEDIT or LDP.EXE and checking the CN=ms-Exch-Schema-Version-Pt object in the Active Directory schema. After the schema change, its "rangeUpper" property should have the value 14529
(or higher, as this value is for Beta1 of Exchange Server 2010 and will
change with later versions). Just so you know, the property can have
the following values:
| Value | Corresponding Exchange version |
|---|
| 6870 | Exchange Server 2003 RTM |
| 6936 | Exchange Server 2003 service pack 2 |
| 10628 | Exchange Server 2007 |
| 11116 | Exchange Server 2007 service pack 1 |
| 14622 | Exchange Server 2007 service pack 2 |
| 14622 | Exchange Server 2010 |
NOTE
If
you have multiple domain controllers in your Exchange Server
environment, you'll have to wait for the Domain Controller replication
to finish before you continue to the next step.
After upgrading the
Schema, the current Exchange Server 2003 organization can be upgraded to
support Exchange Server 2010. To do this, run the following command
from the Exchange Server 2010 installation media:

This simple command
automatically configures the global Exchange objects in Active Directory
(residing in the Active Directory Configuration container), creates the
Exchange Universal Security Groups in the root of the domain, and
prepares the current domain for Exchange Server 2010.
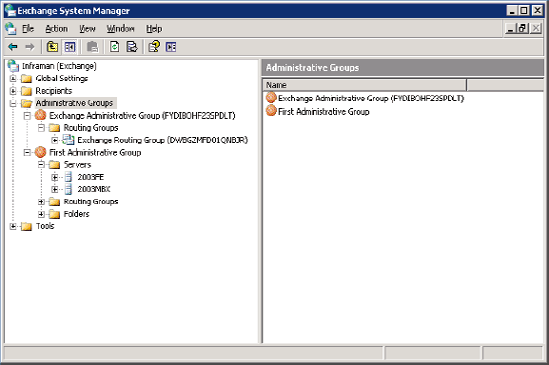
It also
creates the Exchange 2010 Administrative Group called "Exchange
Administrative Group (FYDIBOHF23SPDLT)" and Exchange 2010 Routing Group
called "Exchange Routing Group (DWBGZMFD01QNBJR)" if they didn't already
exist .
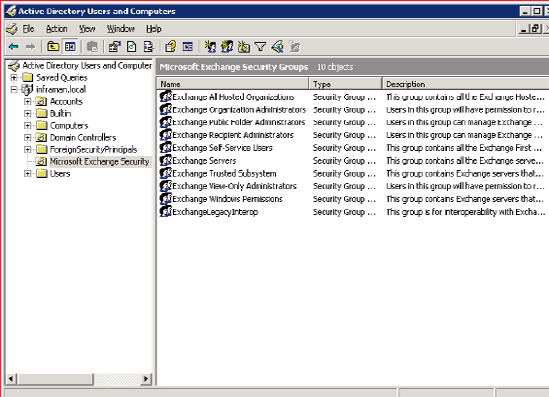
To verify that this step
completed successfully, make sure that there is a new organizational
unit (OU) in the root domain called Microsoft Exchange Security Groups and that this container contains the groups shown in Figure 3.
After running the setup.com application with the /PrepareAD switch, the newly created Administrative Group will show up in the Exchange Server 2003 System Manager, as you can see in Figure 4.
The last step in
preparing your environment for the implementation of Exchange Server
2010 is to prepare the Active Directory domain (or domains) for Exchange
Server 2010. The domain is prepared by running the following command
from the Exchange Server 2010 installation media:

When you have multiple
domains holding Exchange Recipients in your Active Directory forest, and
you want to prepare all domains in one step you can replace the /PrepareDomain with /PrepareAllDomains.
This sets the
necessary permissions on the Exchange Server container in Active
Directory, as well as for the Exchange Servers, the Exchange
Administrators and Authenticated Users. It also creates a new Global
Group called "Exchange domain servers"
in the domain where the command is run. This Global Group is only used
for installing Exchange Server 2010 servers in a child domain, in a site
other than the root domain. The setup program uses this to avoid
installation issues when the Domain Controllers haven't yet fully
replicated all the updated information.
After performing these easy
steps, the Active Directory and Exchange Server environment is fully
prepared for the installation of the first Exchange Server 2010 server!
2.2 Installing the first Exchange Server 2010 server
In our example Exchange Server
2003 environment, we will implement a combined Exchange Server 2010 Hub
Transport and Client Access Server, and a dedicated Exchange Server 2010
Mailbox Server. Both the Client Access and Hub Transport Servers will
need to have Internet Information Server installed.
To install a combined
Exchange Server 2010 Hub Transport and Client Access Server into the
nicely prepared Exchange Server 2003 environment, you can follow these
steps:
Log
on to the new server where you want to install Exchange Server 2010.
Make sure that the server is a member of the domain where Exchange
Server 2003 is installed, and that all the prerequisite software is
installed.
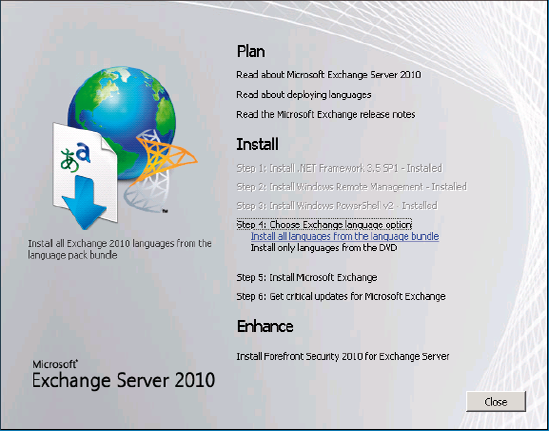
Go to the installation media and start the setup.exe
installation program. The setup splash screen appears and, if all
prerequisite software is installed correctly, the first three steps are
grayed out.
If
needed, download the language files, or else just use the languages
provided on the DVD. You have to select one of these options to proceed.
When
you've finished downloading the language files, select "Step 5: Install
Microsoft Exchange" and click Next to move past the Introduction page.
Accept the license agreement and click Next.
If wanted, you can select the error reporting option. Click Next.
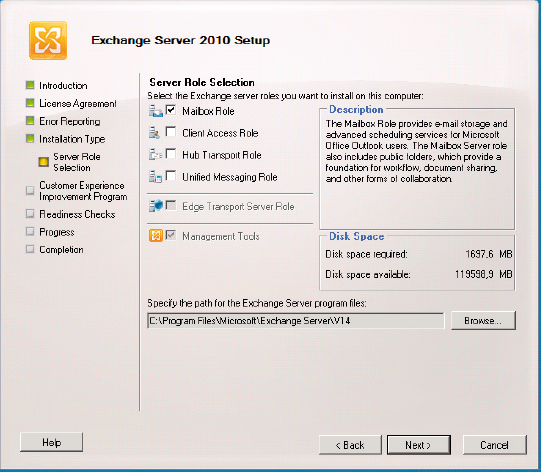
In
the "Installation Type" screen, you can choose between a Typical
Installation or a Custom Installation. Select Custom Exchange Server Installation and click Next.
As
we're only installing the Hub Transport Server and Client Access Server
roles, you need to ensure that those are the only two options selected
from the component list. The Exchange Management Tools will be
automatically installed with any Exchange Server role.
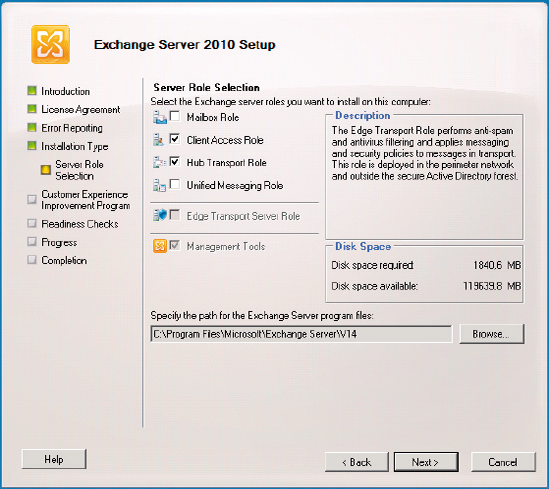
Click Next to continue;
With
the Exchange Server 2010 setup program, there's the option to configure
the Client Access Server role as an Internet-facing server. If that's
what you want, you can just tick the relevant checkbox and enter the
domain name you want to use when accessing the Client Access Server from
the Internet.
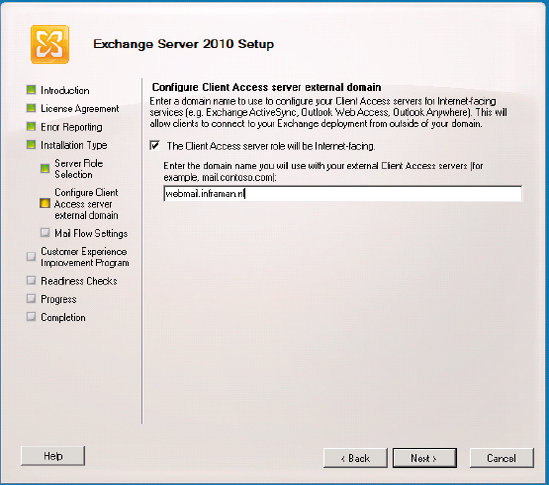
It
is also possible to leave this field blank and enter the parameters
during the later configuration of the servers. For now we'll use this
option, so enter your own domain name and click Next to continue;
The "Mail Flow Settings"
screen will only appear when performing a transition from Exchange
Server 2003 to Exchange Server 2010. Using the Browse button, you select
which 2003 Exchange Server will be assigned as a hub server for an
Interop Routing Group Connector, which both Exchange Server 2003 and
Exchange Server 2010 use for sending messages to each other .
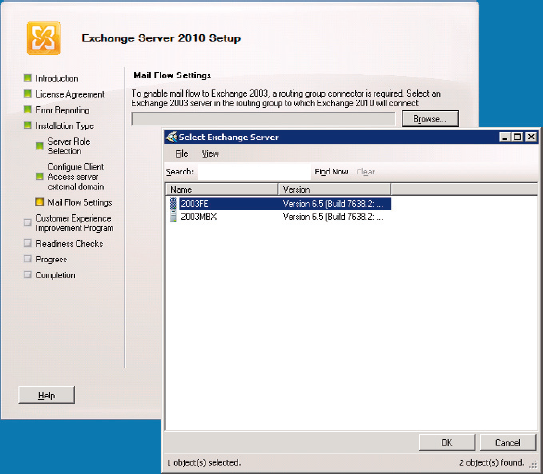
In this example we'll select the 2003FE server, which is an Exchange Server 2003 Front-End server. Click OK and Next.
In the "Customer Experience Improvement Program"
screen you can select whether or not you want to participate in this
program. There's no trick to this, so you can just make your selection
and click Next.
The
setup application will now check the readiness of the Exchange
configuration. If issues are found, they are presented at this stage and
you'll have the opportunity to resolve them. If no issues are found,
just click Install.
The Exchange Server 2010 server will now be installed. For every step a progress bar is shown.

When all steps are completed, click Finish, and then click "Close"
on the Welcome screen to end the setup program. You can continue to
check the installation using the Exchange Management Console, which is
automatically opened after the setup.
2.3 Installing the Exchange Server 2010 Mailbox Server
As we've only installed a Client
Access Server and Hub Transport Server, we still need to go through the
installation process for an Exchange Server 2010 Mailbox Server. The
steps are very similar, but there are some small differences.
Log
on to the server that will hold the Mailbox Server role. Make sure that
it is a member of the domain and that all prerequisite software is
installed.
If
you haven't done so already, install Internet Information Server for
the Mailbox Server Role by going to the \Scripts directory on the
installation media, and entering the following command:

This
will install Internet Information Server and the Failover-Clustering
software components according to the Mailbox Server Role prerequisites.
Open the graphical setup program (setup.exe) and follow the steps as outlined earlier, making sure that you select the Custom Exchange Server Installation and select only the Mailbox Server Role.
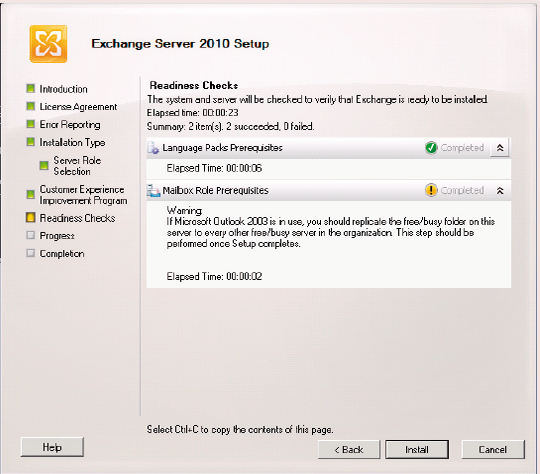
During
the Readiness Check, a warning message will be displayed about Public
Folder Replication as the setup application automatically detects the
Exchange Server 2003 environment and the Public Folder existence. Don't
worry about this, as Public Folder replication between Exchange Server
2003 and Exchange Server 2010 will have to be configured manually when
setup is finished.
Click
Install to complete the installation process, then click Close on the
Welcome screen to end the setup program. As before, you can continue to
check the installation using the Exchange Management Console, which is
automatically opened after the setup.