SharePoint 2010 provides
several tools to assist in backing up and restoring your SharePoint
content, and you will use a combination of them for complete protection.
Test each tool available to you within your environment and see what
combination of tools works best with your disaster recovery plan.
This section discusses the following tools and provides information on how and when to use them.
1. Versioning
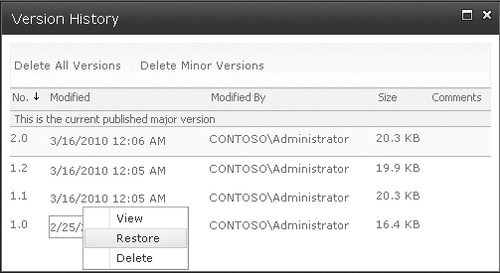
The most common method for
restoring corrupted content is achieved with versioning functionality,
which is available in all libraries in SharePoint 2010. This
functionality is disabled by default, but after enabling it, you can
restore a previous version of a document from within that library as
shown in Figure 17-1.
Versioning is your first line of defense against data corruption and
user changes.
Also be aware that if a user has
the ability to modify a document, he can also delete it. Versioning does
not protect content; it only preserves history by creating copies of
content each time it is saved. If a document is deleted, it must be
recovered from the Recycle Bin.
2. The Two-Stage Recycle Bin
For a user, the deletion of a
document can be a disaster. Beginning with Windows SharePoint Services
3.0, Microsoft provided an out-of-the-box Recycle Bin solution that
allowed users and administrators to recover deleted items, essentially
eliminating the need for a third-party solution. The SharePoint Recycle
Bin should be your first choice for restoring deleted files, and it is
the easiest of the tools available for recovering content.
Microsoft SharePoint
Foundation 2010 includes a two-stage, first-in/first-out Recycle Bin
that allows for a second level of retention before content is
permanently deleted from the system. By default, after a user deletes an
item and then empties their user-level Recycle Bin, the items are
retained in the second stage Recycle Bin for 30 days. Security trimming
is used to provide each user with their own Recycle Bin view that
displays the content that they have deleted from that site. A user can
recover any of the following deleted items from the Recycle Bin.
Documents
List items
Lists
Document libraries
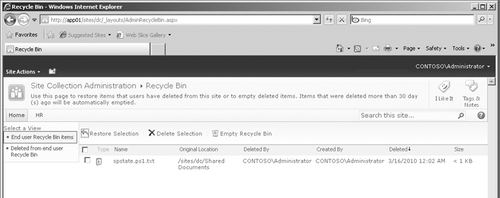
In addition to the end-user Recycle Bin, site collection administrators have access to a global view of the Recycle Bin (see Figure 2)
that includes items deleted by all of the end users and allows the
administrator to recover items that have been deleted by other users
without affecting the value in the Modified By column. This is useful
for those instances in which the original user is unavailable but
content needs to be recovered. Also available to administrators is the
second-stage Recycle Bin, where documents that have been deleted from
the users’ Recycle Bins are stored, so they still can be recovered by a site collection administrator.
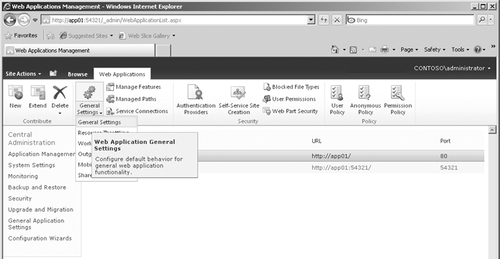
Administrators can access
both Recycle Bin views by navigating to the Site Settings page for the
top-level site in the site collection and then clicking the Recycle Bin
link in the Site Collection Administration section. Only the
second-stage Recycle Bin can be configured directly. The first stage can
only be modified by the global Recycle Bin settings at the Web
application level and can be configured within Central Administration.
To do this, you would click Application Management, select Manage Web
Applications, and then click the name of the Web application you want to
modify. Finally, select General Settings from the drop-down menu
accessible from the General Settings icon located on the Ribbon, as
shown in Figure 3.
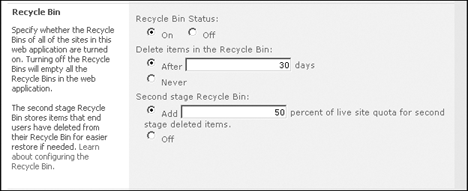
By default, both the first
and second stages of the user Recycle Bin retain deleted items for 30
days before automatically purging the items. Because this is a global
setting, items do not expire to the second-stage bin; they are expunged.
The only time an item enters the second stage is when a user or
administrator empties the first stage. The second-stage limit is based
on a ratio of the site collections storage quota rather than a set
period of time. By default, the second stage of your Recycle
Bin is limited to 50 percent of your site quota, but you should lower
the value of this setting to fit your storage needs. You may think that
raising this quota makes sense, but carefully consider before making the
value higher, because incorrect stage configurations can waste large
volumes of disk space. Figure 4 shows the settings you can modify for the second-stage Recycle Bin.
The second-stage bin’s capacity is in addition
to the current site collection quota. Therefore, if you were planning
for 100-gigabyte (GB) content databases using these default settings,
they could reach 150 GB in size if you leave the default size of the
second stage set at 50 percent (refer back to Figure 17-4).
Also, if you do not enable Site Quotas, there is no limit on the
Recycle Bin’s second-stage storage capacity. If this is set in
conjunction with clearing the time-based expiration setting, deleted
items are retained indefinitely.
Keep in mind that your site
collection administrators have the ability to permanently delete objects
in site collections. With this in mind, be sure to choose site
collection administrators for your critical sites carefully and provide
all site collection administrators with adequate training.
If you encounter a shortage
of disk space and need to recover some disk storage quickly, you can
disable the second-stage Recycle Bin. This will cause all Recycle Bins
to be emptied immediately and will release the disk space used by those
Recycle Bins. The only way to recover any items that were in the Recycle
Bin prior to disabling that functionality, however, is to perform a
restore from a database backup or unattached content database.
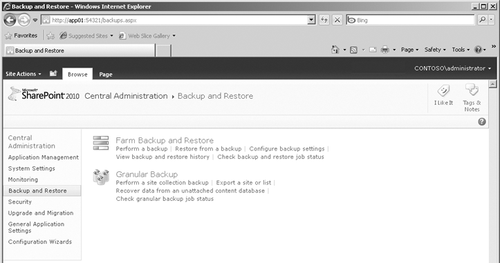
3. Central Administration
The SharePoint 2010 Central Administration Backup And Restore interface shown in Figure 5 gives you the ability to perform several types of backups and restores, including
Entire farm
Farm configuration only
Service applications
Web applications
Content databases
Site collections
Sites
Lists and libraries
This additional
functionality removes the burden from your SQL Server administrators and
gives the SharePoint administrators more control over the backups of
their SharePoint information from farm level down to list or library
level. This is also the tool primarily used during the recovery
of a database, whereas Windows PowerShell or STSADM are often used to
backup SharePoint information because they can be scripted. This is
because the Central Administration Backup And Restore interface is used
during the recovery of a database, because this action often requires
flexibility in performing the proper restore operations, depending on
which restore operations need to be performed. Alternatively, Windows
PowerShell commands or STSADM are often used to back up SharePoint
information because they can be scripted and therefore scheduled to run
at specified times.
You can also change the
location of the file backups using the Backup And Restore user
interface. However, if you need to change this location at a later time,
be sure to leave your original backup location available for the length
of time required to meet your SLAs. If you need to restore from a
previously created backup source, change the location when viewing the
Backup And Restore history.
Note:
You
cannot perform a differential backup of the entire farm when a new Web
application is created. You must perform at least one full backup before you can successfully complete a differential backup, whether you are using the UI or a command-line tool.