IT tutorials
 
Applications Server
 

Microsoft Lync Server 2010 : Using Reverse Proxies with Lync Server (part 2) - Configuring TMG to Support Lync Server

2/18/2013 6:40:01 PM
- Free product key for windows 10
- Free Product Key for Microsoft office 365
- Malwarebytes Premium 3.7.1 Serial Keys (LifeTime) 2019

Configuring TMG to Support Lync Server

Forefront TMG is the logical successor of ISA 2006 SP1 and is the other primary choice for use as a reverse proxy with Lync Server. The high-level steps for publishing Lync Server with Forefront TMG are the same as those for ISA 2006 SP1. The specific steps that vary due to the slightly different interface are detailed in the following sections.

Tip

Because Forefront TMG is a native 64-bit application, whereas ISA 2006 SP1 is a 32-bit application, it has the potential to service a much larger number of connections and could be a key decision point for large deployments.


Configure Web Publishing Rules

Web publishing rules are used by Forefront TMG Server to securely publish internal resources over the Internet. In addition to providing web service URLs for the various Lync Server virtual IIS directories, it is also necessary to create publishing rules for simple URLs. For each simple URL, it is necessary to create an individual rule on the reverse proxy that references that URL. The following procedures can be used to create web publishing rules:

1.
Log on to the Forefront TMG Server.

2.
Click Start, All Programs, Microsoft Forefront TMG, and Forefront TMG Management.

3.
In the left pane, expand the name of the TMG Server.
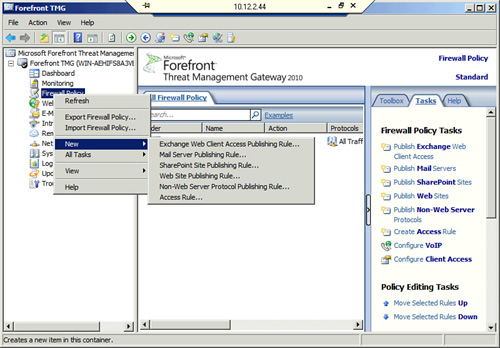
4.
Right-click Firewall Policy, click New, and click Web Site Publishing Rule, as shown in Figure 10.

Figure 10. Creating a New Website Publishing Rule

5.
On the Welcome to the New Web Publishing Rule page, enter a name for the publishing rule that will be easy to reference in the future. Click Next.

6.
On the Select Rule Action page, choose Allow. Click Next.

7.
On the Publishing Type page, select Publish a single Web site or load balancer and click Next.

8.
On the Server Connection Security page, choose Use SSL to connect to the published Web server or server farm. Click Next.
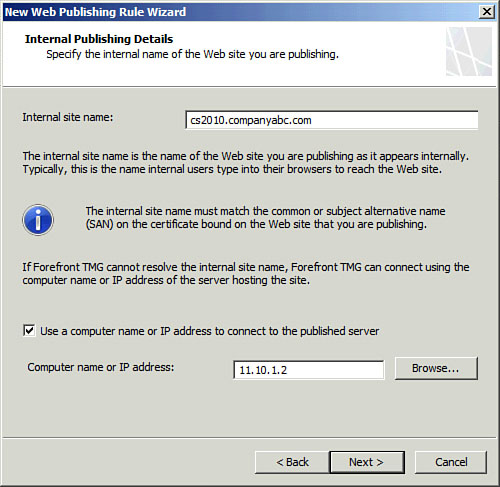
9.
On the internal Publishing Details page, enter the FQDN of the internal web farm where meeting content and the Address Book are hosted in the internal Site name box.

Note

The ISA Server must be able to resolve the FQDN entered in step 9. If the ISA Server will not be able to reach a DNS server that can resolve the FQDN, select Use a computer name or IP address to connect to the published server and then enter the IP address in the Computer name or IP address box, as shown in Figure 11.

Figure 11. Connecting to an IP Address


10.
On the internal Publishing Details page, enter /* as the path of the published folder. Click Next.

11.
On the Publish Name Details page, verify that This domain name is selected under Accept Requests for. Type the FQDN of the external web farm into the Public Name box. Click Next.

12.
On the Select Web Listener page, click New.

13.
On the Welcome to the New Web Listener Wizard page, enter a name for the new web listener in the Web listener name box. Click Next.

14.
On the Client Connection Security page, choose Require SSL secured connections with clients. Click Next.

15.
On the Web Listener IP address page, select external, and click Select IP Addresses.

16.
On the external Listener IP selection page, select Specified IP address on the TMG Server computer in the selected network, select an IP address, and click Add. Click Next.

17.
On the Listener SSL Certificates page, click Assign a certificate for each IP address, and select the IP address that was added in step 16. Click Select Certificate.

18.
On the Select Certificate page, select the certificate matching the public name selected in step 11, as shown in Figure 12 and click Select. Click Next.
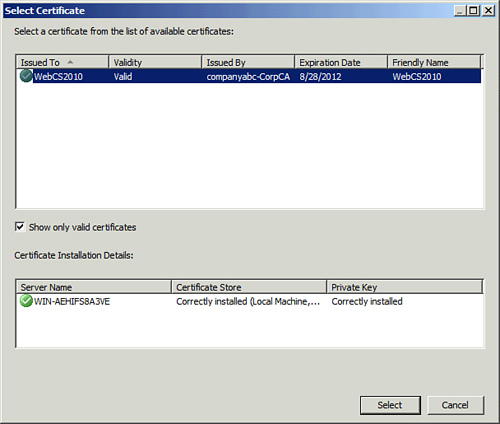


Figure 12. Selecting the Certificate

19.
On the Authentication Settings page, select No Authentication. Click Next.

20.
On the Single Sign On Settings page, click Next.

21.
On the Complete the New Web Listener Wizard page, click Finish.

22.
Returning to the Select Web Listener page, select the listener that was just created and click Next.

23.
On the Authentication Delegation page, select No delegation but the client may authenticate directly. Click Next.

24.
On the User Sets page, click Next.

25.
On the Completing the New Web Publishing Rule Wizard page, verify the rule settings and click Finish.
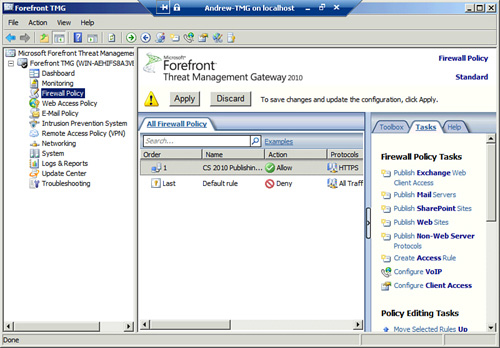
26.
Click Apply to save the changes, as shown in Figure 13 and update the configuration.


Figure 13. Applying the Firewall Policy
 
Others
 
- Microsoft Lync Server 2010 : Using Reverse Proxies with Lync Server (part 1) - Configuring ISA 2006 SP1 to Support Lync Server
- Microsoft Dynamics Ax 2009 : Programming Enterprise Portal Controls (part 4) - ViewState, Page Life Cycle, Proxy Classes
- Microsoft Dynamics Ax 2009 : Programming Enterprise Portal Controls (part 3) - Labels, Formatting, Error Handling
- Microsoft Dynamics Ax 2009 : Programming Enterprise Portal Controls (part 2) - Data, Metadata
- Microsoft Dynamics Ax 2009 : Programming Enterprise Portal Controls (part 1) - AJAX, Session, Context
- Microsoft Dynamics GP 2010 : Speeding up month-end processing with Reconcile to GL functionality
- Microsoft Dynamics GP 2010 : Getting control of printing with Named Printers
- Microsoft Dynamics GP 2010 : Speeding up entry by Copying a Purchase Order
- BizTalk Server 2009 : Handling Ordered Delivery
- BizTalk Server 2009 : Implementing Dynamic Parallel Orchestrations
 
 
Top 10
 
- Microsoft Visio 2013 : Adding Structure to Your Diagrams - Finding containers and lists in Visio (part 2) - Wireframes,Legends
- Microsoft Visio 2013 : Adding Structure to Your Diagrams - Finding containers and lists in Visio (part 1) - Swimlanes
- Microsoft Visio 2013 : Adding Structure to Your Diagrams - Formatting and sizing lists
- Microsoft Visio 2013 : Adding Structure to Your Diagrams - Adding shapes to lists
- Microsoft Visio 2013 : Adding Structure to Your Diagrams - Sizing containers
- Microsoft Access 2010 : Control Properties and Why to Use Them (part 3) - The Other Properties of a Control
- Microsoft Access 2010 : Control Properties and Why to Use Them (part 2) - The Data Properties of a Control
- Microsoft Access 2010 : Control Properties and Why to Use Them (part 1) - The Format Properties of a Control
- Microsoft Access 2010 : Form Properties and Why Should You Use Them - Working with the Properties Window
- Microsoft Visio 2013 : Using the Organization Chart Wizard with new data
Technology FAQ
- Is possible to just to use a wireless router to extend wireless access to wireless access points?
- Ruby - Insert Struct to MySql
- how to find my Symantec pcAnywhere serial number
- About direct X / Open GL issue
- How to determine eclipse version?
- What SAN cert Exchange 2010 for UM, OA?
- How do I populate a SQL Express table from Excel file?
- code for express check out with Paypal.
- Problem with Templated User Control
- ShellExecute SW_HIDE
programming4us programming4us