1. Users and security
Prior to implementing Dynamics GP it is helpful to
plan out all the system users and the security needs for them. If you
have implemented Dynamics GP for versions prior to 10.0 and have not
worked with the new Dynamics GP security yet, you may want to forget
everything you have learned about Dynamics GP security in the past, as
it has been completely overhauled starting with version 10.0.
Dynamics GP security is now pessimistic. Considered
long overdue by many consultants and system administrators, this means
newly created users will not have permissions to anything and will need
to be explicitly granted any and all permissions.
The components of Dynamics GP security are:
Operations: These are the lowest
level security building blocks. Operations include access to windows,
reports, tables, tools, posting permissions, and SmartList objects.
Tasks: Groupings of operations. Tasks
typically group operations across common fairly low-level functions,
such as creating customers or entering sales transactions. Tasks can
cross Dynamics GP products and modules. Multiple tasks can have the same
operations.
Roles: Groupings of tasks. Multiple
roles can have the same tasks. When setting up user security in Dynamics
GP, users get assigned one or more roles.
All operations, a large number of tasks, and some
roles are predefined in Dynamics GP. Existing tasks and roles can be
changed and new ones can be created as needed. Any user can be assigned
one or more roles.
A DEFAULTUSER task is available containing the basic
system operations required by just about every user. When a new role is
created, the DEFAULTUSER task is automatically added to it, and some
third-party products include basic permissions needed in the DEFAULTUSER
task.
A POWERUSER role is available for any system
administrators that should have access to all functionality in Dynamics
GP. This is similar to the sa user in SQL Server, which
bypasses security completely. Any user with the POWERUSER role assigned
does not need any other role assigned to them.
To start planning for security setup in Dynamics GP:
Identify all the users that will need access
to Dynamics GP. Make sure to get the correct full name of the user, as
this is helpful to fill in when creating Dynamics GP users.
Decide
on the user ID naming. Even though Dynamics GP does not use Windows
Authentication, the recommendation is to make the user IDs the same as
the Windows user IDs to minimize user confusion.
Unlike Windows user IDs, Dynamics GP user IDs are case sensitive.
Following the example set by
Dynamics GP, it is recommended to take a pessimistic approach to setting
user security. Start by granting users only roles and tasks that they
need to perform their work. It is easier to grant someone additional
access when needed, rather than take away something a user already had
or, even worse, having to fix issues caused by a user inadvertently
changing a setting they should not have had access to in the first
place.
2. Sales and purchase taxes
As part of the planning for your Dynamics GP setup,
you will need to determine whether sales and purchase taxes should be
calculated and tracked by the system. Even though the concept is the
same, sales and purchase taxes must be set up separately, as a tax in
Dynamics GP can only be one or the other. Many small and mid-size
companies in the US choose not to track purchase taxes separately.
However, any business selling goods or services will often need to
collect and remit sales taxes to each state they do business in and have
detailed records for state reporting purposes.
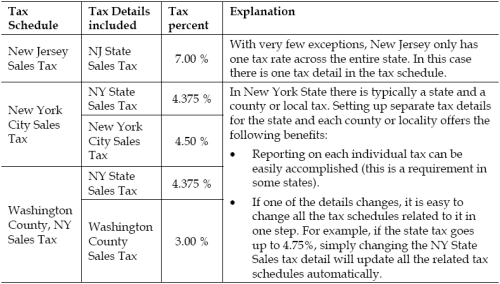
Setting up taxes in Dynamics GP involves the creation of Tax Details and Tax Schedules.
Tax details are the lowest level of taxes a company wants to track; tax
schedules are a combination of one of more tax details that are used
together to calculate the total tax for a transaction. The same tax
detail can be used on multiple tax schedules. Tax schedules are assigned
to customers, vendors, items, and transactions that need to be taxed.
Here is a typical example:

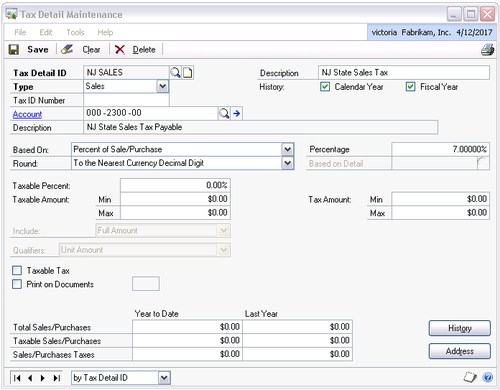
The followings screenshot shows a typical tax detail setup window:

If planning to set up taxes, gather the following information for each tax detail needed:
|
Data
|
Explanation
|
|---|
|
Tax Detail ID
|
This may be another place you want to decide on some consistent
numbering, especially if there are a lot of taxes to be set up. Having
the state abbreviation in front will allow better sorting and selection
of ranges during reporting. Maximum length is 15 characters.
|
|
Description
|
Optional, but very helpful when looking at a long list of tax details
during setup of tax schedules or reporting. Maximum length is 30
characters.
|
|
Tax Type
|
Sales or Purchase.
If the same tax detail is needed for both sales and purchase taxes, it
will need to be set up twice. In this case, consider adding something to
the ID to indicate this, maybe a S for sales and P for purchases at the end of the ID.
|
|
Tax ID Number
|
The company's tax ID number with the taxing authority—this is optional
for the setup, but many businesses like to have this information all in
one place.
|
|
GL Account
|
The General Ledger account number where the tax liability is accumulated, typically this is a Payables account for sales taxes.
|
|
Tax Based On
|
How the tax is calculated. Options are:
Flat Amount per Unit Percent of Another Tax Detail Percent of Cost Percent of Sale/Purchase Percent of Sale/Purchase plus Taxable Taxes Tax Included with Item Price
The most common of these is Percent of Sale/Purchase. If one of the other methods is chosen there may be some additional information needed for setup.
|
|
Percentage
|
Tax percentage—up to five decimal places are available.
|
|
Round
|
Rounding options for the tax calculation. Available options include
nearest up, nearest down, to the nearest decimal place, or whole digit.
The recommendation is to round to the nearest decimal place, as this is
the most commonly expected calculation method.
|