SharePoint 2010 makes every
effort to understand the intent of a query and to reduce the noise to
the search engine. That is, to provide a better search experience for
the user, SharePoint 2010 must parse and understand the search query and
filter out information that isn’t essential to a query’s meaning.
Out of the box, SharePoint Search supports anti-phrasing.
Anti-phrases refer to the parts of a query that do not contribute to
its meaning. Words or phrases such as “How do I find” make sense to the
user, but they do not provide added value to the search query. Filtering
out words that aren’t useful in the query is traditionally done by
using noise word (stop-word) lists that remove the unnecessary words,
such as “and,” “the,” and “I,” from search queries. The use of stop-words
can pose a problem because the words are always removed from queries.
SharePoint resolves this issue by removing phrases using a more
intelligent anti-phrasing process, so that a query such as “how do I do
SharePoint” is transformed to “SharePoint.” As a result, the search
results are improved to include more SharePoint-related topics. Based on
the search results that are then selected by the user, the search
engine uses query recall to improve subsequent searches for the term
“SharePoint.”
Providing a good
conversational user experience is one of the first—and more
important—search criteria for delivering useful information to users. A
conversational search experience allows a user to type search phrases
and interact with the results as if she were talking to another person
rather than to computer software. SharePoint 2010 out of the box
provides a good starting point for queries and searching for the best
qualified results. However, because the user can analyze and/or refine
the resulting dataset, it is also important that the search system can
adapt those results to improve search quality for future queries. These
tasks help enterprises give users high quality and fast results, which
in turn allow users to complete their tasks quickly and easily.
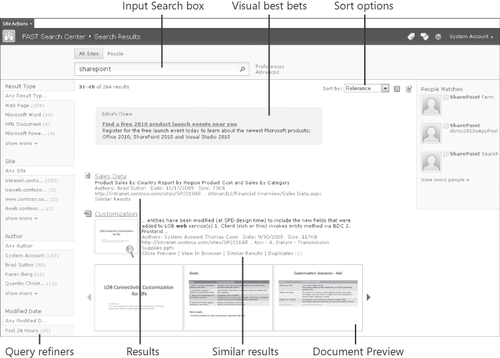
By default, the SharePoint 2010 FAST Search results page contains several elements that help satisfy these needs.
Input Search Box Allows the user to interact with the search engine
Visual Best Bets Presents customizable advertisements or suggested content based on the user’s profile or search criteria
Document Preview Previews the document contents
Query Refiners Shows related results to the query
Similar Results Provides a new result set similar to a document or result item
Sort Options Enables sorting by custom metadata
Each of these functions is shown in Figure 1.
1. Contextual Promotions
Web applications such as SharePoint are able to provide information to a Web user
based on their search actions, location, people, or relevant
information. SharePoint Search takes these user-related objects and
defines them as the “user context.” For example, SharePoint Search is
able to refine search results for a search query such as SharePoint
Development to include results that could highlight SharePoint
developers, provide a list of geo-located developers in the area, and
determine related blogs or sites that focus on SharePoint development.
Contextual promotions
allows the search engine to apply user contexts for best bets, visual
best bets, and site promotions. These features allow users to see
information that is most likely to be relevant, depending on the user’s
profile information, such as title, function, or department. As an
example, a developer might be searching for specific, detailed
information, whereas a sales manager might prefer to see a more
high-level set of search results. Furthermore, with an increasingly
global workforce, mobile and geographic location–based information must
be considered as well.
The context
information available from the user’s profile and URL information
allows enterprises to tap into search functionality and provide higher
quality search results. Administrators and developers alike should be
aware of the following context items available in the user context.
Location awareness Where is the user located: in the United States, Europe, or some other part of the world?
Device awareness Is the user on a mobile phone, a laptop, or at a computer in the corporate environment?
Referrer awareness
How did this user get to this page: through a search engine like Bing, a
social media site like Twitter, the current website, or a peer website?
Click patterns Analyze Web logs to determine how users generally navigate the site.
Time of day
Do any search patterns exist relative to the time of day when different
results are expected? Users executing a site search during business
hours usually look for more business applications, whereas users
performing the same search during off-hours could be looking for more
home-use type products.
Personalize content Provide search result content to which the user relates.
In short, applying context
depends on the intent of the user and what her predicted pattern might
be. For global enterprises, when a user clicks on the corporate support
pages, the landing page might include the local office address, a map
with links to directions of the location, and key employee contact
information. Each of these items can be based on the IP address in the
user’s context protocol. All browsers identify themselves with
device-dependent content when accessing Web pages, which enables search
applications to provide specific content as needed for a user and the
user’s device. It is also important to adapt rendering based on the
user’s device profile. For example, when building search pages for
mobile phones, the element size should be adjusted so that it is
smaller, to fit the devices’ screen real estate. Furthermore, font
choice and limited page content ensure a quick and positive user
experience on a mobile device. A user accessing the same search site
with a PC will expect a feature-rich content page and should receive as
much related information as possible, based on the user’s profile and
context.
You can personalize the search results content using the SharePoint Server Search products. You can achieve these contextual
promotions by optimizing the site layout and ranking features using
keywords, promotions, and the users’ context information.
1.1. Adding User Context Metadata
Metadata in SharePoint 2010 is important in returning quality user results to improve find-ability. Findability, as defined by Peter
Moreville (2005), is a user’s ability to identify and navigate the
pages of a website to discover and retrieve relevant information
resources. Metadata is used in SharePoint 2010 to categorize and rank
information located in the SharePoint document store.
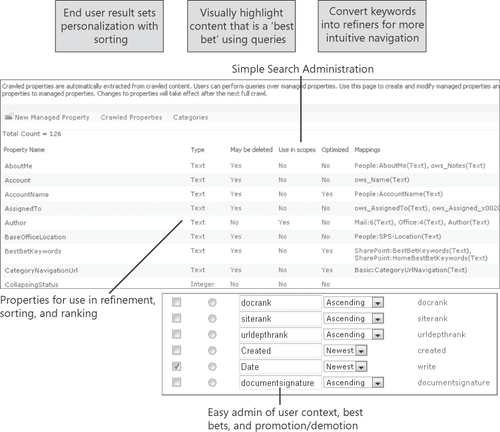
The managed property
administration is enhanced significantly to support the new search
features. Each metadata property contains the ability to be a sort
property, a query property, or a refiner property, and it can be mapped
to either SharePoint document properties or external content for search
queries. By defining query properties, end users can gain control of their refinement queries, sorting, and default language, as illustrated in Figure 2.
Note:
SharePoint 2010 is able to
extract applied metadata, such as author information, from content
created in Microsoft Office applications based on document properties.
To view document properties on documents before they are uploaded to a
SharePoint site, open Windows Explorer, right-click the document, and
then select Properties from the shortcut menu to open the document’s
Properties dialog box. In the dialog box, click the Details tab to view
information about the Author, Title, and other available document
properties.
Filtering search
information based on document metadata and managed properties allows
the enterprise search application to retrieve user content information
and provides specific filters to the search engine. Adding user
context information to search keywords allows targeted search results
to be displayed. After targeted results are created, they can be
associated to best bets. A common example might be a geographic-based user context in which information is displayed depending on the region where the user is located.
Both SharePoint and FAST
Search retrieve newly crawled properties that can then be used in
managed properties. This activity presents two areas of concern.
Previously, you could not determine from which documents the crawled
properties were derived. SharePoint now has the capability to log the
extraction from a specific document using a Windows PowerShell cmdlet.
The various metadata
usage options each require an index, which impacts the storage (size) of
the metadata database. Some of these options can be disabled in the UI,
and others require the use of a Windows PowerShell cmdlet for
configuration. Keep in mind that although disabling an option can reduce
the database size, it obviously limits the use of the metadata in some
functions and may break the Web Part currently configured for that
usage. Also, since the search Web Parts are configured with XML files,
they could be configured for functionality that is not available for
some metadata. Be sure to document any nonstandard metadata usage
configurations that you apply.
The managed properties currently being used by search can be retrieve with the cmdlet Get-SPEnterpriseSearchMetadataManagedProperty.
Note:
The FullTextSQLQuery
class doesn’t return results if you use the = operator with a
text-managed property and do not select the managed property’s option,
Reduce Storage Requirements For Text Properties By Using A Hash For
Comparison. Therefore, you should select this option when the managed
property is automatically generated by the crawling process.
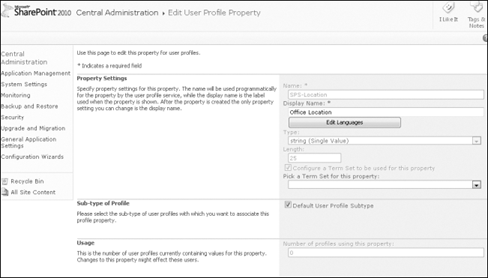
To add a user geographical user
context requires exposing the user property that is available and then
configuring it for use by FAST user context. To expose the user
property, follow these steps.
Open a browser and go to the SharePoint Central Administration website.
Click Application Management, and under Service Applications, click Manage Service Applications.
Click
User Profile Service Application to select it and then click Manage in
the Operations group on Service Applications Ribbon.
Under People, click Manage User Properties.
Edit an existing property or create a new property.
Fill in the appropriate values for the form depending on your needs and requirements.
Click OK. See Figure 3 for an example of the Edit User Profile Property page.
To configure the property for use in FAST user context in search results, follow these steps.
Open a browser and go to the SharePoint Central Administration website.
At the root level of the SharePoint website, click Site Settings.
Click Fast Search User Context under Site Collection Administration to create or manage user contexts. The Add User Context page, as shown in Figure 4, creates a new user context.
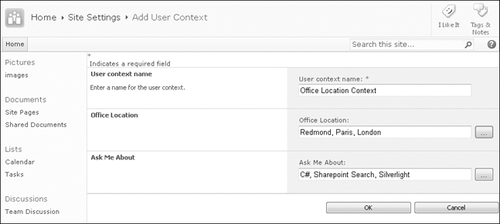
Enter information as needed for the user context. Information entered here can be modified later in the Edit User Context page.
Note:
Multiple items can be listed in the fields shown in Figure 13-5 if they are separated by commas. These items are interpreted by the system as OR clauses. In Figure 13-5, for example, the search server interprets Office Location as Redmond or Paris or London.
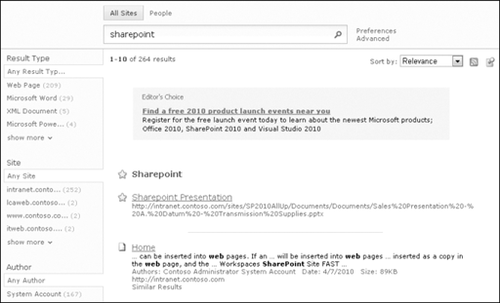
After the user context is defined, it can be applied to a best bet or a visual best bet, which narrows the scope of users
to target information. If a user’s profile context information Ask Me
About column contains the data C#, a best bet appears in the search
results, as shown in Figure 5.
This out-of-the-box capability
gives search applications more control over the content they provide to
a user and helps to ensure that the user is presented with quality
search results.
1.2. Using Managed Keywords
Managed keywords are the basis for creating best bets, visual best bets, and promotion. A keyword (also described as a tag)
can be defined as a nonhierarchical term set called a keyword set. When
keywords are added to a site or site collection, documents within that
site prompt the user to enter a keyword that defines how the document
appears in the search results. These keywords may be required as
necessary when a user edits or uploads a document.
When using enterprise
keywords (with SharePoint Server or SharePoint FAST Server), a user who
is updating content in SharePoint can choose from either Enterprise
Search terms or managed terms. This could be important if document
content is needed to participate in SharePoint Server Search
applications and/or SharePoint FAST Server Search applications. One of
the primary differences between enterprise keywords and managed terms is
that enterprise terms allow multiple values by default. Figure 6 shows how a user could apply enterprise search terms to a document.

When a user
begins typing a value into the managed keyword field, a suggestion is
provided from available search terms defined by the system. The managed
term, as well as the term set, is displayed with the term’s location in
the hierarchy. Higher placement in the list indicates a larger search
priority over lower items. If needed, the user can add a term set if
permission is granted by the administrator. In Figure 13-7, the user is presented with two keywords, two users, and the option to create a new keyword.
Administrators should limit
keywords to choices the user is likely to know or understand and should
develop rules and/or roles for the addition of search terms. For
example, if a user is creating a new engineering document for his
product, he might need to include the names of the different consultants
who also worked on the document so that other users in the department
can find documents that were authored by a particular consultant. In
this case, consultants are not employees of the company and cannot be
assigned to people lookup columns, such as Responsible. Adding the
consultant name to the keyword column links the document to the
consultant when using the SharePoint search functions. If the
consultant’s name already exists in the list, it is shown as are the two
names in Figure 13-7.
However, if the consultant’s name is misspelled in the keyword column,
the user might add another keyword entry with the consultant’s name
spelled correctly. This can make the keyword lists long and provide
confusing results if the data is not managed. For example, if there is a
consultant named Sharjah, but the name is sometimes spelled Siharjah,
then multiple entries exist for the same person. As with any data-based
application, the better the data that is input to the system, the better
the application results that will be returned.
To create a new managed keyword, follow these steps.
Click Site Settings from the Site Actions menu.
Click Fast Search Keywords under Site Collection Administration to display the Manage Keywords page, as shown in Figure 7.

Click Add Keyword to display the Add Keyword page, shown in Figure 8.
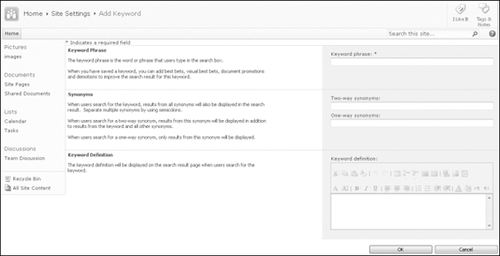
In the Keyword Phrase box, type the search term.
Enter
synonyms in the appropriate text box, if required. A two-way synonym
tells the FAST Server to include results from the keyword when searches
for the synonym are requested. You can use multiple synonyms if you
separate them with semicolons.
Note:
Synonyms are defined as
terms that are similar to the keyword phrase. For example, if a company
has a product line called chipset products with individual products
called companyparta and companypartb, then a search administrator would
type COMPANYPARTA;COMPANYPARTB as the synonym so that searches for parts will display related parts in the same product line.
SharePoint FAST
Search enables synonym and spelling variation expansion of queries or
indexed documents. The query-side expansion adds synonyms or spelling
variations to the query prior to the actual matching. The document-side
expansion expands the document with synonyms in a separate part of the
index. You can control the variation expansion one-way or two-way
options from the page shown in Figure 8 in the same way as lemmatization at query time.
Enter a keyword definition if needed.
After you create a managed keyword, you can apply best bets and visual best bets.
1.3. Adding Best Bets
Adding best bets to search results allows documents to be highlighted based on the search terms provided by the user.
This feature ensures a higher quality search result because it targets
individual search terms or user profile information. Best Bests can
consist of one or more URLs or images. To create a best bet, complete
the following steps.
Click Site Settings from the Site Actions menu.
Click
Fast Search Keywords under Site Collection Administration, then hover
over the number under Best Bets, and click Add Best Bet, as shown in Figure 9.

Enter a title for the best bet.
Enter a URL for the page or document to be associated with this best bet.
If this keyword search specifically applies to only certain users, enter the user context information.
Enter the start and end date if required for publishing.
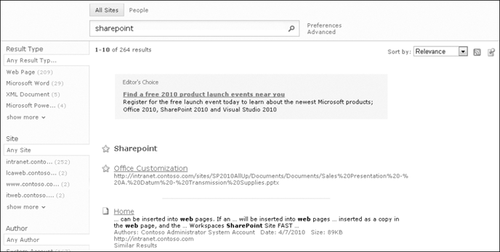
To see the search term in action, open the FAST Search site and type the term SharePoint, as shown in Figure 10. The document Office Customization is highlighted as a best bet for the term SharePoint.
1.4. Adding Visual Best Bets
Being able to show visual best bets when users
are searching for a particular keyword is an important aspect of
providing quality search results. Visual best bests can consist of one
or more URLs or images. To create a visual best bet, use the following
steps.
Click
Site Settings from the Site Actions menu, click Fast Search Keywords
under Site Collection Administration, and then hover over the number
under Visual Best Bets.
Click Add Visual Best Bets, as shown in Figure 11.

Enter a title for the visual best bet.
Enter a URL for the visual best bet.
If this keyword search should apply to only certain users, enter the user context information.
Enter the start and end date if required for publishing.
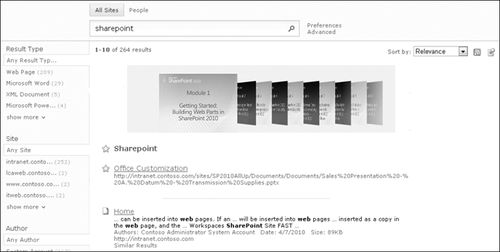
If a user types SharePoint as a search term, as shown in Figure 12, an image is displayed at the top of the search results that shows information about SharePoint 2010 training.
1.5. Advanced User Contexts
It is sometimes necessary to create more complex user
contexts than a simple OR statement allows. SharePoint 2010 supports
the creation of custom user contexts that allows for a context such as
creating a location-based context as complex as “all Locations except
Redmond and people with the user property Title having a value of Sales
or with the user property Responsibility that includes SharePoint.”
Using Boolean notation, this context would be identified by the
following statement.
(NOT(SPS-Location:Redmond)) AND (Title:"Sales" OR SPS-Responsibility:SharePoint)
If you create this
example using the context process described in previous sections, you
must create multiple contexts that are connected using keyword features
and ultimately are subject to error.
SharePoint 2010 is capable of creating advanced user contexts using the Windows PowerShell interface.
Note:
Before you attempt to use the
following example, make sure that the correct server (named FAST in the
example) is selected. The FAST cmdlets in Windows PowerShell are not
available on the SharePoint hosts.
On
the SharePoint farm, determine the Site-ID of the context/keyword to be
defined. This Site-ID is used on the FAST Search nodes as a site
collection feature.
In a SharePoint 2010 Management Shell, run the following command:
Get-SPSite -Identity "http://yoursite/"
On a FAST Search node, open the Management Shell and run the following commands.
Add-PSSnapin Microsoft.FASTSearch.Powershell  # Register the FAST Search
$ssg = Get-FASTSearchSearchSettingGroup -Name '<SiteID-GUID>' #Use site GUID from
   above
$ctx = $ssg.Contexts.AddContext('newcontextname')  # Name given to the context
$ae = $ctx.AddAndExpression()
$or = $ae.AddOrExpression()
$or.AddMatchExpression('Title', 'Sales')
$or.AddMatchExpression('SPS-Responsibility', 'SharePoint')
$not = $ae.AddNotExpression()
$not.AddMatchExpression('SPS-Location', 'Redmond')
When these commands
execute, a context with the name newcontextname is created and can be
connected to a keyword feature like best bet or visual best bet using
the administration user interface.
1.6. Using Language Detection
SharePoint 2010
automatically detects and understands 81 different languages, which
allows language-specific content detection to occur during document and
query processing. In cases in which document metadata defines the
document language, this feature can be disabled. If a site administrator
is asked to develop a multilingual SharePoint site, pages must include
Web Parts that reflect language-specific search queries for data that
does not belong to the page. For example, many enterprises have
multilingual Internet-facing sites that redirect the user
based on the default user browser language. In these cases, it is
important to have central repositories for press releases, support
documents, and so on.
SharePoint
allows support for different pages and document translations based on
either SharePoint site regional settings or individual sites. The FAST
Search application is aware of these predefined settings and displays
results accordingly. In SharePoint 2010, results are prioritized higher
if they exist in the same language as the searcher.