1. Introducing Web Parts
Web Parts are components that offer reusable functionality
when added to a Web Part Page. An example is a Web Part that provides
the current weather forecast for your region. Because every user is not
from the same region, you can add a weather Web Part to different pages
and offer the same functionality on each page, yet users would be able
to customize the functionality on each page, too. For example, users
could customize the weather forecast by setting their own postal codes
using the Web Part properties; then each user would see the weather
forecast for his or her own region. In Microsoft SharePoint Server 2007,
you added Web Parts to Web Part zones. In Microsoft SharePoint 2010,
you add them directly to a region on the page. The important thing to remember is that you
write Web Parts just once—and then you can reuse them any number of
times.
Web Parts continue the ongoing effort by Microsoft to provide users with an easy way to build plug-and-play websites.
2. Before You Begin Developing Web Parts
Most developers know
that you can access data quickly with very little code. However, if you
are creating a fully functional Web Part that offers filtering, sorting,
categorization, conditional formatting, and numeric formatting options,
you can find yourself authoring a Web Part that takes months or years
to finish. Then you have to maintain it and support it. And what happens
if the developer who authored the Web Part leaves the company? All this
effort and expense might not be necessary, however.
SharePoint 2010 offers a
vast range of different types of Web Parts. Whether you want to
aggregate content from other sites, display list content, or display a
Silverlight component or line-of-business data, it is likely you could
find a Web Part that provides that functionality
out of the box. Indeed, there are so many Web Parts in SharePoint 2010
that it would be time consuming to learn about all of them.
Unfortunately, companies often make the mistake of spending time and
money developing custom Web Parts when the Web Part they need is already
available with SharePoint, simply because they didn’t take the time to
research the Web Parts that ship with SharePoint. Because a lot of
SharePoint functionality is expressed through Web Parts, it stands to
reason that the product team provides a catalog of available Web Parts
that offer specific functionality that you can add to a Web Part Page or
wiki site.
Out-of-the-box
Web Parts also offer a consistent “look and feel,” which means that
once a user has grasped the concept of one Web Part, it is easy to grasp
the concept of another. This consistency extends to other features of
Web Parts; for example, each Web Part offers the same context menu and
shares many of the same properties, such as those found in the
Appearance, Layout, and Advanced sections of all Web Parts. Even when
you author your own custom Web Part, you inherit these properties. You
can set these properties by clicking the drop-down arrow on the Web Part
itself and then choosing either the Modify Shared Web Part or Modify My
Web Part option, depending on your permissions to the site.
3. Managing Web Parts
In SharePoint 2010, you
now insert and manage Web Parts using the Ribbon. Just like in previous
versions of SharePoint, you initially put the page into Edit mode by
choosing Site Actions and then Edit Page at the upper-left corner of the
page. Then under the Editing Tools tab, select the Insert tab. When you
are in Edit mode, the Ribbon appears as shown in Figure 1.
Note:
In some templates, such as the
Collaboration Portal template, you will not immediately see an Editing
Tools tab. However, if you click a spot on the page that accepts Web
Parts, the Editing Tools tab will appear and you’ll be able to add Web
Parts to the regions on the page that will accept them.

3.1. Adding Web Parts
In SharePoint Server 2007,
you insert Web Parts into a Web Part zone. The Web Part zones are
predefined by the site definitions default.aspx. Although new Web Part
zones can be added to the page using SharePoint Designer 2007, if you
reset the page to the site definition, you lose your Web Part zone. This
difficulty has been addressed in SharePoint 2010 so that now sites and
Web Part Pages contain one big content zone. Within the content zone,
you can insert text, images, reusable content, video and audio, and Web
Parts. Your pages will flow better and you will have more control over
the look and feel. Figure 2 shows content and a Web Part being inserted.
Note:
You may see different categories of Web Parts, depending on the Features that you have enabled within your Site Collection.
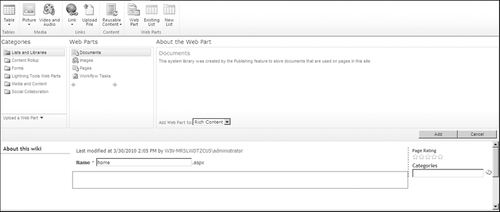
The list of Web Parts is
categorized by type, allowing you to navigate to the Web Part you want
more easily. An About The Web Part section also describes the
functionality of each Web Part and provides you with the option to
select the section of the page in which the Web Part will be added.
To add a Web Part to a page,
you must place your cursor in the target zone or region and then click
the Add button in the lower-right corner of the screen. This loads the
Web Part onto the page. After it is on the page, you can move the Web
Part between zones or regions using a drag-and-drop method, but you
cannot use this method to add the Web Part to the page initially.
3.2. Editing Web Parts
After you have added the Web Part to the content area, point to the Web Part to display a shortcut menu, shown in Figure 3.
The shortcut menu provides you with the options to minimize, close,
delete, edit the Web Part, connect it to another Web Part, or export it.
Depending on the Web Part and your permissions, you may not see all of
these options. Third-party Web Parts may also offer additional choices.
Users are often confused about the difference between closing and
deleting a Web Part, because they both remove the Web Part from the
page. Closing a Web Part maintains the properties that you set even
though the Web Part is not visible, and you can retrieve it again using
the Insert Web Part option without the need to reconfigure it. Deleting a
Web Part removes the Web Part permanently. To move Web Parts, you can
simply drag them using the mouse within or across content areas.

|
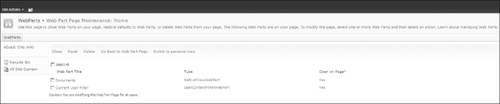
It is quite common for a user to
add a Web Part to a page and then find that the page produces errors.
This can occur for several reasons, especially if the Web Part is a
custom component. You can remove a Web Part from a page even if you
cannot navigate to it, however. Use the site URL but add ?contents=1
to the end of the URL in the address bar. The Web Part Page Maintenance
page appears. Use this interface to remove the problematic Web Part, as
shown in Figure 4.
The log files that you can find
in the SharePoint Root folder under Logs provide useful information
about any Web Part errors that have occurred. ULSViewer
is a useful tool you can use to see live information written to the log
files if you are looking for an error in the log files that may occur
from a custom Web Part. You can download ULS Viewer from http://code.msdn.microsoft.com/ULSViewer.
Quite often Web Parts are the
reason SharePoint pages to load slowly. Slow load times can be caused by
poor configuration, such as attempting to roll up too much information
in the Content Query Web Part, or by poor development by third-party
companies. You can turn on the Developer
Dashboard to help you find out which Web Part is causing this behavior
by providing you with the following information.
A breakdown of the request/response cycle with timings for each operation A breakdown of the response times for each database query that the Rendering process triggers A breakdown of the load times for each Web Part on the page
|
There are typically two ways to
modify Web Part properties. You can either select Edit Web Part from
the shortcut menu or click Open The Tool Pane, which is displayed in the
majority of the available Web Parts.
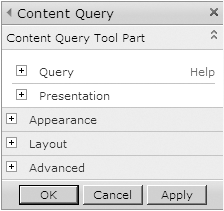
After you have the tool pane
open, you will notice that the properties are categorized. The
categories, which are Appearance, Layout, and Advanced, will display for
all Web Parts as long as you have permission to modify them. As well as
these three categories, you will also usually see other categories of
properties that are specific to the selected Web Part. In Figure 5,
you can see Appearance, Layout, and Advanced as well as Query and
Presentation categories, which are specific to the Content Query Tool
Part.
Note:
The Content Query Web Part is only available to add to a Web Part Page if you have activated the Publishing
Feature. Publishing must be turned on for the site collections and for
the site in which you are adding the Content Query Web Part.
3.2.1. Appearance
The Appearance category contains the following properties.
Title
Allows the user to change the title of the Web Part to a more suitable
title. For example, if you are using the Content Query Web Part to roll
up tasks for a user who is logged on, you might want to provide a title
such as My Tasks instead of Content Query Web Part.
Height & Width
The default Height and Width settings allow the Web Part to expand to
fit the content within the boundaries of the content area. You can also
set a fixed value for Height and Width.
Chrome State The Web Part chrome describes the border, menu, and title of the Web Part. This can be minimized or normal.
Chrome Type
The Chrome Type setting allows you to choose between variations in how
the Web Part is displayed, such as Title Only or Title And Border.
3.2.2. Layout
The Layout category provides the following properties.
Hidden
The Hidden attribute allows the Web Part to be hidden within the zone.
This is useful for Web Parts such as filter Web Parts that have a
purpose on the page but do not need to be seen unless the page is in
Edit mode.
Direction The Direction property allows the text within the Web Part to be justified to the left or to the right.
Zone
The Zone properties allow you to change which Web Part zone the Web
Part is to be in, and which order from top to bottom. This can also be
changed by dragging and dropping the Web Part.
3.2.3. Advanced
The Advanced category is only displayed for users with Full Control on the site. The category contains the following properties.
Allow Options
Use these to select what users without Full Control of the page are
allowed to change, such as the Allow Minimize option. You can also
select whether the user is allowed to close the page. This means that
the site administrator can enforce rules such as ensuring that the Web
Part is never deleted.
Export Mode
You can decorate each property within the Web Parts tool pane with an
attribute within the tool parts code that specifies the sensitivity of
the property. For example, consider a password property within a Web
Part. When exporting that Web Part, you would not want the password to
be exported. As the site administrator, you can control whether
properties decorated with sensitivity attributes should or should not be
exported.
Title URL
In some Web Parts, the title of the Web Part is a hyperlink. An example
of this is a List View Web Part. By clicking the List View Web Part’s
title, you will navigate to the Lists default view. The URL for the
hyperlinked title can be changed using this property.
Description Provides a description of the Web Part, which is displayed when the Web Part is being inserted.
Icon Image URL You can set the Category and Title URLs to allow a user to click the link, which can take them to a custom description page or external URL.
Import Error Message
Import error messages are often vague. However, you can customize the
error message to provide more information, such as how to obtain support
from your company if the Web Part cannot be added.
Target Audiences
Every Web Part can be targeted to a specific audience, which allows
different Web Parts to be displayed depending on the profile setting for
the user who is currently logged on.
Help URL Administrators can also add a help URL to describe to users how to use the Web Part.
3.3. Connecting Web Parts
Web Parts can be connected
to each other for many reasons, such as providing a filter value to a
consuming Web Part. For example, you might have the current user filter a
Web Part passing through the current user name to a List View Web Part
such as Tasks. You can connect the current user Web Part to the Task
List View Web Part and then map the user name to the Assigned To column.
You can also connect Web Parts to display content in alternative ways,
such as displaying line-of-business data from Business Connectivity
Services to the Chart Web Part.
Figure 6
shows an example in which the Current User Filter Web Part is connected
to the Documents List View Web Part showing Documents that are modified
or checked out to the current user.
