With the Topology Builder
tool, most of the configuration is done automatically. Although both
configuration and administration can be done from the Silverlight web
GUI or the Lync Server management shell, the configuration section
focuses on the former and the administration section on the latter to
avoid duplication of concepts.
Open the Lync Server Control Panel, which can be found at https://<pool_FQDN>/Cscp/.
Note
To access the interface, you
must be a member of the RTCUniversalServerAdmins group. If the system
you are accessing this web page from does not currently have Silverlight
installed, Lync Server 2010 offers you a download link to install it.
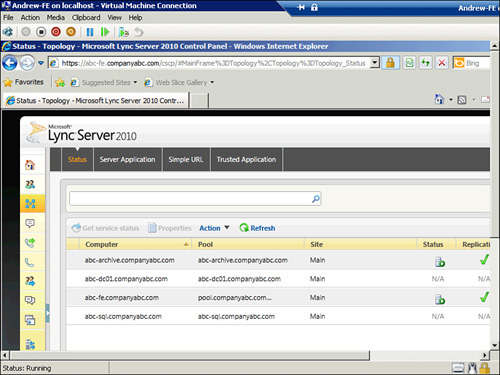
After the Lync Server
Control Panel is open, click the Topology button in the left bar. Find
the new Archiving server in the list or search for it using the search
box at the top. Ensure that there is a green check mark for Service
Status, as shown in Figure 1. This indicates the archiving service is running and responding.
Tip
To modify archiving policies, the logged on user must be a member of the CSServerAdministrator group.
Scroll down in the left bar
and click the Monitoring and Archiving button. This brings up the
settings menus for the Monitoring and Achiving Server roles. Because
Call Detail Recording and Quality of Experience Data are Monitoring
functions, skip directly to the Archiving Policy tab. Here, you see the
default Global Policy. Select it and click Edit–—Show Details.
The available options are
Along with two check boxes:
By
default, the check boxes for archiving internal and external
communications are cleared. To enable archiving for these types of
communications, check the boxes and click Commit in the upper area of the interface.
Archiving Configuration Tab
Now move to the Archiving Configuration tab. Again, you see the default Global Policy. Select it and click Edit—Show Details. The available options are
Along with two check boxes:
- Block instant messaging (IM) or web conferencing sessions if archiving fails
- Enable purging of archiving data
If purging is enabled, there are two radio button options:
- Purge exported archiving data and stored archiving data after maximum duration (days)
- Purge exported archiving data only
If the “days” option is selected, the administrator has the option to define how many days the archived data is stored.
Tip
The capability to block IMs based on the archiving service is available only if IMs are archived.
If any changes in this policy are made, be sure to click Commit in the upper portion of the interface.
Create Site and User Policies
In addition to modifying the default Global policy, administrators have the ability to create additional policies.
1. | From the Monitoring and Archiving window, click the Archiving Policy tab and click New.
|
2. | Choose either a Site policy or a User policy.
Tip
A site policy can be associated
with specific sites to allow their behaviors to be different from the
default global policy. User policies are assigned directly to users and
allow them to bypass the default global policy. This is useful when
archiving is needed only for select users who are distributed across the
environment.
|
3. | For this example, choose Site policy. When prompted to select a site, choose it from the list and click OK.
|
4. | Now,
the policy is named after the site—this cannot be modified. Input a
description and choose whether internal and external communications will
be archived. Click Commit.
|
For a user policy, repeat steps 1 and 2 but choose User policy and follow these steps:
1. | Enter a name for the user policy.
|
2. | Enter a description for the policy.
|
3. | Choose whether or not internal and external communications will be archived. Click Commit.
|
This results in the creation of multiple policies that can be used to manage archiving.
Tip
The same process can be used to
create additional archiving configurations, although those can be
created only by site, not by user.
To apply a user-based Archiving Policy to a user, perform the following steps:
1. | From the Lync Server 2010 Control Panel, click Users in the left pane.
|
2. | Click Find in the search area to view the list of enabled users.
|
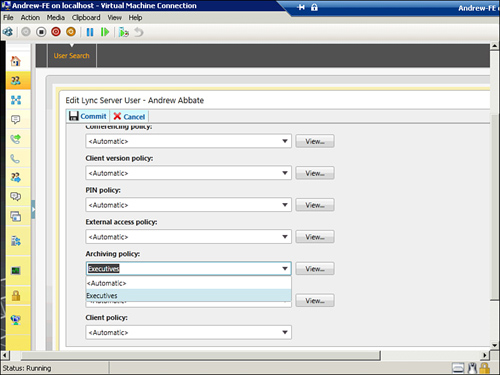
3. | Double-click the user you want to modify.
|
4. | Scroll down to Archiving Policy and choose the policy you want to apply from the drop-down list, as shown in Figure 2.
|
5. | Click Commit.
|
Note
It is worth highlighting
the Archiving Configuration option Block instant messaging (IM) or web
conferencing sessions if archiving fails. This is what Microsoft refers
to as critical mode.
If archiving this content is deemed critical by an environment, usually
due to regulatory compliance, this option prevents the possibility of
unarchived IMs or web conferences from occuring.
Using PowerShell for Configuration Tasks
For
administrators who prefer to do all their configuration tasks through
PowerShell, Lync Server 2010 supports the capability to read and modify
the archive policy and archive configuration through cmdlets:
Get-CsArchivingConfiguration
Identity                   :Global
EnableArchiving            :ImAndWebConf
EnablePurging        :True
PurgeExportedArchivesOnly:False
BlockOnArchiveFailure      :True
KeepArchivingDataForDays   :14
These cmdlets can be
modified through Set-CsArchivingConfiguration. For example, the
following cmdlet updates the archive retention period to 15 days.
Set-CsArchivingConfiguration –Identity Global –KeepArchivingDataForDays 15
For the policy, use Get-CsArchivingPolicy:
Identity                   :Global
Description          :
ArchiveInternal            :True
ArchiveExternal            :True
This cmdlet returns the same set of information for each policy that has been defined.
To modify a policy, use Set-CsArchivingPolicy as shown in the following example:
Set-CsArchivingPolicy –Identity Global –ArchiveExternal:$False
Note
The use of the $ indicates that
the ArchiveExternal is looking for a Boolean value. As such, using
–ArchiveExternal:0 would have the same effect.
Using Cmdlets for Configuration Tasks
As one might logically expect, the policies and configurations can also be created through cmdlets, for example:
New-CsArchivingConfiguration –Identity "site:New York" –EnableArchiving
ImAndWebConf –EnablePurging:$True –PurgeExportedArchivesOnly:$False
–BlockOnArchiveFailure:$False –KeepArchivingDataForDays:21
–ArchiveDuplicateMessages:$False
Notice the last argument set in
this command—ArchiveDuplicateMessages. This is a good example of where
there are options available through the cmdlets that aren’t exposed to
the GUI tools.
The power of using cmdlets
to manage an application, such as Lync Server 2010, becomes readily
evident when you are dealing with a large implementation. By scripting
the configuration of the entire environment, you are able to eliminate
the human error introduced by having a distributed group of people
perform repetitive tasks. Similarly, the script written to perform the
configuration immediately becomes the documentation of the
configuration. If later changes need to occur, you can perform queries
to find the objects and modify them at the same time. If you plan to
manage the environment in this manner, it becomes helpful to put some
thought into a logical naming convention for policies and
configurations. This enables you to search on some common value in the
policies and configurations to select them for modification.
In a similar manner,
PowerShell-based cmdlets make it easy to pull configuration reports
from a large implementation. For example, imagine that your company
announced a policy that all IMs will be retained for at least 30 days.
More than likely, someone will ask you to make sure all your
configurations retain messages for at least 30 days. Rather than
scrolling through the GUI to find configurations with values under 30,
you could simply run a cmdlet such as the following to produce a report
of all configuration where the CachePurgingInterval is less than 30
days:
Get-CsArchivingConfiguration | Where {$_.CachePurgingInterval –lt "30"} | select
Identity
However, if you were going to do that, why not fix it all on one shot?
$Array=Get-CsArchivingConfiguration | Where {$_.CachePurgingInterval –lt "30"}
Foreach ($Name in $Array)
{
$Var = $Name.Identity
Set-CsArchivingConfiguration –Identity $var –CachePurgingInterval:30
}
This
report searches all configurations in the topology and sets any that
have a CachePurgingInterval of less than 30 to 30 without touching any
that were already higher than 30.