SMS Service Account
SMS creates the SMS
Service account during setup, and it’s the primary service account for
the SMS site. It provides the site server with access to most SMS
services running on the site server as well as on other site systems, including the SMS Executive, SMS Site Component Manager, and the SMS SQL Monitor services.
If you chose to
install SMS in standard security mode, SMS can create the account for
you, and it calls it SMSService by default. This account is made a member of the local
Administrators group on the site server and the domain’s Domain Users
global group, and it’s granted the Log On As A Service and Act As Part
Of The Operating System user rights for the site server as well.
However, if your site is
running in advanced security mode, the SMS site server uses the Local
System account to provide access to the same SMS services rather than
create a separate SMSService account.
If you’re
running in standard security mode and need to modify the SMS Service
account name or password that you or SMS created, follow these steps:
1. | Create
the new account or modify the existing account using Active Directory
Users And Computers. Be sure that any new account is a member of the
local Administrators group on the site server and the domain’s Domain
Users global group. Also be sure that you have given the account the
Logon As A Service and Act As Part Of The Operating System user rights
on the site server.
|
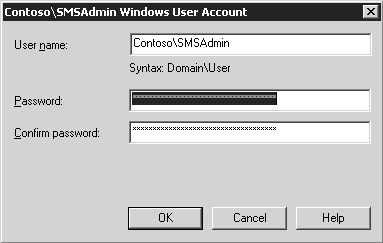
2. | In
the Site Properties’ Accounts tab, click the Set button in the SMS
Service Account frame to display the Windows User Account dialog box, as
shown in Figure 6.
|
3. | Enter the new account name in the form domainname\username,
and then enter and confirm a password. Click OK to save your changes
and then click OK again to close the Site Properties dialog box.
|
Alternatively, you
can let SMS create the new account for you or specify the new account
for SMS to use by running the SMS Setup program in the Systems
Management Server program group. To do so, follow these steps:
1. | From the Systems Management Server program group, on the Start menu, choose SMS Setup.
|
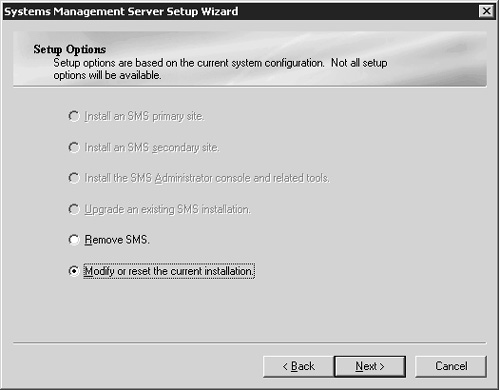
2. | From
the Setup Wizard Welcome page, click Next twice to get to the Setup
Options page. Select the Modify Or Reset The Current Installation
option, as shown in Figure 7.
|
3. | Click Next to display the SMS Security Information page, as shown in Figure 8. Enter the new account and password that you have created and want SMS to now use or that you want SMS to create for you.

|
4. | Click
Next to pass through the rest of the pages (unless you need to make
other modifications), and then click Finish on the final page. SMS will
prompt you to confirm the creation of the new account. Click Yes.
|
SMS will create the
account, make it a member of the appropriate groups, grant it the
appropriate rights, and reset the service account for the site server
and its services. The new account will then be displayed in the SMS
Service Account field when you open the Site Properties’ Account tab.
Caution
Microsoft
recommends using Site Reset to notify the site server of any changes to
either the SMS Service account or the SQL Server account rather than
making the changes through the Accounts tab Set buttons. |
Tip
If
you’re using advanced security, SMS will use the Local Security account
as its service account. However, if you must run SMS in standard
security, be sure to exercise appropriate security with the SMS Service
account. It does, after all, have administrative access across the
domain as well as in the SMS site. Use an identifiable name as well as a
complex password, preferably using some combination of alphanumeric and
special characters (for example, gle43kaz$) In addition, consider
making the SMS Service account a direct member of the local
Administrators group on each site system (client access point, server
locator point, and so on). By doing this, you can remove the account
from the Domain Admins global group for the domain so that this account
won’t affect the security of other systems in the domain. |
When SMS attempts to
access a site system in another Windows domain, SMS uses the SMS Service
account you specified to complete its tasks. If your site server and
site systems are in separate Windows domains, particularly in a mixed
mode Windows environment (supporting both Windows NT 4 and Windows 2000
servers and domains), the SMS Service account you specify must have
access to the other Windows domains. This access can be accomplished by
using Windows trust relationships or pass-through authentication.
If the Windows
domain that contains the site system trusts the site server Windows
domain, you can use the same SMS Service account you (or SMS) created in
the site server Windows domain to access the site system. All the rules
apply, of course. Be sure that the SMS Service account from the trusted
domain is a member of the trusted domain’s Domain Admins global group,
or make it an explicit member of the local Administrators groups on the
site system in the trusting domain and grant it the appropriate user
rights.
Note
Recall that all Active Directory domains in the same forest automatically maintain two-way transitive trusts. |
If no trust
relationship exists between the two Windows domains, you must duplicate
the SMS Service account in the site system’s Windows domain, giving it
the appropriate group access and user rights. Duplicating the account
means creating an account with the same name and password so that SMS
can use pass-through authentication to access the site system.
Running
SMS in advanced security presupposes that all your SMS servers have
been upgraded to Windows 2000 or higher and participate in a native mode
Active Directory forest structure. In this case, SMS will use the
directory to locate and connect to site systems in different domains.
SQL Server Account
The SMS 2003 site
server uses the SQL Server account to gain access to the SMS database
and this account is created during setup. The SQL Server account varies
depending on the type of SQL Server security implemented during the
setup. If SQL Server is using SQL Server authentication, you could
specify the default sa account or another SQL login ID that you create
and configure. If SQL Server is using Windows authentication, SMS will
use whatever account the SMS administrator logs on with to access the
database.
Note
If SMS 2003 is installed using the Express Setup, SMS uses the SQL sa login ID as the SQL Server account by default. |
There should be
little need to modify this account. However, if you must change the
account that SMS uses, you should follow the same basic steps and
cautions as you would for changing the SMS Service account above. After
you’ve created or modified the account, you can inform SMS to use it by
following these steps:
1. | In
the Accounts tab, click the Set button in the SQL Server Account frame
to display the SQL Server Account dialog box, which resembles the one
shown in Figure 6.
|
2. | Enter
the new SQL account user name, and then enter and confirm a password.
Click OK to save your changes and then click OK again to close the Site
Properties dialog box.
|
Alternately, run a Site Reset from SMS Setup and provide the updated SQL Account information when prompted.
More Info
If
your working knowledge of creating the SQL Server account falls short,
you might want to attend a training class on SQL Server. |
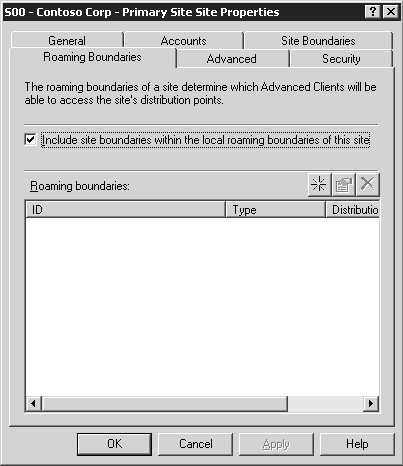
The Roaming Boundaries Tab
The Roaming Boundaries tab, shown in Figure 9,
allows you to configure boundaries for roaming Advanced Clients that
will allow those clients to access the site’s distribution points. Use
the action buttons to add a new roaming boundary, view and edit the
properties of a selected roaming boundary, or to delete a roaming
boundary.
To add a new roaming boundary, follow these steps:
1. | In the Roaming Boundaries tab, click the yellow star button to display the New Roaming Boundary dialog box.
|
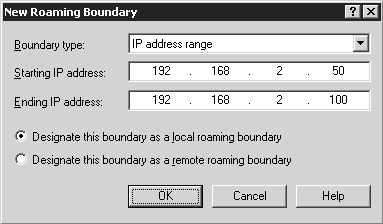
2. | Select
the boundary type you wish to add from the Boundary Type drop-down
list: IP Subnet, Active Directory Site, and IP Address Range.
|
3. | Enter the appropriate information for the boundary type you selected. Figure 10 shows the entries for an IP address range.
|
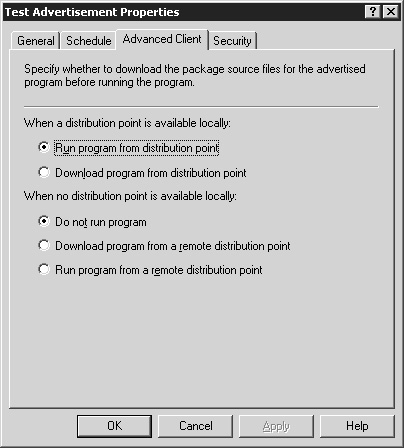
4. | The
Designate This Boundary As A Local Roaming Boundary and Designate This
Boundary As A Remote Roaming Boundary options let you specify whether
the roaming Advanced Client should treat this site’s distribution as
local or remote. If the local option is selected, the distribution
points will be designated as local, and the Advanced Clients will use
the When A Distribution Point Is Available Locally setting you choose in
the Advanced Client tab of the Advertisement Properties shown in Figure 11
when it receives an advertisement. If this local option is not is not
selected, the Advanced Client will use the When No Distribution Point Is
Available Locally setting you choose in the Advanced Client tab of the
Advertisement Properties. This option can be useful when the roaming
boundaries you specify represent slow or unstable links to the network.
|
5. | Click OK to save your changes.
|
The Advanced Tab
The Advanced tab, shown in Figure 12,
allows you to specify two options for dealing with child sites. By
default, all new SMS 2003 sites use private/public key pairs to sign
data that’s sent between sites. The option Publish Identity Data To
Active Directory, enabled by default, ensures that this SMS data is
published in the Active Directory. Using private/public key pairs helps
to ensure that potentially harmful data is rejected when sent between
sites within your SMS hierarchy. However, this data signing is not
enabled for SMS 2.0 sites that haven’t been upgraded to SP 5 or higher.
If you haven’t disabled signed communications between
SMS 2003 sites, select the option Do Not Accept Unsigned Data From
Sites Running SMS 2.0 SP 4 And Earlier to ensure that those sites don’t
send unencrypted data to their parent sites. If you need to maintain
down-level SMS 2.0 sites within your site hierarchy, and you want those
sites to continue to report data, such as inventory, discovery
information, and status messages, to your SMS 2003 site, you’ll need to
disable signing of data between that site and its SMS 2003 parent; in
this case, disable the previous option.
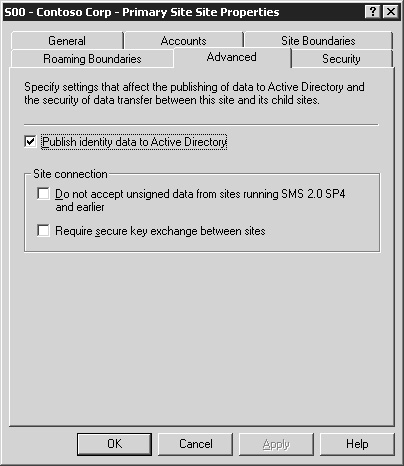
Select the option
Require Secure Key Exchange Between Sites to ensure that communication
is allowed only when keys can be securely exchanged between sites. If
you wish to enable data to be sent without this data signing process,
leave this option cleared.
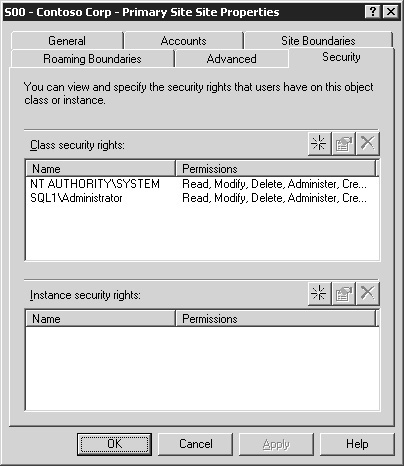
The Security Tab
The Security tab, shown in Figure 13,
displays the current security rights for the Site Properties object.
Every object in the SMS database has both class and instance security
that can be applied. Applying security to SMS objects is similar to
creating an access control list (ACL) for Windows files, folders, or
shares. To set object class security rights, click the yellow star
button in the Class Security Rights frame to display the Object Class
Security Right Properties dialog box. You can specify permissions such
as Administer, Create, or Delete by selecting the boxes in the
Permissions list. To set object instance security rights, click the
yellow star button in the Instance Security Rights frame and follow the
same procedure for setting the class security rights.
Site Settings
Typically, you’ll
think of SMS site settings and component attributes such as client agent
settings, site addresses, site systems and their roles, and so on, as
properties of the site, and rightly so since these settings are indeed
specific to each site. However, as you’ve seen, these other settings
aren’t part of the Site Properties dialog box for an SMS 2003 site. The
SMS 2003 Site Properties dialog box might better be thought of as
relating to the site object properties than to settings and attributes
of components within that site.
To access the
component settings, expand the Site object in the console tree and then
expand the Site Settings object. Under the Site Settings object, you’ll
find SMS 2003 component settings, as we discussed above.