At some point you might need to remove an SMS 2003
site server for one reason or another. Perhaps you’re moving your site
server to another computer, or perhaps you need to remove a component.
The removal process consists of three main parts: removing the site
server client software, removing the SMS site server components, and
cleaning up the server. This last task generally consists of removing
any leftover SMS accounts, folders and files, and registry keys.
Removing the SMS Site Server Client Software
When
SMS 2003 installs your SMS site server, it doesn’t automatically
install the SMS client software on it. However, if you chose to install
the SMS client components on the SMS site server yourself, then the
first step in uninstalling your primary site is to remove the client
piece. You may have installed either the Advanced Client or the Standard
Client software on your site server. The steps to remove each client
are different. Let’s start with the Standard Client. To remove the
Standard Client software from the site server, follow these steps:
1. | Start the Windows Registry Editor (Regedt32.exe or Regedit.exe).
Caution Modifying the Windows registry without due caution is like signing your server’s death warrant. Be careful! |
|
2. | Find and highlight the following key: HKEY_LOCAL_MACHINE\ Software\Microsoft\SMS\Client\Configuration\Client Properties.
|
3. | Choose
Edit from the Registry Editor menu, and then choose Add Value to open
the Add Value dialog box. Enter SMS Client Deinstall as the Value Name,
select REG_SZ as the Data Type, and click OK to open the String Editor
dialog box.
|
4. | In the String Editor dialog box, enter True and then click OK.
|
5. | Close the Windows Registry Editor.
|
6. | Start the Services console from the Administrative Tools program group and find and highlight the SMS Client Service entry.
|
7. | Right-click
SMS Client Service and choose Restart. Restarting the SMS client
service causes it to reread the registry and find the deinstall value
you entered. This initiates the deinstall process. Once the service
starts, close the Services console.
|
Only a user with
administrative credentials on the computer can remove the Advanced
Client software. Remove the Advanced Client software by using the
Ccmclean.exe tool. This tool is available for download on the Microsoft
Web site at http://www.microsoft.com/smserver/downloads.
If you monitor
processes through Windows Task Manager, you’ll notice that the deinstall
process has begun. This might take several minutes to complete—when the
SMS client service (Standard Client) or the SMS Agent Host service
(Advanced Client) is no longer running, the deinstall process will be
complete. You can see whether this service has completed deinstallation
by checking the Control Panel for the absence of the Systems Management
icon or checking the Task
Manager for the absence of the process file Clisvcl.exe (Standard
Client) or Ccmexec.exe (Advanced Client).
You can actually use
these same processes to remove the SMS client software from any Windows
computer. Once the client components have been removed from the site
server, you can proceed to the next task at hand—removing the site
server components.
Removing the Primary Site Software
To remove a primary site, follow these steps:
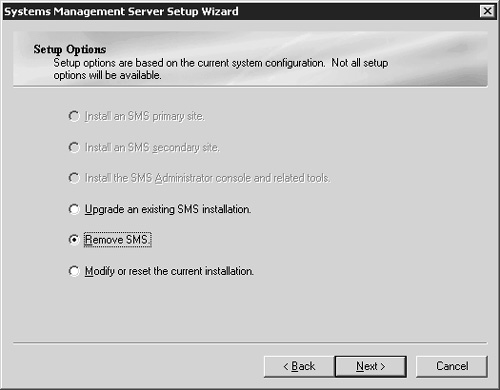
1. | Initiate
SMS 2003’s uninstall process by executing SMS 2003 Setup.exe from the
SMS 2003 CD or by running the SMS Setup from the Systems Management
Server program group on the site server.
|
2. | From the Setup Options page, shown in Figure 1, select Remove SMS.
|
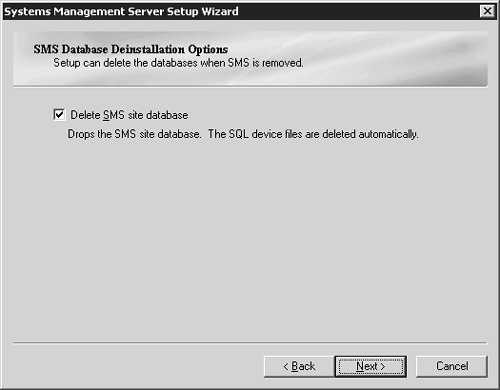
3. | Click Next to display the SMS Database Deinstallation Options page, as shown in Figure 2.
Here you’re given the opportunity to delete the SMS database as part of
the removal process. Clear the check box if your intent is to reinstall
the site server and point it to the existing database.
|
4. | Click Next and then click Finish to complete the removal process.
|
The SMS 2003 removal
process will uninstall SMS services and components, remove the SMS
Administrator Console, and remove the Systems Management Server program
group. However, it will not completely remove all vestiges of SMS 2003
from your server. You’ll need to attend to three areas of cleanup:
removing folders and files, removing Windows registry keys, and removing
SMS accounts and groups. We’ll look at how to perform this cleanup
next.
Removing Folders and Files
Use Windows Explorer
to search for the drive on which SMS 2003 was installed. If you still
see the SMS folder, delete it and all its subdirectories. Remember that
any non-SMS files or folders in the SMS folder will be removed also. To
avoid the removal of non-SMS data, be sure that SMS is installed in a
folder that doesn’t hold any other data, preferably off the root
directory. You might also find the following folders on this drive: CAP_sitecode, if the site server was assigned the CAP site system role, and one or more SMSPkgx$ directories (x
represents the drive letter) if the site system was assigned the
distribution point site system role. All SMS-related folders should have
been removed when you ran the Remove SMS option in Setup. Nevertheless,
be sure to confirm that they’re gone.
You can choose to
install SMS client software on the site server. The Standard Client
component files are stored in a subfolder named MS created in the
operating system
folder, %Systemroot%\MS. The Advanced Client component files are
generally stored in a subfolder named CCM created in the System32
subfolder in the operating system folder, %Systemroot%\System32\CCM.
However, if the site server is also the management point, the CCM folder
might be created in the same folder as the management point files. The
client removal process should have already cleaned out these subfolders,
but it’s good practice to check for their existence and remove them if
necessary.
Under %Systemdrive%\System32,
delete all SMSSetup.* files, smsmsgs, and smsexec_PROCHIST.DAT. In
%Systemroot%, delete SMSCFG.ini (only present if SMS 2003 client
components are not installed on the computer).
Under C:\Documents and
Settings, delete all profiles with an SMS prefix. Also, remove the
SMSPKG folder on the SMS installation drive if one exists. After these
folders and files have been deleted, you must then turn your attention
to the registry. SMS does add several entries to the registry. However,
the uninstall process doesn’t completely remove them. The next section
discusses how to clean up the registry.
Removing SMS Windows Registry Keys
Using the Windows
Registry Editor (with all due caution, of course), find the
HKEY_LOCAL_MACHINE\Software\Microsoft key. Within this key, remove the
NAL and SMS subkeys if they exist. Then find the HKEY_LOCAL_MACHINE\
System\CurrentControlSet\Services key and be sure to delete any service
keys beginning with SMS, if any exist.
Now that we have
cleaned up the leftover folders, files, and registry keys, we have one
final task left to perform. SMS uses many accounts and groups to perform
different tasks. We have so far talked about only the SMS Service
account.
Removing SMS Accounts and Groups
Through the Local
Users And Groups node in the Computer Management console on Windows 2000
or Server 2003 member servers or through the Active Directory Users And
Computers MMC on domain controllers, find and remove any user or group
accounts that begin with SMS.
The number of accounts and groups will vary, depending on how you
configured your primary site. If you created any additional accounts of
your own for use with SMS, be sure to delete those as well.
After
you perform these cleanup steps successfully, your server should be
free of any leftover SMS folders, files, registry keys, and accounts. Be
sure to review the entire process before you remove your site servers
and perhaps create a checklist for yourself of the tasks involved.
Always pay particular attention when editing or deleting any registry
key to avoid errors.