The first step in configuring your new SMS 2003 site
is to identify which clients should become members of the site. SMS 2003
determines which clients should be assigned to the site according to
the site boundaries you configure. You can assign SMS clients to only
one site. SMS 2003 site boundaries are defined by either IP subnet or
Active Directory site. A subnet is a segment of a network whose members
share the same network address and is distinguished from other subnets
by a subnet number and subnet mask. An Active Directory directory
service site defines a physical relationship among domain controllers
based on their IP subnets and represents a unit of optimum network
performance for Active Directory replication and authentication.
Don’t confuse site
assignment with the discovery process. SMS uses any of several
configurable discovery processes to “look for” and record an instance of
a resource. A resource might be a client computer. However, it might
also be a user; a global group; an Active Directory user, group or
system; or an IP-addressable device such as a switch or a network
printer. Discovering a resource doesn’t make it an SMS client. A client
computer can’t become an SMS client until it has been assigned to an SMS
site based on the IP subnet or the Active Directory site with which
it’s associated. Once it has been assigned, it can then be installed
with the SMS client software. To sum up, the SMS site server can
discover clients as a site resource, but does not necessarily have to
install them immediately. Likewise, it can install them as SMS clients
without discovering them first. But in all cases, a client must be
assigned to an SMS site before it can be installed.
Site systems, on the other
hand, do not need to be located within the boundaries of the site with
which they’re associated—unless, of course, they will also become
clients of that site. In some cases, site system roles can be shared
across sites, or SMS clients can reference site systems that are members
of another SMS site in the site hierarchy.
You can configure
two kinds of boundaries: site boundaries and roaming boundaries. The
main difference between the two has to do with the kind of SMS client
support that will be provided. SMS 2003 supports two kinds of clients: Legacy Client
and Advanced Client. Legacy Clients are SMS 2.0-type clients and may
include Microsoft Windows NT 4.0 SP6 and Windows 98 Second Edition
computers. Advanced Clients are Windows 2000 and higher computers that
participate fully in Active Directory. Site boundaries are used to
assign Legacy Clients to the site based on their IP subnet or Active
Directory site association. Using Active Directory sites to define site
assignment provides you with the easiest way to assign new clients that
join the network regardless of their IP address.
Note
The
Advanced Client software is actually installed on a potential SMS
client using SMS package distribution, Client Push Installation, or by
manually installing the client. |
For
example, if you use only IP subnets, every time a new client or set of
clients joins the network, in addition to associating them with an
appropriate Active Directory site, you must ensure that the IP subnets
of those clients is represented in the site boundary for the appropriate
site. However, if you’ve defined the site boundary based on Active
Directory sites, you need only associate the new clients with the
appropriate Active Directory site. The SMS site will already “know” that
the SMS client should be assigned to it.
Roaming boundaries are
used to support Advanced Clients that can—and do—move from site to site
and might not have access to a distribution point in the site to which
they’re assigned. Advanced Clients use roaming boundaries to locate
distribution points in other sites in the SMS hierarchy that can provide
them with distributed programs. Like site boundaries, roaming
boundaries can be defined by IP subnet, Active Directory sites, or both.
However, because Advanced Clients can access the network by a variety
of connection methods, such as a RAS server or a VPN, you can also use
IP address ranges to define a roaming boundary.
When you configure
the site boundaries for a site, all the client agent settings that you
define will be applied to all the assigned clients when the SMS software
is installed. In other words, agent and component settings are
site-wide settings and apply equally to all members of the site. If
different sets of clients require different client components, you might
need to create a separate site for those clients. For example, if 100
out of 1000 clients require Software Metering to be enabled, and the
remaining clients do not, you need to segment these clients into their
own subnet, create an SMS site for that subnet, assign those 100 clients
to that site, and enable Software Metering for that site. There are
ways to get around this limitation, of course, both supported and
unsupported. Nevertheless, your goal as an administrator should not be
how to “get around” a product’s boundaries. This is one of the reasons a
well-conceived deployment strategy will be extremely valuable to you as
you construct your SMS site hierarchy.
When
you use IP subnets to determine site assignment, SMS 2003 checks the
client’s discovery record to see whether the client’s IP address falls
within the IP boundaries set by the SMS administrator. It does so by
checking the client’s subnet mask. (The subnet mask determines the
subnet address for that segment of the network.) Checking the client’s
subnet mask is significant because most companies don’t use a subnet
mask of 255.255.0.0 or something similar to define their network
segments. In fact, they likely will use a mask such as 255.255.248.0 to
segment the network into different subnets for organizational reasons,
network routing considerations, security, localization of resources, and
so on. Using
a subnet mask such as 255.255.0.0 makes it easy for us to identify the
subnet address. With this particular mask, every number in the third and
fourth octets will constitute a host device address. Every number in
the first and second octets will constitute a different IP subnet
address. For example, consider these two IP addresses: 172.16.20.50 and
172.16.10.50. Using subnet mask 255.255.0.0, it’s easy to see that
they’re both in the same subnet. If you set the SMS site boundary to
172.16.0.0, you’ll be sure to discover and assign both clients. Now
take the same two IP addresses, but use subnet mask 255.255.248.0
instead. This subnet mask places each client address into a different
subnet. If your site boundary is 172.16.8.0, it will discover and assign
clients whose IP addresses fall within the range 172.16.8.1 through
172.16.15.254. Thus the client with address 172.16.10.50 would be
assigned and the client with address 172.16.20.50 would not. To include
the latter client, you would need to add its subnet
address—172.16.16.0—to the site boundaries. You
might need to refresh your IP addressing skills to fully appreciate the
significance of subnet masking and SMS 2003. But rest assured, the
subnet mask does make a difference. Now
consider using Active Directory sites as your SMS site boundary.
Without going into a lengthy discussion about Active Directory sites,
suffice it to say that they also depend in part on subnet objects. These
subnet objects consist of both subnet addresses and masks. This makes
it easier to associate computer objects with a particular Active
Directory site and so makes it easier for the SMS administrator to
assign those clients to an SMS site. |
|
Configuring Site Properties
In SMS 2003 you can
configure other site properties besides site boundaries, including site
accounts and security.
To display the site properties for an SMS site, follow these steps:
1. | Open the SMS Administrator Console.
|
2. | Under
the Systems Management Server group, expand the Site Database node, and
then expand the Site Hierarchy node to display the site object (in the
form, sitecode—sitename).
|
3. | Right-click
the site object and choose Properties from the context menu. Or,
highlight the site object, and from the Action menu choose Properties to
display the Site Properties dialog box for the site, as shown in Figure 1. Let’s start with the General tab.
|
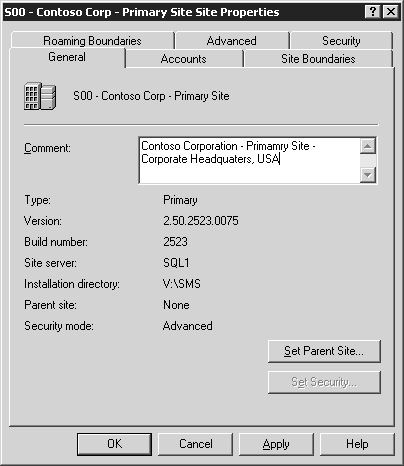
The General Tab
The General tab displays some descriptive information about your site server. For example, in Figure 3-1
we can see that the site server is a primary site. We can identify its
version and build numbers, the server name, the SMS installation
directory, and the current security mode. We can also see whether this
site participates in a site hierarchy as a child site to another site.
Since in Figure 3-1
the Parent Site label is set to “None,” we can conclude that this site
is either a stand-alone site, since it has no parent site, or that it
might be the central or topmost site in an SMS site hierarchy. You use
the Set Parent Site button to identify the parent site that this site
should communicate with in an SMS site hierarchy.
Descriptive comments
always add value to objects in SMS 2003, as they help provide additional
information that might otherwise not be available. In this case we can
use the Comment text box to indicate the name of the company (Contoso
Corporation), its site hierarchy role (Primary Site), and its location
(Corporate Headquarters—USA).
If you installed your
site using standard security mode, you can switch to advanced security
mode by clicking the Set Security button. When you do, the Set Security
Mode dialog box shown in Figure 2 is displayed. Note the requirements for switching to advanced security as outlined in this dialog box.
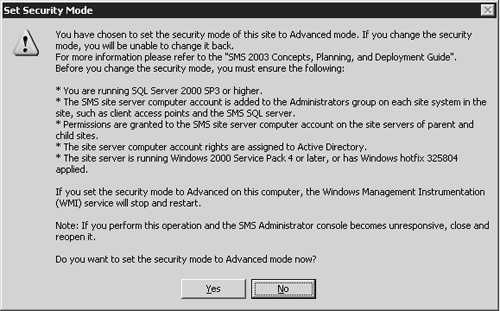
Be
sure that these requirements are set before you change security modes.
Note too that this is a one-time option. Once you change to advanced
security mode you cannot change back to standard security. The Set
Security button becomes disabled (as displayed in Figure 1).
The Site Boundaries Tab
To configure the site boundaries, complete the following steps:
1. | Click the Site Boundaries tab in the Site Properties dialog box, as shown in Figure 3. The IP subnet of the segment in which the site server was installed will be displayed by default.
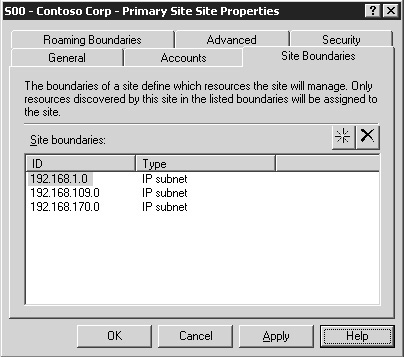
|
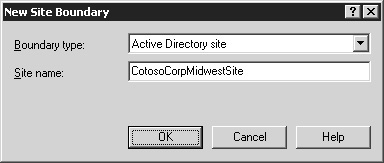
2. | To
add a new IP subnet or Active Directory site, click the yellow star
button on the right to open the New Site Boundary dialog box, as shown in Figure 4. Select a Boundary type from the drop-down list and enter either the subnet ID or the Active Directory Site name (shown in Figure 4) as appropriate. Then click OK.
|
3. | The
new boundary will be displayed in the Site Boundaries list in the Site
Boundaries tab. Click OK or Apply to save your changes.
|
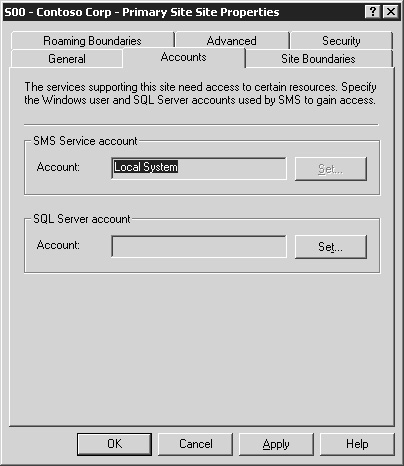
The Accounts Tab
SMS 2003 in standard
security mode makes use of several accounts to access other sites,
install clients, install packages, access the database, generate
reports, and so on. The Accounts tab, shown in Figure 5,
provides the SMS administrator with the means of modifying two accounts
specific to the site itself: the SMS Service account and the SQL Server
account.