1. Animating text opacity
You’ll take the animation of the director’s name a
little further by having it fade onscreen as the letters expand. To do
this, you’ll animate the layer’s Opacity property.
1. | Select the Your Name Here layer in the Credits timeline.
|
2. | Press T to reveal only the layer’s Opacity property.
|
3. | Go to 7:10, and set the Opacity to 0%. Then click the stopwatch icon ( ) to set an Opacity keyframe. ) to set an Opacity keyframe.
|
4. | Go to 7:20, and set the Opacity to 100%. After Effects adds a second keyframe. Now, the letters of the director’s name should fade in as they expand onscreen.
 |
5. | Drag
the current-time indicator across the time ruler between 7:10 and 8:10
to see the letters of the director’s name fade in as they spread out.
 |
6. | Right-click (Windows) or Control-click (Mac OS) the ending Opacity keyframe, and choose Keyframe Assistant > Easy Ease In.
|
7. | Choose File > Save.
|
2. Using a text animator group
Text animator groups let you animate individual
letters within a block of text in a layer. You’ll use a text animator
group to animate only the characters in your middle name without
affecting the tracking and opacity animation of the other names in the
layer.
1. | In the Timeline panel, go to 8:10.
|
2. | Hide the Opacity property for the Your Name Here layer. Then expand the layer to see its Text property group name.
|
A text animator group includes one or more selectors and one or more animator properties.
A selector is like a mask—it specifies which characters or section of a
text layer you want an animator property to affect. Using a selector,
you can define a percentage of the text, specific characters in the
text, or a specific range of text.
Using a combination of animator properties and
selectors, you can create complex text animations that would otherwise
require painstaking keyframing. Most text animations require you to
animate only the selector values—not the property values. Consequently,
text animators use a small number of keyframes even for complex
animations.
For more about text animator groups, see After Effects Help.
|
|
3. | Next
to the Text property name, click the Animate pop-up menu, and choose
Skew. A property group named Animator 2 appears in the layer’s Text
properties.
|
4. | Select Animator 2, press Enter or Return, and rename it Skew Animator. Then press Enter or Return again to accept the new name.
|
Now you’re ready to define the range of letters that you want to skew.
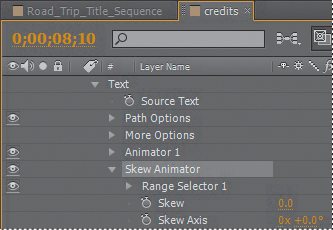
5. | Expand
the Skew Animator’s Range Selector 1 properties. Each animator group
includes a default range selector. Range selectors constrain the
animation to particular letters in the text layer. You can add
additional selectors to an animator group, or apply multiple animator
properties to the same range selector.
|
6. | While
watching the Composition panel, drag the Skew Animator’s Range Selector
1 Start value up (to the right) until the left selector indicator ( ) is just before the first letter of your middle name (the B in Bender, in this example). ) is just before the first letter of your middle name (the B in Bender, in this example).
|
7. | Drag the Skew Animator’s Range Selector 1 End value down (to the left) until its indicator ( ) is just after the last letter of your middle name (the r in Bender, in this example) in the Composition panel. ) is just after the last letter of your middle name (the r in Bender, in this example) in the Composition panel.
 |
Now, any properties that you animate with the Skew Animator will affect only the middle name that you selected.
Skewing the range of text
Now, make that middle name shake and shimmy by setting Skew keyframes.
1. | Drag
the Skew Animator’s Skew value left and right, and notice that only the
middle name sways. The other names in the line of text remain steady.
|
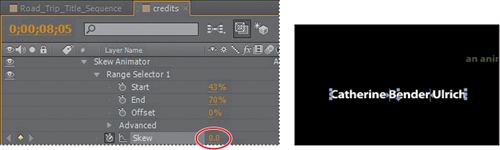
2. | Set the Skew Animator’s Skew value to 0.
|
3. | Go to 8:05, and click the stopwatch icon ( ) for Skew to add a keyframe to the property. ) for Skew to add a keyframe to the property.
 |
4. | Go to 8:08, and set the Skew value to 50. After Effects adds a keyframe.
 |
5. | Go to 8:15, and change the Skew value to -50. After Effects adds another keyframe.
 |
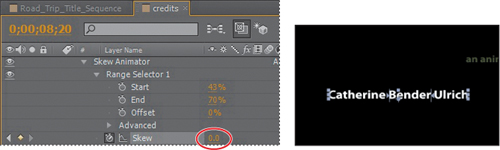
6. | Go to 8:20, and change the Skew value to 0 to set the final keyframe.
 |
7. | Click
the Skew property name to select all of the Skew keyframes. Then choose
Animation > Keyframe Assistant > Easy Ease. This adds an Easy
Ease to all keyframes.
|
8. | Drag
the current-time indicator across the time ruler from 7:10 to 8:20 to
see how the director’s name fades in and expands onscreen, and the
middle name rocks side to side while the other names are unaffected.
|
9. | Hide the properties for the Your Name Here layer in the Timeline panel.
|
10. | Select the Road_Trip_Title_Sequence tab to open its timeline.
|
11. | Press
End, or move the current-time indicator to 9:29. Then press N to set
the end bracket for the work area at the end of the composition.
Tip
To quickly remove all text animators from a text
layer, select the layer in the Timeline panel and choose Animation >
Remove All Text Animators. To remove only one animator, select its name
in the Timeline panel and press Delete.
|
12. | Press Home or go to 0:00, and then play a RAM preview of the entire composition.
|
13. | Press the spacebar to stop playback, and then choose File > Save to save your work. |