IT tutorials
 
Graphics
 

Adobe Fireworks CS5 : Working with Vector Graphics - Customizing fills and strokes (part 4) - Adding to the skyline, Adding windows to the building

5/30/2013 3:57:39 AM
- Free product key for windows 10
- Free Product Key for Microsoft office 365
- Malwarebytes Premium 3.7.1 Serial Keys (LifeTime) 2019

Adding to the skyline

Now it’s time to add the new building.

1.
Click away from the current building and make sure nothing else is selected.

2.
Choose the Rectangle tool from the Vector tools section of the Tools panel, and near the right side of the canvas, draw a rectangle that is 106 pixels wide by 500 pixels tall.

3.
Select the Zoom tool and draw a marquee that includes the top of the large rectangle and some space above it.

4.
Select the Rectangle tool again. Then, in the Properties panel, click the Add/Union icon.

5.
Draw a second, short rectangle at the top of the first one. Don’t worry about position or size; you will adjust that next.

If you switch to the Pointer tool, you will see that both rectangles are selected.

6.
Choose the Subselection tool and click on the small rectangle.

7.
Drag the small rectangle until it sits flush on the top of the larger shape and is centered side to side. Smart Guides will help you with this positioning.

8.
Repeat steps 5–7, this time drawing a slightly smaller rectangle. The Add/Union attribute remains in place until you deselect the current compound shape.

9.
Zoom out until you can see the entire building.

Adding windows to the building

It’s time to add the windows. We’ll make use of the History panel to speed up this process, but first we need to create one set of windows.

Note

Selecting the compound shape is just a way to make sure you are adding the other shapes to the correct object. Once you choose the Rectangle tool, the compound shape is no longer selected. This is normal.


1.
Make sure your building is still selected and then choose the Rectangle tool again if necessary.

2.
Change the Compound Shape tool attribute to Subtract/Punch and draw a rectangle that is 20 × 40 pixels. When you release the mouse, a hole is punched through the main rectangle. Remember you can always adjust the dimensions in the Properties panel.

Note

The act of punching one vector through another can also be done using the Path panel or the Modify menu, but doing so requires multiple steps and is a destructive process. Punching one vector through another is normally a three-step operation: draw the punching shape, select both shapes, and then use the Path panel or Modify menu to perform the action. This workflow permanently changes the vectors by combining them into a single composite path. You did the same thing in just two steps, and the objects remain unique and editable!

3.
Using the Subselection tool, position the rectangle about 13 pixels from the left edge and 26 pixels from the top edge of the main rectangle.

4.
Press Ctrl+Shift+D (Windows) or Command+Shift+D (Mac) to create a clone of the window.

5.
While holding down Shift, press the Down arrow key five times.

6.
Open the History panel (choose Window > History) and locate the last two steps, Clone and Move.

7.
Hold down the Shift key and click on Clone and Move to select them both.
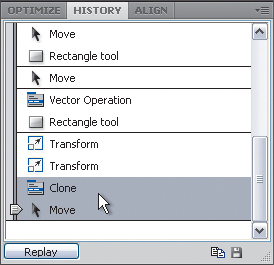
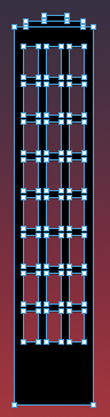
8.
Press the Replay button six times to create your first column of windows.

9.
Choose the Subselection tool, and while holding down Shift, click on all of the windows to select them.

10.
Clone the selected group of windows.

11.
Hold down Shift and press the Right Arrow key three times.

12.
Repeat steps 10 and 11 using the new column of windows.

13.
Select the Pointer tool and drag your new building until the bottom lines up with the bottoms of the other buildings. Again, Smart Guides display a horizontal dashed line when the building matches up with the others.
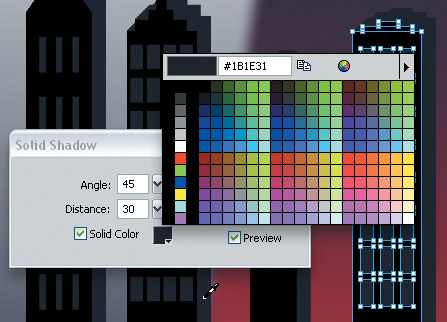
14.
One last step is to apply the solid shadow to this new building. Make sure the object is selected with the Pointer tool, and then choose Shadow And Glow > Solid Shadow from the Live Filters menu in the Properties panel.

15.
Leave the Angle and Distance settings as they are, but enable the Solid Color option.

16.
To make sure the new shadow has the same color as the others, click on the Color fill box and then place your cursor over one of the other shadows and click to sample that color exactly. Until you add the correct solid color, the whole object turns black.

17.
Click OK.

Your skyline is complete!

18.
Unhide the foreground layer and save your file.

This has been a big lesson, but vectors are a large part of the creative toolset in Fireworks and it’s important that you get comfortable with the tools. Although we did not work with the Auto Shapes panel, we recommend you have a look at the panel and check out the prebuilt vector shapes that are included with Fireworks.
 
Others
 
- Adobe Fireworks CS5 : Working with Vector Graphics - Customizing fills and strokes (part 3) - Using the Compound Shape tool, Working with compound shapes
- Adobe Fireworks CS5 : Working with Vector Graphics - Customizing fills and strokes (part 2) - Customizing the stroke, Importing and resizing a vector object
- Adobe Fireworks CS5 : Working with Vector Graphics - Customizing fills and strokes (part 1) - Adding a gradient fill
- Adobe Flash Professional CS5 : Working Within the Flash Environment - Setting General Preferences
- Adobe Flash Professional CS5 : Working Within the Flash Environment - Creating Keyboard Shortcuts
- Adobe Flash Professional CS5 : Working Within the Flash Environment - Creating a Workspace
- Adobe InDesign CS5 : Working with Objects and Layers - Repeating Object Transformations
- Adobe InDesign CS5 : Working with Objects and Layers - Arranging Object Stack Order, Transforming Objects
- Adobe InDesign CS5 : Working with Objects and Layers - Distributing Objects
- Adobe Illustrator CS5 : Working with Objects - Using the Free Transform Tool
 
 
Top 10
 
- Microsoft Visio 2013 : Adding Structure to Your Diagrams - Finding containers and lists in Visio (part 2) - Wireframes,Legends
- Microsoft Visio 2013 : Adding Structure to Your Diagrams - Finding containers and lists in Visio (part 1) - Swimlanes
- Microsoft Visio 2013 : Adding Structure to Your Diagrams - Formatting and sizing lists
- Microsoft Visio 2013 : Adding Structure to Your Diagrams - Adding shapes to lists
- Microsoft Visio 2013 : Adding Structure to Your Diagrams - Sizing containers
- Microsoft Access 2010 : Control Properties and Why to Use Them (part 3) - The Other Properties of a Control
- Microsoft Access 2010 : Control Properties and Why to Use Them (part 2) - The Data Properties of a Control
- Microsoft Access 2010 : Control Properties and Why to Use Them (part 1) - The Format Properties of a Control
- Microsoft Access 2010 : Form Properties and Why Should You Use Them - Working with the Properties Window
- Microsoft Visio 2013 : Using the Organization Chart Wizard with new data
Technology FAQ
- Is possible to just to use a wireless router to extend wireless access to wireless access points?
- Ruby - Insert Struct to MySql
- how to find my Symantec pcAnywhere serial number
- About direct X / Open GL issue
- How to determine eclipse version?
- What SAN cert Exchange 2010 for UM, OA?
- How do I populate a SQL Express table from Excel file?
- code for express check out with Paypal.
- Problem with Templated User Control
- ShellExecute SW_HIDE
programming4us programming4us