2. Transforming symbols with the 3D Rotation tool
The 3D Rotation tool
enables you to spin objects around the x, y, or z-axis and creates the
illusion of depth by skewing and scaling your graphics based on the
degree of rotation and the vanishing point and perspective angle
settings. Figure 4
shows a simple rectangle with a drop shadow added (top) and the result
of a 45-degree rotation applied along the x, y, and z-axis,
respectively.
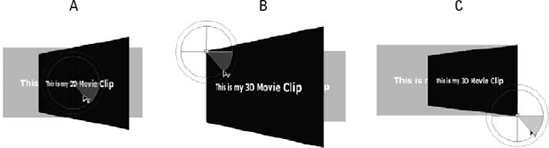
To apply the 3D Rotation tool
(W), activate it in the Tools panel, then select a symbol on the Stage.
When you select a symbol with the 3D Rotation tool, a target overlay
(shown in Figure 4)
appears, guiding you in moving the symbol in 3-D space. The red
vertical crosshair enables x-axis rotation, the green horizontal
crosshair enables y-axis rotation, the inner blue circle enables z-axis
transformation, and the outer orange circle enables free transformation
(around the x- and z-axis at the same time). To rotate an object, click
and drag from the guide that represents the axis you want to use —
dragging clockwise adds a positive transformation, and dragging
counterclockwise adds a negative transformation. An object can be
rotated around any axis from 0 degrees to 360 degrees in a positive or
negative direction. When you release the mouse, you will notice that the
3D Position in the Properties panel updates, and if you have the
Transform panel open (Window => Transform), you can see the exact degree of rotation in the 3D Position and View section of the panel.
NOTE
If you rotate an object
more than 180 degrees, Flash automatically updates the values in the
Transform panel to the smallest equivalent value. For example, applying a
positive transformation to rotate an object 190 degrees around the
x-axis has the same end result as applying a negative transformation to
rotate it −170 degrees, so after you release the mouse and apply the
transformation, Flash updates the value in the x-axis field of the
Transform panel to be −170 degrees rather than 190 degrees.
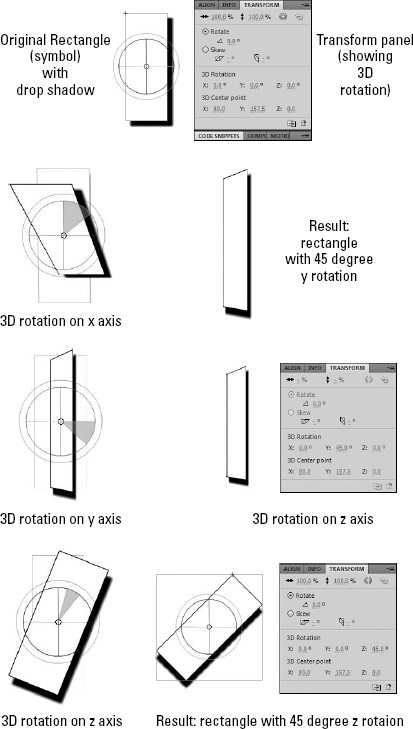
The final result of 3-D
rotation is affected by the location of the 3-D center point. The 3-D
center point is indicated by the white dot at the center of the 3-D
target overlay when the 3D Rotation tool is active and a 3-D symbol is
selected. The default location for the 3-D center point is at the center
of the selected symbol. Click and drag to reposition the center point
(or transformation center point) to another location on your current
symbol or even outside of the symbol. Moving the 3-D center point away
from the center of the symbol increases the arc of any 3-D rotations —
this can be helpful for specific effects but it can also make it more
likely that your symbol will move dramatically and end up outside the
viewable Stage area. Double-click the 3-D center point dot to reset it
to the center of the symbol. If you prefer to set rotation values in the
Transform panel, select the symbol you want to modify and use the hot
text fields for x-, y-, and z-axis in the 3D Rotation section of the
panel. You can also modify the location of the 3-D center point by using
the hot text fields for x-, y-, and z-axis in the 3D Center point
section of the Transform panel. Figure 5
shows the difference in result when the same rectangle is rotated
around the y-axis with three different 3-D center point locations.
|
The Remove Transform button
at the bottom-right corner of the Transform panel returns your symbol to
its unmodified state with just one click. The Duplicate Selection and
Transform button beside the Remove Transform button makes an exact copy
of your current selection — but be warned that you won't notice until
you move the copy because it will be stacked on top of your original.
|
|
Symbols can be rotated in
global space (relative to the main Stage drawing area), or if they are
nested Movie Clips, they can be rotated in local space (relative to the
container Movie Clip's drawing area). The toggle for global or local
rotation is at the bottom of the Tools panel when the 3D Rotation tool
is selected — the default setting is for global rotation.
|
You can temporarily toggle
the 3D Rotation tool from global mode to local mode while dragging to
move a symbol along any axis by pressing the D key.
|
|
To rotate multiple objects
simultaneously, activate the 3D Rotation tool (W) in the Tools panel,
and then select multiple symbols on the Stage (Shift+click or drag a
selection field around multiple items). The Rotation guides/target will
be centered on the most recently selected item. All the selected symbols
rotate around the 3-D center point, which appears in the center of the
guide. To change the position of the 3-D center point, you can do any of
the following while you have a selection active on the Stage:
Drag the center point to a new location.
Shift+double-click any of the current symbols to move the center point to that symbol.
Double-click the 3-D center point to auto-position it at the center of the current group of selected symbols.
Change the values for the x, y, z location of the 3-D center point in the Transform panel.
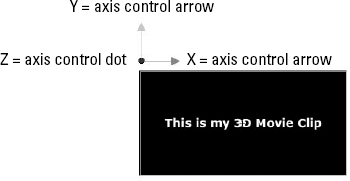
3. Moving symbols with the 3D Translation tool
The 3D Translation tool
enables you to move objects forward and backward in space along the
z-axis, left and right in space along the x-axis, and/or up and down in
space along the y-axis. For nested Movie Clips, 3D Translations can be
global (relative to the main Stage) or local (relative to the parent
Movie Clip's drawing area). To apply the 3D Translation tool (G),
activate it in the Tools panel, then select a Movie Clip on the Stage.
As shown in Figure 6,
the 3D Translation tool consists of two arrow guides for moving along
the x- and y-axis and a center blue dot for moving along the z-axis.
Click the head of the red horizontal arrow and drag your object left or
right along the x-axis. Click the head of the green vertical arrow and
drag your object up or down along the y-axis. Click the blue dot and
drag your object forward or back along the z-axis. To reposition the
guides for the 3D Translation tool, press and hold Alt/Option and then
click and drag the blue dot to a new location. Double-clicking the
center blue dot auto-positions the guides back at the center of your
symbol.
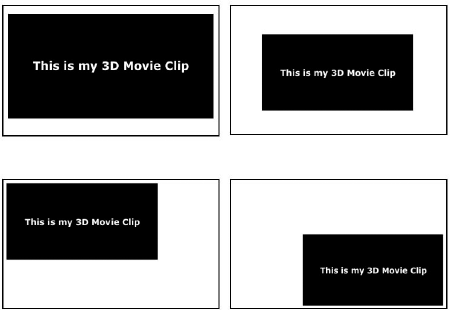
Changes to the location of
your 3-D symbol updates the x, y, and z values in the Position and View
section of the Properties panel. These values are also hot text fields,
so you can position your 3-D symbol by changing the values directly in
the Properties panel. Moving an object along the z-axis changes its
apparent size relative to the Stage. The apparent width and height also
appear in the 3D Position and View section of the Properties panel, but
these are read-only values, unlike the original width and height values
in the Position and Size section of the Properties panel, which are
editable hot text fields. You can also move multiple items
simultaneously with the 3D Translation tool; Refer to the instructions
for the 3D Rotation tool in the previous section.