IT tutorials
 
Graphics
 

Adobe InDesign CS5 : Working with Frames and Shapes - Understanding Frames Versus Shapes

2/2/2015 2:52:31 AM
- Free product key for windows 10
- Free Product Key for Microsoft office 365
- Malwarebytes Premium 3.7.1 Serial Keys (LifeTime) 2019

The frame/shape relationship can be confusing to new InDesign users, especially those coming over from QuarkXPress. I can’t tell you how many times I’ve been asked, “Why does the Tools panel have two rectangles? Which one is for text and which one is for graphics? How do I draw a text box?”

By definition, a frame is a container that holds either an image or a body of text. A shape is not intended to be a text or image container, but can be converted into one.

In Quark language, this means that the box tool with the X in it (the Rectangle Frame tool) is used to draw picture boxes. The box without the X (the Rectangle tool) is used for drawing shapes. Finally, text boxes can be drawn with the Type tool.

In InDesign, both rectangle tools (frame and shape) can be used to draw a picture box or a text box. Frames can be shapes and shapes can be frames, and you do not have to draw a box first before placing an image. Despite this flexibility, you should be aware of some differences when working with the frame and shape tools.

Frames

Frames are containers that can hold either a placed image or a body of text. If you prefer to draw frames first before placing content in them, you can do so with the Rectangle, Ellipse, or Polygon Frame tools, and also with the Type tool. If you prefer to 
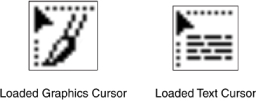
paste content first and resize frames later, you can place graphics (or text) by applying the File, Place command (Cmd-D or Ctrl+D). When you do so, InDesign automatically draws a frame for you when you click the loaded cursor anywhere on the page.

Figure 1. The loaded graphics cursor (left) and the loaded text cursor (right).


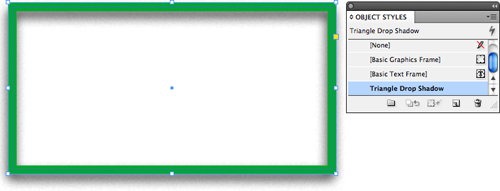
You can also apply saved attributes, called object styles, to newly drawn empty frames . By default, whenever you create a frame using any of the Frame tools, InDesign automatically applies the None object style to it.

Figure 2. A selected rectangle frame with the default, non-editable None object style (neither graphic nor text frame) applied to it.

Shapes

You draw shapes using the Rectangle, Ellipse, or Polygon tools. You can draw custom shapes by using the tools available in the Pen toolset, or draw freeform shapes with the Pencil tool.

You can save assigned shape attributes as object styles and later apply them to other shapes or frames (empty or with content). InDesign also enables you to select an object style from the Control panel Object Styles drop-down list, or from the Object Styles panel, and apply it to a shape as you draw it with the tool . This is something you cannot do when working with frames.

Figure 3. A selected rectangle shape with a saved object style applied to it.

Whenever you create a shape using any of the Shape tools, InDesign automatically applies the document default object style to it. When you first launch InDesign, the default object style is [Basic Graphic Frame]. To select a different object style to use as the document default, deselect all objects (Edit, Deselect All) and click an object style name from the Object Styles panel or from the Control panel Object Styles drop-down list.

 
Others
 
- Adobe Flash Professional CS5 : Importing Graphics - Using Trace Bitmap to Create Vector Shapes
- Adobe Flash Professional CS5 : Importing Graphics - Editing a Bitmap with the Magic Wand
- Adobe Flash Professional CS5 : Importing Graphics - Modifying a Bitmap Fill - Change the Center Point
- Adobe Flash Professional CS5 : Importing Graphics - Using Break Apart to Create Fill Patterns
- Adobe Flash Professional CS5 : Importing Graphics - Setting Bitmap Compression
- Adobe Dreamweaver CS5 : Working with Divs and AP Elements - Placing div Tags (part 3)
- Adobe Dreamweaver CS5 : Working with Divs and AP Elements - Placing div Tags (part 2)
- Adobe Dreamweaver CS5 : Working with Divs and AP Elements - Placing div Tags (part 1)
- Adobe Dreamweaver CS5 : Working with Divs and AP Elements - Divs and AP Elements 101
- Adobe Illustrator CS5 : Working with Paths (part 3) - Understanding how fills and strokes relate to paths
 
 
Top 10
 
- Microsoft Visio 2013 : Adding Structure to Your Diagrams - Finding containers and lists in Visio (part 2) - Wireframes,Legends
- Microsoft Visio 2013 : Adding Structure to Your Diagrams - Finding containers and lists in Visio (part 1) - Swimlanes
- Microsoft Visio 2013 : Adding Structure to Your Diagrams - Formatting and sizing lists
- Microsoft Visio 2013 : Adding Structure to Your Diagrams - Adding shapes to lists
- Microsoft Visio 2013 : Adding Structure to Your Diagrams - Sizing containers
- Microsoft Access 2010 : Control Properties and Why to Use Them (part 3) - The Other Properties of a Control
- Microsoft Access 2010 : Control Properties and Why to Use Them (part 2) - The Data Properties of a Control
- Microsoft Access 2010 : Control Properties and Why to Use Them (part 1) - The Format Properties of a Control
- Microsoft Access 2010 : Form Properties and Why Should You Use Them - Working with the Properties Window
- Microsoft Visio 2013 : Using the Organization Chart Wizard with new data
Technology FAQ
- Is possible to just to use a wireless router to extend wireless access to wireless access points?
- Ruby - Insert Struct to MySql
- how to find my Symantec pcAnywhere serial number
- About direct X / Open GL issue
- How to determine eclipse version?
- What SAN cert Exchange 2010 for UM, OA?
- How do I populate a SQL Express table from Excel file?
- code for express check out with Paypal.
- Problem with Templated User Control
- ShellExecute SW_HIDE
programming4us programming4us