Shooting
on film is still a valid choice. Film offers greater flexibility for
low-light situations, and it offers some aesthetic options not afforded
by digital capture. Many purists swear that shooting film adds richness
in detail and color, as well as introduces subtle nuances like film
grain, which cannot be replicated with a digital camera. Additionally,
many pictures that you’ll need to work with might only exist on
traditional media (such as prints) or as a negative. You’ll need to use a
scanner to turn these optical formats into digital formats.
Note: Other Applications
Digital
photographers who have large collections of digital images to manage
will often use a library management application. Two of the most popular
are Adobe Lightroom and Apple Aperture. Both have excellent integration
with Adobe Photoshop.
Choosing a Scanner
If you work in a computer lab or
other work environment, your choice in scanners may have already been
made for you. However, it is still important to understand the different
types of scanners that are available to consumers.
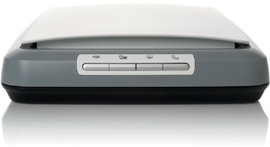
Flatbed scanners
The most common scanner type is
a flatbed scanner on which photos are loaded face down on a piece of
glass. The scanner then moves a charge-coupled device (CCD) across the
image to capture/digitize the image. High-quality scans can greatly
increase the amount of data that is captured. So, be sure to look at
high-speed scanner-to-computer connection options. For a modern
computer, FireWire or USB 2 are the best options.
Be sure to pay close
attention to the optical resolution of the scanner: This is the maximum
size of the image before using software interpolation to enlarge it.
Most users doing intermediate-level work or desktop publishing find a
scanner capable of 600 to 1200 spi to be adequate. Remember, samples per
inch can translate fairly well into pixels per inch. It is a good idea
to have more pixels to start with, and then reduce the size of the image
for delivery.
| Output Method | Typical ppi |
|---|
| Onscreen (Web/slides) | 72–96 | | Laser printing | 150–250 | | Newsprint | 120–170 | | Offset printing | 250–300 | | High-quality offset printing | 300–600 |
|
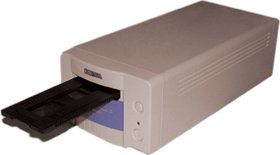
Film/slide scanners
Specialized scanners load
in slides or film negatives. These scanners use a tray to hold the
material, and then a motor pulls the tray slowly across an optical
sensor. This process is relatively slow due to the resolution needed.
The scanner must capture a lot of data from a very small surface area to
produce a usable image. These scanners are slightly more expensive than
flatbed scanners but are essential if you frequently work with slides
or negatives.
Drum scanners
When top image quality is a
must, pros turn to drum scanners. These units are very expensive
(starting at $5,000 and increase significantly). This is the oldest
scanning technology. It calls for the image to be mounted on a drum. The
drum is then rotated in front of a photomultiplier tube. The tube is
much more sensitive than the CCDs used in flatbed scanners. Drum
scanners’ primary advantage is resolution, and they should be used when
you need to significantly enlarge a scanned image (such as museum
archival pieces or for magazine output). Because the machines are
expensive and very complex (as well as potentially destructive), users
will often send images to a service bureau for drum scanning.
A
drum scanner is a highly specialized piece of equipment. These machines
are very expensive and are usually found only in high-end service
bureau facilities.

What Size to Scan? Think in Pixels
People
often get confused when determining which settings to scan with. Too
little information and the picture goes soft. Too much information and
the scanner slows to a crawl. The answer is to know your intended output
resolution as well as your device.
Tip: Need a Scanner?
Many all-in-one printers
combine a printer and scanner, essentially creating a fax machine and
photocopier in the process. Be sure to check if your printer offers
scanning software to load your traditional photos. You can also rent
scanners at many local photocopy shops.
For example, if you need to
create a 20-inch-wide poster that will be printed on a high-quality
press requiring 300 ppi, use this calculation:
20 (inches) × 300 (ppi) × 1.25 (pad for flexibility) = 7500 pixels
Do
not adjust your scanner’s dpi (or ppi) settings. Rather, crop the image
after running a preview scan. You can then adjust the scanner’s
resolution by looking at the output size of the scanned file. As you
adjust the output file size, the scanning software will automatically
determine the appropriate settings for samples per inch. All scanners
tell you just how many samples you are about to capture. Looking at
these numbers gives you a truer sense of the end result. Total pixel
count is much more important than dpi, especially when scanning images
of various original sizes.