Begin with a close-up photo of someone you
don’t know so that you’re not influenced by your feelings for (or
against) the person. It’s a good idea to avoid young children (their
faces aren’t developed yet) and exceptionally good-looking people (for
so many reasons, including damage to your self-esteem). Find the photo
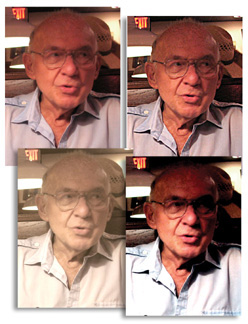
you want to work with, or join me in using this candid (unposed)
headshot of JohnG. The original, available in the People > Heads
folder on the CD, is on the upper left of Figure 1.
The directional lighting makes it a good choice for drawing and
painting, and I like the soft focus. I made a sharpened version, too,
with Effects > Focus > Sharpen. In the Sharpen dialog, choose the
Gaussian aperture and set the amount around 11. Sharpening reveals more
texture and color variation in the skin. That could prove interesting
later on.
|
Did
I warn you not to increase the resolution of an image without
decreasing its size proportionally? That’s because you usually won’t be
improving quality. Well, here’s an exception to that. If you have a
small and/or low-resolution image to use as a clone source for a drawing
or painting, increase the resolution as much as you like before you create the clone copy. Your brush strokes (whether using Clone Color or not) will be at the higher resolution.
|
Two Heads Are Better Than One
We will create a couple of portraits of John in
different styles. I prepared two preliminary versions from the
Underpainting Palette. They are shown in the bottom row of Figure 1.
The Sketchbook Color Scheme is on the left. The other version has two
Underpainting effects applied simultaneously: Modern Color Scheme and
Desaturate from the Photo Enhance list. These prepared images are also
provided in the People > Heads folder.
Be Prepared
Let’s begin with a sketch using just two colors,
dark brown for shadows and white for highlights, with tinted paper for
mid-tones. Here are the basic steps for
setting up this type of sketch:
- Pick a neutral gray from the color picker or sample a medium tone from the source photo.
- Use Canvas > Set Paper Color.
- Make a Quick Clone of the source image (yes, the blank background will be the new paper color).
- Choose your paper texture, brush variants, and color set.
- Practice a few strokes on a blank canvas and, if needed, adjust tablet sensitivity with Brush Tracking.
I’ll
use Charcoal Paper for this drawing, but you might like something
smoother or rougher. There is a custom palette available in the Palettes
and Libs folder on the CD, though you probably don’t need that much
hand-holding anymore. It’s called Tonal Sketch and has Square Chalk (14
pixels), Sharp Charcoal Pencil 5, and Pastel Pencil 3. Except for a few
broader strokes in the background, I ended up using only the Pastel
Pencil 3 for the entire sketch. I like the firm, grainy quality of this
variant.
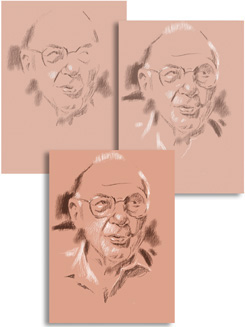
Stages in my head study are shown in Figure 2.
Using a dark color, establish the major lines and shadow shapes. Work
with strokes that vary in direction, following the planes and curves of
the face. Begin to add a few highlights with white strokes, using the
same sketchy technique. Develop the likeness by toggling tracing paper
on and off frequently and changing the opacity of tracing paper as
needed. Create visual interest by leaving out some lines or details. I
like the expression of John’s mouth in this photo, so I make that area
the focus of more detail. Avoid a solid outline around the head, which
can make the drawing look flat. My finished drawing looked a little
anemic, so I punched it up using Effects > Tonal Controls >
Brightness/Contrast. An increase in contrast along with a decrease in
brightness worked nicely.
With
only two colors, it’s easy to switch between them using the Eyedropper
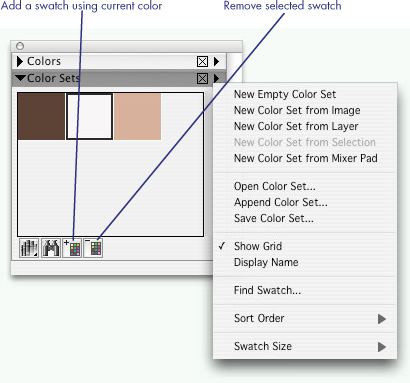
access trick (Option/Alt key) while you’re sketching. Even better, make a
color set with those two colors, plus the paper color. Open the Color
Sets Palette and use the command at the top of the popup menu: New Empty
Color Set. Figure 3
shows the menu commands and icons needed. With your dark color current,
click on the Add Color icon at the bottom of the palette. Switch to
white and click Add Color again. Sample the paper color and add it to
your new color set. Make the swatches much bigger with the Swatch Size
options at the bottom of the menu. I chose 48 × 48 pixels.
Why include paper color in your color set?
To cheat! That is, you can make corrections by
drawing over unwanted dark or white lines with the paper color. This
works only for variants that function using the Cover method, as opposed
to the Buildup method. Chalk, charcoal, and pastels all use the Cover
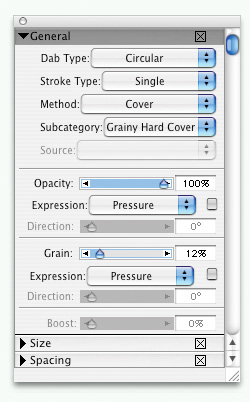
method as part of their basic behavior. To find out what method your
current variant uses, or to change it, open the General Controls by
selecting Window > Brush Controls > Show General, as shown in Figure 4.
As long as you’re up, take a peek at some of the other settings, such
as Dab Type and Stroke Type. These will make more sense when you get to
Lesson 8.