The AutoCAD Drawing (.dwg) and AutoCAD Interchange File (.dxf) Formats
The DWG and the DXF formats
are both used for exchanging files with computer-aided design (CAD)
applications. They can be especially helpful when you want to send
Illustrator artwork to architects, interior designers, or industrial
designers. Both formats support vector and raster elements.
When exporting a DXF or a DWG file (they both use the same export dialog box; Figure 6),
you can specify the version of AutoCAD you want your file to be
compatible with and the number of colors in the resulting file. If your
file contains raster elements (or if vector elements need to be
rasterized), you can choose to have them embedded as either bitmap or
JPEG files.
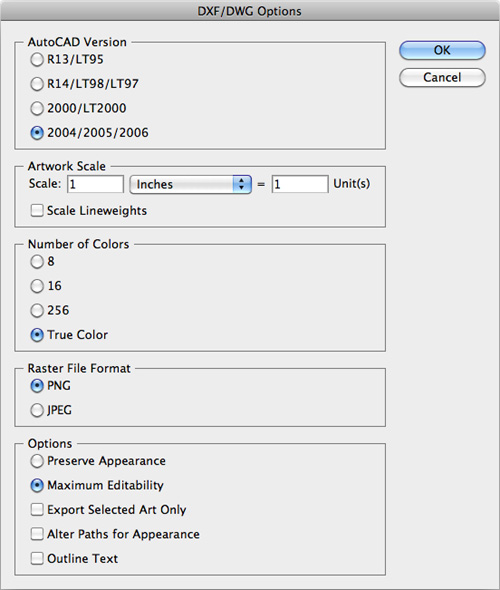
Additionally,
you can choose to export only the artwork that you currently have
selected on the artboard. Selecting Alter Paths for Appearance modifies
paths, if necessary, so that they appear when opened in a CAD
application. Additionally, you can outline all text to avoid the need to
send fonts.
The Windows Metafile (.wmf) and Enhanced Metafile (.emf) Formats
The Windows Metafile
(WMF) and Enhanced Metafile (EMF) formats were developed to move
graphics between applications on the Windows platform. These two formats
support both vector and raster elements but are severely limited with
regard to the kinds of art they can reliably display and print (EMF is
slightly better). Both formats can create only straight vector lines,
not curved ones. To make up for this, curved lines appear as numerous
tiny straight paths, which results in large files with many anchor
points. If possible, avoid using these formats for anything other than
simple artwork. You can’t specify any additional options when exporting
WMF or EMF files.
The Flash (.swf) Format
SWF is a popular web-based file
format that supports both vectors and rasters. The Flash file format has
become extremely popular because of its capability to contain
interactive or animated content. You can use Illustrator to generate a
SWF file that you want to upload directly to a website, use in a Flex
framework rich Internet application (RIA), or even place into InDesign
for creating interactive PDF files.
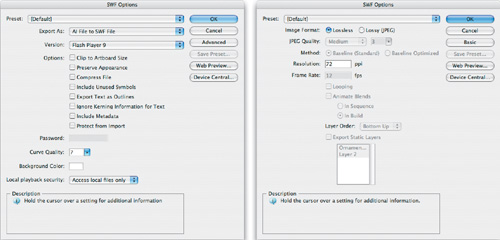
The SWF Options dialog box contains “just a few” options for creating the SWF files that are right for you (Figure 7,
on the next page). Along the right side of the dialog box are options
to save presets of SWF output settings, to preview your SWF in your
default web browser, and to preview your SWF using Adobe Device Central.
The SWF Options dialog box is actually split into two separate panels
labeled Basic and Advanced, which you can access by clicking their
respective buttons that appear underneath the Cancel button along the
right side of the dialog box.
Basic Options
The options in the Basic panel of the SWF Options dialog box are general settings that apply to most SWF files:
Export As.
You can export Illustrator files in one of four ways: AI File to SWF
File, which creates a single SWF file that contains all your Illustrator
artwork; AI Layers to SWF Frames, where each layer is converted into a
key frame, resulting in a single animated SWF file; AI Layers to SWF
Files, where each layer in your Illustrator document is exported as a
separate SWF file (useful when you are creating Flash scenes); and AI
Layers to SWF Symbols.
Version.
You can export a SWF that is compatible with any available version of
Flash Player. The default is Flash Player 9, which is present on more
than 98 percent of computers that access the Internet.
Options.
A variety of general settings appear in this section. You can choose to
export your SWF at the exact size of your artboard or active crop area.
If your file contains artwork that may not translate to the SWF format
perfectly, you can select Preserve Appearance to expand or rasterize
those areas to ensure the integrity of the appearance of your art.
Compressing a file will result in a smaller SWF. You can choose to
include all symbols in your resulting SWF (even if they aren’t used on the
artboard), have your text converted to outlines, and ignore kerning
that you may have applied to text. You can also choose to enclose
metadata (from information you’ve entered using the File > File Info
function) and protect the resulting SWF file from being opened in Flash
by applying a password.
Curve Quality. This setting controls the quality level for curved paths in the resulting SWF file.
Background Color. This setting allows you to specify a background color for the SWF file.
Local playback security. You can choose whether the SWF file can access local or network files only.
Advanced Options
The options found in the
Advanced panel of the SWF Options dialog box are settings that apply to
rasterized portions of a file and animated content:
Image Format.
If there is raster content in your file (or if flattening requires that
content becomes rasterized), you can choose how those images are stored
in your SWF file—either using a lossless format or a lossy format. If
you choose the lossy format, which is JPEG, you can choose a JPEG
quality and the Baseline setting. You can also choose the resolution you
want your raster content to use (usually 72 ppi).
The
rest of the options in the Advanced panel of the SWF Options dialog box
are specific to animated SWF content. Therefore, they are available
only when choosing the AI Layers to SWF Frames option in the Export As
pop-up menu in the Basic panel of the dialog box.
Frame Rate.
This setting controls how fast the animation plays and is measured in
frames per second (although in the context of Illustrator, they are
actually layers per second). A lower value will slow down the animation,
while a higher value will cause the animation to play faster.
Looping. Selecting this option causes the animation to repeat itself endlessly.
Animate Blends.
If your Illustrator file contains any blends, selecting this option
will automatically animate those blends in the resulting SWF file. This
setting allows you to keep blends live and editable in your Illustrator
file and still get the desired animated result. Otherwise, you would
have to use the Release to Layers function in your Illustrator file to
manually create the content necessary to create an animation. You can
choose to have blends animate either as a sequence (each frame appears
individually, one after the other) or as a build (each frame appears
successively, adding to the previous one).
Layer Order. By default, Illustrator animates layers from the bottom up, but you can alternatively select the Top Down option.
Export Static Layers.
Static layers are those that appear in every frame of the animation. If
you select this option, you can Command-click (Ctrl-click) any layers
that you want visible throughout the entire animation. For example, if
you had an animation of a bird flying across a cloudy sky, you might set
the layers that contain the sky and cloud elements to export as static
layers.