Airless Airbrush
The ideal brush
category for working with selection masks is Airbrushes. Traditional
airbrushes spray tiny droplets of pigment mixed with compressed air. The
instrument connected to that compressed air source is a metal device
with a nozzle and a small reservoir for pigment. It has a couple of tiny
wheels for finger control of the size of the spray and the density and
coarseness of the droplets. It takes quite a bit of practice to get
skilled with a traditional airbrush. Painter lets you shave months, even
years, off that process. Make a new canvas for trying out several of
the Airbrush variants.
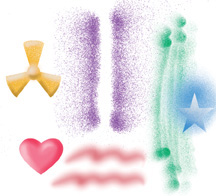
Figure 5
shows some airbrush practice. Check out the realistic response to the
tilt and bearing of your Wacom pen as you change its angle and
direction. The two purple strokes, made with the Pepper Spray variant,
were done with the pen held at a steep angle to the tablet, in opposite
directions. The green strokes show what happens when an airbrush is
moved rapidly but lingers a bit at the beginning and the end of a
stroke: pigment keeps on spraying. The blue star was made with the Fine
Wheel Airbrush. I sprayed a bit at the lower left of the selection, then
used Select > Invert so I could spray outside of the star. I
switched to the Soft Airbrush 40 to make the very smooth pink strokes
and the heart. Both the heart and the yellow propeller show a basic
technique for creating the illusion of depth: spray a slightly darker
color for the shadow side, slightly lighter for the highlights. Remember
to be consistent with your imaginary light source.
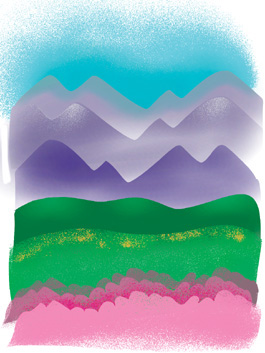
The imaginary landscape in Figure 6 was created with a combination of smooth
and coarse Airbrush variants and a few selection masks made with the
Lasso tool. A couple of the masks, “mountains” and “bushes,” were saved
for repeated use. RIFF files showing the development of this piece are
available in the Lesson 6 folder on the CD, and they include the saved
selections. When you use the Save Selection command, a new channel is
created. Open the Channels Palette, where you’ll find icons for saving,
loading, and inverting them. Those options are also available in the
Select menu.
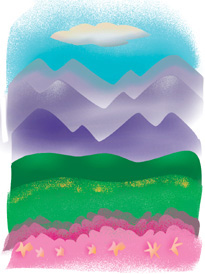
These are the Airbrush variants I used for different parts of the artwork.
Soft Airbrush 50— Mountains, dark green hills, foreground flowers, cloud.
Pepper Spray— Light green grass, snow on mountain tops, sky.
Tiny Spattery Airbrush— Yellow flowers on the green grass.
Coarse Spray— Foreground pink and fuchsia bushes.
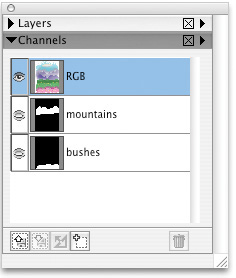
Recreate this whimsical
landscape with me. Start with a white canvas 3 × 4 inches at 300 ppi.
Open the RIFF file of the final stage. Feel free to borrow the
selection masks I saved or make similar ones with the Lasso tool—they’re
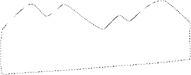
quick and easy. Figure 7 shows the Channels Palette for the completed piece, and Figure 8 has my “mountains” mask (the marching ants are resting temporarily).
Move
your Lasso selection into position with the Selection Adjuster tool.
Spray a light purplish-blue color for the furthest mountain range, then
switch to the Selection Adjuster to move the selection lower for the
next group of mountains. Use a slightly darker color for this section.
Save the selection in case you need it later. For a little variety,
before spraying the third set of mountains, I flipped the selection
horizontally. There doesn’t seem to be a way to do this automatically,
so with the Selection Adjuster tool active I dragged one edge across to
the opposite side, then pulled the second edge out the other way. Kids,
don’t try this at home…and don’t confuse this transformation with the
Invert command, which deselects all selected areas and vice versa.
I made a new Lasso
selection for the green hills. Some lighter green highlights were added
with a large-sized brush, stroking from above the selection for more
control. Figure 9 shows this technique.
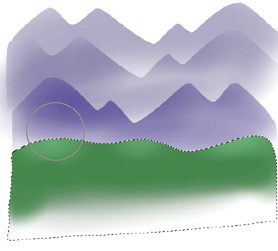
Figure 10
shows a lot of progress, with sky added and some snow sprinkled on the
mountains, aided by loading the mountain selection once again. (I knew
it would come in handy.) The foreground bushes were sprayed in using a
new selection, saved as “bushes.”
Now let’s add a fluffy
cloud, sprayed white and then given a gentle shadow and sunny glow at
its top. As a finishing touch, the foreground could use a bit of detail.
I scribbled a Lasso selection to suggest a flower shape, gave it the
shadow-and-highlight treatment, and then inverted the selection so I
could spray a darker pink behind it. A couple of these Lasso scribbles
were worth repeating, so I dragged them to a new position with the
Selection Adjuster and repeated the process. It was easy to make a few
new flower scribbles, too. I like the irregular edges of this painting,
giving the viewer a glimpse at the process. So it turns out that
airbrush art doesn’t have to be slick, smooth, and realistic. And it
doesn’t necessarily have to feature either sports cars or what used to
be called “pinup” girls.