There are several ways to add and delete pages from a
document; three ways are using menu commands, using shortcuts while
holding modifier keys, and using certain page views. However, quick is
best, and in this section, you see the most convenient way as well as
methods that are easiest to remember. You can decide for yourself which
best suits the way you work.
Inserting Pages and Setting Options
From the main menu,
choose Layout | Insert Page to open the Insert Page dialog, shown here,
which features a host of options for specifying your new page properties
and where you would like to add the new page in relation to your
existing pages.
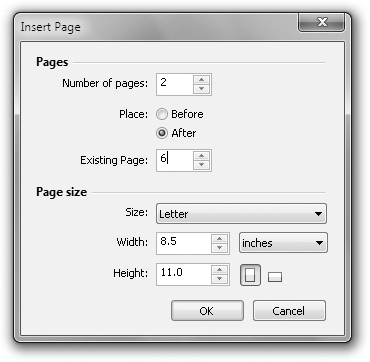
Enter the Number Of Pages
needed in the Insert Page dialog, and choose to Place them either Before
or After your current page, or between specific pages in your document
by using
the Existing Page box. You are not limited to the orientation or size
of your current page when you add pages, unlike the constraints of
traditional printed books and magazines!
Tip
To quickly add a new page to the beginning or end of your document, go to the first or last page and click the plus (+)
symbol on the left or right of the page buttons at the lower left of
your document window. To add a page before or after your current page,
right-click a page tab to the right of the + button on the right, and
choose either Insert Page Before or Insert Page After from the pop-up
menu.
Deleting Pages
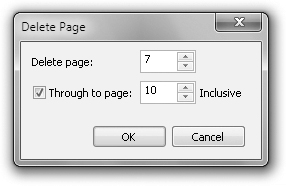
Deleting document pages can
be done by choosing Layout | Delete Pages from the main menu; you can
delete one or more of the existing pages in your document. By default,
the dialog opens to display the current page as the page in the Delete
Page box, shown next, but you may select any page before or after your
current page if you choose. To delete an entire sequence of pages, click
the Through To Page option, which enables you to delete all pages in a
range between the page specified in the Delete Page box through to any
page following your current page. Pay careful attention to the word
“Inclusive” after the last page number: if you type, for example, 10 when you want to delete pages 1–9, well, oops—there goes your day unless you press CTRL+Z immediately!
Tip
To
delete the current page, right-click the page name on the page tab, and
then choose Delete Page from the pop-up menu. There is no confirmation
when you delete a page, so make sure you’ve had your second cup in the
morning before doing this.
Moving and Duplicating Pages
You’re going to create
such fantastic content in CorelDRAW that you might never want to delete
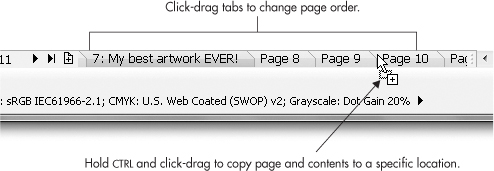
it; instead you might want to move and/or copy pages. To move a page,
use a click-drag action on the page tab to drag it to a new position. To
copy a page—and all its contents—thus creating a new page order, hold CTRL while click-dragging the page tab, dragging the page to a new position. CorelDRAW does not duplicate the name of a user-named
page; you’d wind up with an organizational nightmare if it did, so it’s
a good practice to name a duplicate page after you’ve created the copy.
Using the Page Sorter
Page Sorter is a view that
provides you with a broad look at your document and all its pages. In
this view, you can add, delete, move, or copy pages in a single view.
You can also change the Paper/Type Size and the page orientation of all
the pages or just selected pages. A CorelDRAW document can contain pages
of different sizes, which can be very handy when you are designing
matching business cards and letterhead or other similarly related
materials. To open your document and all its pages in Page Sorter view,
choose View | Page Sorter View. The Page Sorter displays all pages in
your document.
Tip
Using
Page Sorter, you can quickly export either your entire document or only
selected pages. Click to select the page(s) you want to export, and
choose File | Export, or click the Export button in the standard toolbar
to open the Export dialog. To export only specific pages, choose the
option to Export This Page Only, which by default is not selected.
Exporting is not to be confused with saving; exporting pages is usually
done to get your work into bitmap format, Adobe Illustrator file format,
or CMX (Corel Media Exchange) for sharing with users who have a
compatible application.
In Page Sorter view, a single click selects a page. Holding SHIFT while clicking pages enables you to select or deselect multiple contiguous pages. Holding CTRL
while clicking enables you to select or deselect noncontiguous pages.
The following actions enable you to apply page commands interactively to
single- or multiple-page selections, as seen in Figure 1.

Move Page(s)
To move a page and change its order in your document, click-drag the
page to a new location. During dragging, a vertical I-beam appears,
indicating the insertion point for the page or the first page of the
selected sequence of pages.
Add Page(s)
To add pages to your document, right-click any page and choose Insert
Page Before or Insert Page After from the pop-up menu to insert a page
relative to the selected page.
Copy Page(s) To copy pages—and their contents—hold CTRL
while click-dragging the page to a specific location. During dragging, a
vertical I-beam appears, indicating the insertion point for the page
copy or the first page of the selected sequence of pages.
Name or Rename Page
To add a new name or change an existing page name, click the page name
below the page to select it; click a second time to highlight the page
title and enter a new name; then press ENTER.
You can also rename a page by right-clicking a specific page and
choosing Rename Page from the pop-up menu to highlight the page name for
editing.
Change Page Size/Orientation of All Pages
In Page Sorter view, the property bar displays typical page property
options for applying standard or custom page sizes and for changing the
orientation between Landscape and Portrait.
If you want to change the orientation of all of the pages in the document, click the All Pages button on the property bar, and then click either the Portrait or the Landscape button to change all pages to that orientation.
Change Page Size/Orientation of Selected Pages
If you want to change only the orientation of some of the pages, click
the Current Page button. Then select the pages you want to change, and
click the Portrait or Landscape button to change the page(s) to the
desired orientation, as shown.
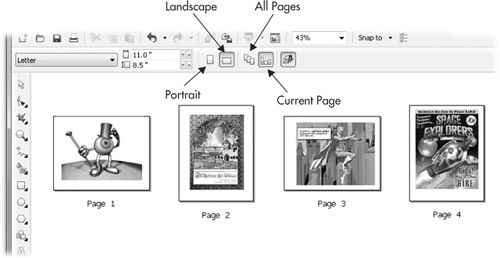
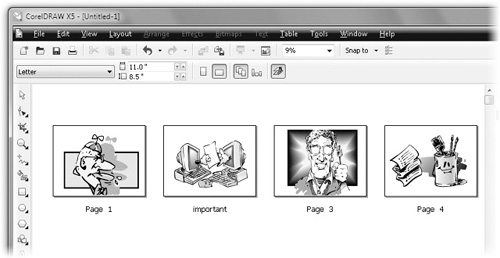
Changing the orientation in the
Page Sorter not only changes the view, but also changes how the pages
themselves are oriented in the document. As you can see, the second and
last pages have drawings that look better in Portrait view; you CTRL-click
pages 2 and 4 in this example, click Current Page, and both the Page
Sorter view and the pages themselves are reoriented. If you want to
rethink this dynamic change, repeatedly pressing CTRL+Z (Edit |Undo) restores your document.
Exiting
Page Sorter view is easily done; click the Page Sorter View button, or
click any tool on the toolbox. Any changes applied while in the Page
Sorter are applied to your document.
Tip
To exit the Page Sorter and immediately go to a particular page in your document, double-click the page.