You can modify the size and resolution of a document
after opening. However, be aware that changing the size and/or the
resolution of an image forces Photoshop to add or subtract pixels from
the image in a process called interpolation.
For example, when you change the resolution of an image from 72 ppi
(pixels per inch) to 144 ppi, Photoshop must add more pixels.
Conversely, if you reduce the resolution, Photoshop must remove pixels.
The image interpolation method determines how Photoshop completes this
process. You can use the Nearest Neighbor method for the fastest way,
but it produces the poorest visual image. Or, you can use the Bicubic
Sharper method, which takes the longest to perform, but produces the
best visual results.
Change Image Size
 Open an image.
|
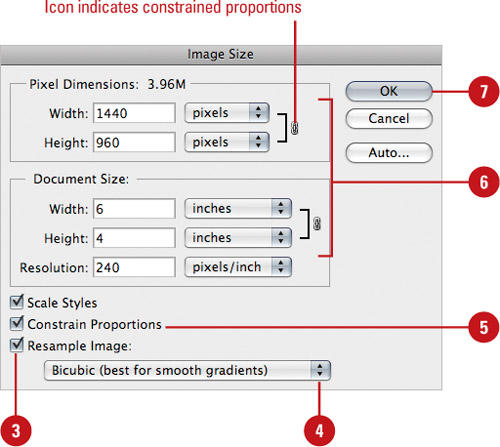
 Click the Image menu, and then click Image Size.
|
 Select the Resample Image check box.
 |
 Click the Resample Image list arrow, and then select an option:
- Nearest Neighbor. Best for quick results with low quality.
- Bilinear. Best for line art.
- Bicubic. Default, best for most purposes with high quality.
- Bicubic Smoother. Best for enlarging an image.
- Bicubic Sharper. Best for reducing an image.
|
 To maintain image proportions, select the Constrain Proportions check box.
|
 Enter the desired sizes in the image size boxes.
If you choose to constrain proportions in step 5, when you change a size, the other boxes will adjust automatically.
|
 Click OK.
|
|
Photoshop supports documents up to
300,000 pixels in either dimension, with up to 56 channels per file.
Photoshop offers three file formats for saving documents greater than 2
GB: PSB, Photoshop RAW, and TIFF. It’s important to note that most
programs, including older versions of Photoshop (before the CS version),
support a maximum file size of 2 GB.
|
Change Image Resolution
 Open an image.
|
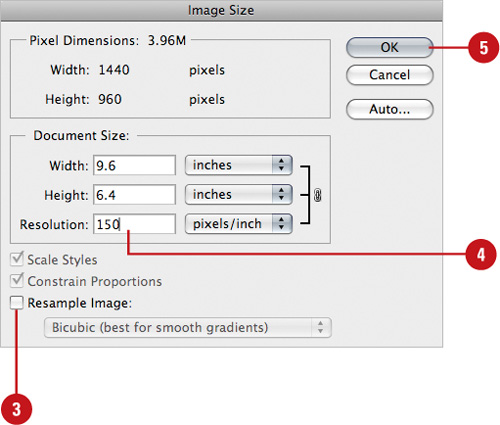
 Click the Image menu, and then click Image Size.
|
 Clear the Resample Image check box.
 |
 Enter a resolution, which automatically adjusts the Width and Height fields.
|
 Click OK.
 |
|