Every new file you create, every file your coworker shares with you, and every CorelDRAW template you use has its own set of page properties that have two attributes: physical properties and display preferences. The physical properties refer to the size, length, and color of each page. Display preferences control how page values are viewed. Let’s begin with the most common options and then move onto the more specialized features.
Controlling Page Size and Orientation
If you’ve unchecked the
“Always show the Welcome screen at launch” check box, the default size
whenever a new document is created is the CorelDRAW default, which might
depend on the language version of CorelDRAW you use. For the U.S.
author, this is U.S. Letter, 8 ½″ by 11″, but this can be changed in a
number of ways. The quickest method is via the property bar while the
Pick tool—and no objects—are selected. You must have a document in
CorelDRAW’s workspace, or you can’t access the property bar. The
property bar features options for setting your page to standard-sized
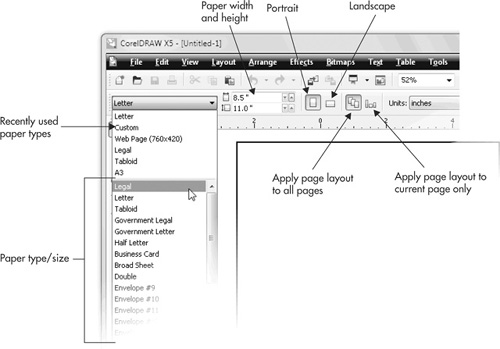
pages, custom sizes, and orientation, as seen in Figure 1.
In case you have a multi-page document, the property bar also has ways
to change all pages at once, or to change only the currently visible
page.

The Paper Type/Size
and orientation options control the format for your document. When you
have a specific format for a design you need to print, the following
sections cover the options available to you in CorelDRAW X5.
Paper Type/Size
To choose a standard page
size for your region, clicking a Paper Type/Size option in the property
bar is the quickest method; from the drop-down box, you have Letter,
Legal, Tabloid, and so on. If you have a limited need for different
paper sizes, click the Edit This List button at the bottom of the
drop-down list, and you can delete seldom-used sizes by clicking the
Delete trashcan button in the Options box. Once you’ve made a selection,
the dimensions are automatically entered as values into the Page Width
and Height boxes in the property bar.
Page Width and Height For a custom page size, type specific values directly into the Page Width and Height boxes, and then press ENTER.
Both page width and height values can be between 0.00333 and 1,800
inches. This is equivalent to 1 to 172,800 pixels if you do more web
design work than printed page layout.
Landscape/Portrait orientation
Clicking either Portrait or Landscape in the property bar while using
the Pick tool (and having no objects selected) sets the page
orientation. If the page width you enter is smaller than the page height
entered, the orientation is automatically set to Portrait, and vice
versa for Landscape. Changing from Portrait to Landscape (or vice versa)
automatically switches the values in the Page Width and Height fields.
All Pages/Current Page In
CorelDRAW X5, you can create a document up to 999 pages long, with
different pages set to any size or orientation. The All Pages and
Current Page buttons operate in “either/or” fashion like the orientation
buttons, enabling you to set the page size either for all pages in your
document at once (the default) or for only the current page. To set
only the current page to be different from the others in your document,
click the Current Page button (whose icon is different-sized pages), and
set your new page size and orientation as needed. Other pages in the
document aren’t resized when you choose this option.
Note
If
you’ve unintentionally removed a page size you need later, re-create the
page size, go to the Page Size list on the property bar, and click
Custom and Edit This List. In the Options | Page Size box that appears,
click the Save (diskette icon) button, type a name for the page, and
click OK.
Page Viewing Options
With CorelDRAW at its
default settings, when you choose File | New and click OK, you’ll see a
rectangle in the workspace. This rectangle represents your document page
in height and width. However, what you won’t
see is how your page will be printed to a personal printer or to a
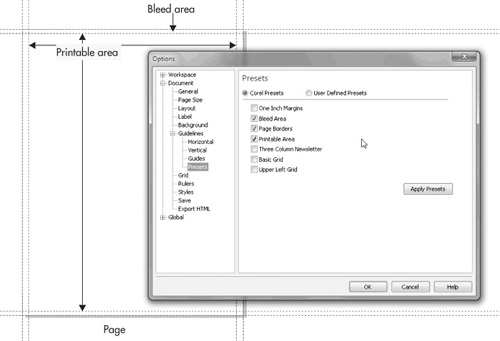
commercial press. Whenever you print, you have areas called the printable area and the bleed area.
You can add nonprinting guidelines to provide a page preview to see
those areas, so objects and text at the edges of your work aren’t
partially printed. You want these features visible when designing for
print because the grippers on printers often prevent edge-to-edge
prints. To have CorelDRAW add bleed area and printable area (safety) guides to your page, press CTRL+J,
and then choose Document | Guidelines | Presets; check the Printable
Area and Bleed Area check boxes, as shown next. The bleed area extends
to the edge of the page, and this is correct for personal printers; see
the following Note.
Note
Bleed is
the part of the printed image that extends beyond the edge of the page.
When printing to a personal printer, there is no bleed, because bleed
is only relevant when a page on a commercial press is trimmed to final
book size. For example, if a commercial press uses 12″ × 14″ paper and
the final trim size is 8 ½″ × 11″, you could set up a bleed area of 10″ ×
13″ to make a design extend to the edge of the page the audience reads.
You’ll see in the next tutorial how to create a No. 10 envelope that
features a bleed design.

Note
If you are printing to a borderless photo printer, your printable area will be the same size as your page border.
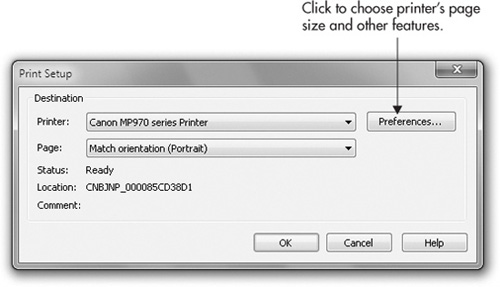
The properties of
Printable Area and Bleed Area depend on the printer options you choose
in the Print Setup dialog, opened by choosing File | Print Setup:

Tip
Setting
a bleed amount is done using Tools | Options | Document | Page Size,
using the Bleed option num box. The bleed amount can be defined anywhere
from 0 (the exact edge of your page) to 900 inches.
Creating Your Own Bleed Designs Using Your Home Printer
Suppose you have a need for an
elegant No. 10 envelope whose design bleeds at the left side. With the
knowledge you now have about bleeds and the printable page size, you can
create a bleed envelope using your home laser or inkjet printer.
Choose File | New, choose Letter as the Size, and click the Landscape orientation button. Click OK to create the new document.
Choose
File | Print Setup to access the printer’s setup features. Click the
Preferences button, and then click the paper/quality tab at the top
(note: this location may differ depending on the printer make and
model). Scroll the Paper sizes list to find Envelope #10. Click on the
finishing tab (again, the location may differ) to set page orientation
in the printer driver to Landscape to match the page orientation in the
CorelDRAW document. Click OK and return to the empty page in CorelDRAW.
Select
Tools | Options and navigate to the Guidelines | Presets section. Check
the Printable Area box to put guidelines on the page that will show the
shape of the envelope selected previously.
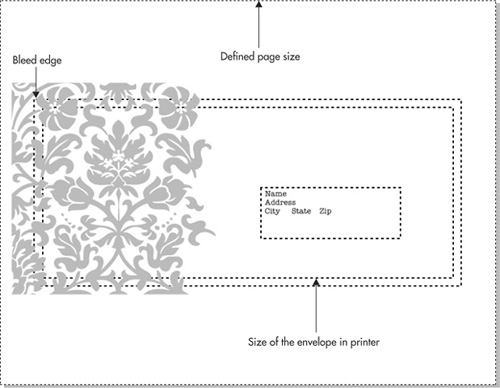
Place
your design in your page border, but overlapping the printable page
area in the position in which you want the design to bleed to the left,
as shown in Figure 2.

Add an address and then choose File | Print (CTRL+P).