Illustrator offers several options when it comes to
how you view your illustrations. This section explains how to discover
these views as well as create and customize your own views.
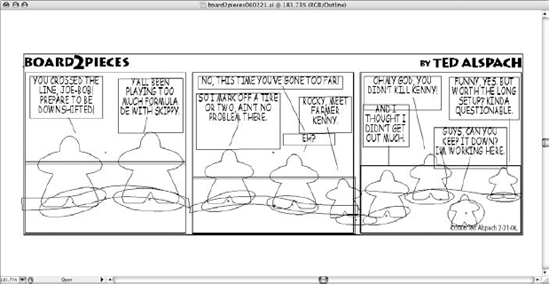
1. Working in Outline mode versus Preview mode
In the old days,
everyone worked in Outline mode (originally called Artwork mode). In
Outline mode, you see only the guts of the artwork — the paths without
the fills and strokes applied, as shown in Figure 1.
To see what the illustration looked like with the fills and strokes
applied, you had to switch to Preview mode. Usually, the preview was not
quite what you had in mind, but to make changes, you had to switch back
to Outline, then to Preview again to check, and so forth. Many users of
Illustrator from that time refer to it as the golden age — with not a
little trace of sarcasm.
Today, Illustrator allows you
to edit your work in both Outline and Preview modes. You can also print
a document from either mode. Saving the document while you're in
Outline mode doesn't affect anything in the document, but the next time
you open it, it displays in Outline mode. The same thing applies to
Preview mode: Whatever mode you're in is saved with the artwork.
You can't undo a Preview or
Outline mode change (for example, going from Preview to Outline). If you
make a Preview or Outline mode change and then close your document,
Illustrator asks you if you want to save changes, which in this case
refers only to the view change. The current view mode is always
displayed in the title bar next to the document name.
1.1. Understanding Outline mode
You may find working with a
drawing in Outline mode significantly faster than working with it in
Preview mode. In more complex drawings, the difference between Outline
mode and Preview mode is significant, especially if you're working on a
very slow computer. This is even more noticeable when the artwork
contains gradients, patterns, placed artwork, and blends. Outline mode
is much closer to what the printer sees — as paths. Paths define the edges of the objects with which you're working.
Getting used to Outline mode
can take some time. Eventually, your brain can learn to know what the
drawing looks like from seeing just the outlines, which show all the
paths. The one big advantage of Outline mode is that you can see every path
(a single entity in your drawing made up of one or more straight or
curved lines) that isn't directly overlapping another path. In Preview
mode, many paths can be hidden. In Outline mode, invisible masks are
normally visible as paths, and you can select paths that were hidden by
the fills of other objects. To select paths in Outline mode, you must
click the paths directly or draw a marquee across or around them.
To change the current document to Outline mode, choose View =>
Outline. In Outline mode, the illustration disappears and is replaced
on-screen by outlines of all the paths. Text that has yet to be
converted into outlines looks fine (not outlines, because it isn't paths — it's text), although it's always black.
NOTE
You can change how a
placed image displays in Outline mode by selecting or deselecting the
Show Images in Outline Mode option in the Document Setup dialog box. To
display the Document Setup dialog box, choose File =>
Document Setup. A placed image displays as a box if you click the Show
Images in Outline Mode check box. If you leave this check box
deselected, the image displays only in black and white and is surrounded
by a box.
1.2. Understanding Preview mode
In Preview mode, you
can see which objects overlap, which objects are in front and in back,
where gradations begin and end, and how patterns are set up. In other
words, the document looks just the way it will look when you print it.
NOTE
In Preview mode, the
color you see on-screen only marginally represents the actual output
because of the differences between the way computer monitors work (red,
green, and blue colors — the more of each color, the brighter each pixel
appears) and the way printing works (cyan, magenta, yellow, and black
colors — the more of each color, the darker each area appears). Monitor
manufacturers make a number of calibration tools that decrease the
difference between what you see on a monitor and the actual output. You
can also use software solutions. One software solution, CIE calibration,
is built in to Adobe Illustrator (choose Edit => Color Settings). Mac users can use ColorSync.
Choosing View => Preview changes the view to Preview mode.
The biggest
disadvantage of Preview mode is that Illustrator begins to draw and fill
in the various parts of your image, which can take some time,
especially if your computer is slow. When you change the image, the
screen redraws. You can stop screen redraw by pressing Ctrl+Y ( +Y) at any time.
Another disadvantage of
Preview mode is being unable to select the path you want to change in
the image. Sometimes, so much stuff appears on your screen that you
don't know what to click! This problem can become more complicated when
you include fills in the mix because the strokes on those paths are also
visible. Instead of selecting a path by clicking it, you can select
entire paths by clicking the insides of those paths in a filled area.
2. Understanding Overprint Preview mode
Drawing in Illustrator
often results in one or more objects overlapping each other, meaning
that the colors of these objects also overlap. When you print these
objects, the top color blocks, or knocks out,
anything below it. The advantage of using this feature is that your
illustration becomes cheaper and easier for a printer to generate. To
see how your overprint will look after you've set the Overprint feature,
you can view it in Overprint Preview mode by choosing View => Overprint Preview.
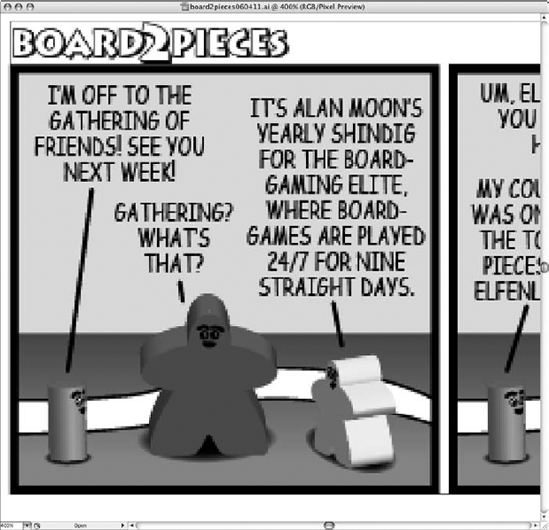
3. Understanding Pixel Preview mode
Because most Web page
graphics are pixel-based, Pixel Preview mode is specifically intended
for graphics that designers want to place on Web pages. This mode lets
you view images before converting them to a Web graphics format. Choose
View =>
Pixel Preview, and Illustrator places a check mark next to the Pixel
Preview option and then shows a raster form of your image. Figure 2
shows what you would see in Pixel Preview mode. In the figure, the
artwork is zoomed to 400% to more clearly show the effect of Pixel
Preview mode.
4. Using and creating custom views
Illustrator has a
special feature called custom views that allows you to save special
views of an illustration. Custom views contain view information,
including magnification, location, and whether the illustration is in
Outline mode or Preview mode. If you have various layers or layer sets
in Preview mode and others in Outline mode (layers in Preview mode are
indicated by regular eyeballs to the left of their names in the Layers
panel, while layers in Outline mode show an outlined eyeball), custom
views can also save that information. Custom views, however, don't
record whether templates, rulers, page tiling, edges, or guides are
shown or hidden.
If you find
yourself continually going to a certain part of a document, zooming in
or out, and changing back and forth between the Preview and Outline
modes, that document is a prime candidate for creating custom views.
Custom views are helpful for showing clients artwork that you created in
Illustrator. Instead of fumbling around in the client's presence, you
can, for example, show the detail in a logo instantly if you've preset
the zoom factor and position and have saved the image in a custom view.
To create a new view, set up the document in the way that you want to save the view. Then choose View =>
New View, and name the view in the New View dialog box. Each new view
name appears at the bottom of the View menu. No default keyboard
shortcuts exist for these views, but you can create your own shortcuts
by using the Keyboard Shortcuts dialog box, available under the Edit
menu. You can create up to 25 custom views. Custom views are saved with a
document as long as you save it using the Illustrator format.
5. Using screen modes
So, you've been
working on an illustration for an important client (actually, they all
are important), and the client scheduled an appointment to see your
progress, but the best part of the work is hidden behind the panels and
the Tools panel. You can turn off the panels and the Tools panel or you
can switch between the different screen modes.
Illustrator uses three
screen modes represented by the three buttons at the bottom of the Tools
panel. They are Standard Screen Mode, Full Screen Mode with Menu Bar,
and Full Screen Mode. In addition to clicking the screen mode buttons in
the Tools panel, you can also press F to switch between the three
modes.