Panel Controls
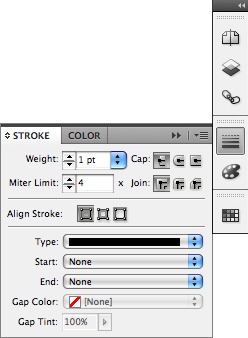
Before you begin working with panels, it’s a good idea to familiarize yourself with the general panel window structure. Figure 1 shows a breakdown of the controls found in all InDesign panels that are used to manage the panels’ location or content.
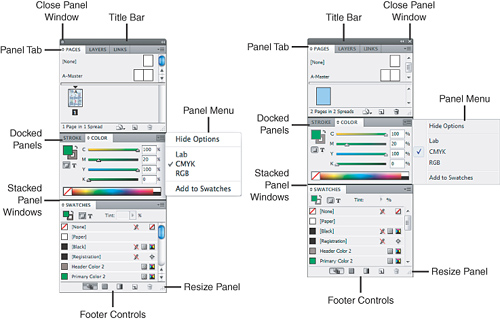
The following list describes the controls and what they do. You’ll put them to work in the sections that follow.
Close Panel Window: Click this button to close the panel window and all panels docked inside.
Title Bar: Click and drag the title bar to reposition the panel window on your screen. Double-click the title bar to collapse the window.
Panel Tab:
Click and drag to dock the panel in another window or side well.
Single-click the tab to bring a docked panel to the front of a group.
Double-click the tab to collapse the panel.
Docked Panels: Every panel window contains a well to dock other panels in. Panel tabs are positioned side by side in the well for easy access.
Panel Menu: Click to access specific panel options. The menu button always appears in the upper-right corner of the window.
Stacked Panel Windows: Panel windows (with or without multiple panels docked inside them) can also be connected in a vertical column, as shown here.
Footer Controls: Various panel-specific action buttons are located at the bottom of the panel window.
Resize Panel:
Not all panels feature this option, but for those that do, click and
drag the icon in the bottom-right corner to resize the panel window.
Organizing Panels
To conserve screen space,
you can regroup panels by docking them together. You can also stack
panel windows into a vertical column. Panels and panel groups can also
be collapsed vertically to create more room for you to work. In
addition, InDesign enables you to dock panels into resizable side wells
on either side of your screen, and even reduce them to icon size. The
following sections show you how some simple workspace reorganization can
improve your ability to get things done.
Regrouping Panels
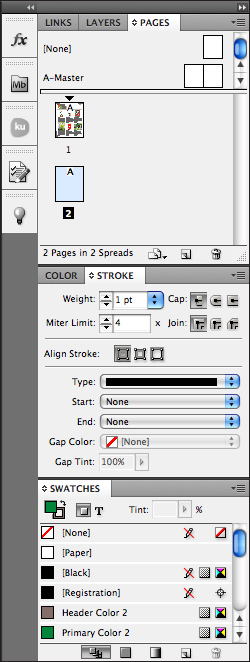
One efficient way to save
screen space is to regroup your most frequently used panels together. By
doing so, you can essentially combine multiple panels into one compact
group (see Figure 2).
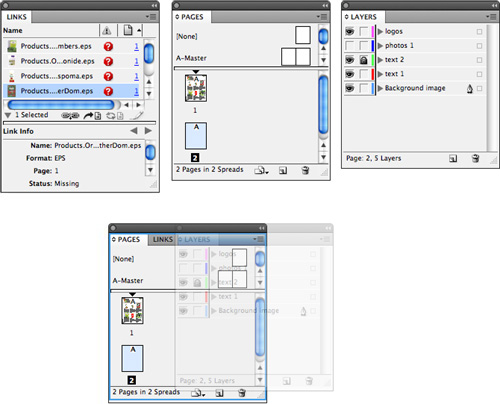
Grouping and Ungrouping Panels
Follow these steps to group and ungroup panels:
1. | To group individual panels, click the tab of one panel and drag it into another.
|
2. | Hold
the mouse button down until a blue outline appears around the panel
window into which you are dragging; then release. The panels become
grouped inside the same window. Click a grouped panel’s tab to bring
that panel to the front of the group.
|
3. | To ungroup a panel, click the tab, hold the mouse button down, and drag it out of the window.
|
4. | Release
the mouse button to place the free-floating panel somewhere else on
your screen, or group it into another window or side well.
|
Collapsing Panels
Another great way to save
screen space is to collapse panel windows. Collapsing panels hides
everything except for the panel tabs (see Figure 3). This is the best way to clear your screen.
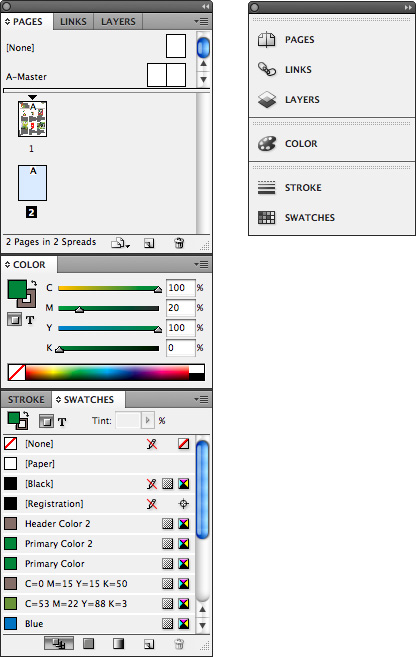
InDesign offers several ways to collapse panel windows when free-floating onscreen or docked in a side well:
- Double-click the title bar to reduce the panel window to icon size.
- Double-click a panel tab to collapse the panel (or panel group) within the window.
- Click the Collapse Window button (the arrow icon) in the upper right of the panel window to reduce it to icon size.
Stacking Panels
One other way that you can
save screen space is to stack your panel groups together. Doing so
allows you to reposition all the panels at once or collapse groups
within the stack (see Figure 4).

To stack panel windows together,
click the tab of one panel, hold the mouse button down, and drag the
panel over the bottom edge of another. Release the mouse button when a
thick blue line appears at the bottom edge of the window you’re docking
to. The panel windows become docked in a vertical column.
Using the Panel Side Wells
The resizable side wells
located on the right and left sides of your screen enable you to store
individual panels, docked panel groups, and stacked panel windows.
Adding a Panel to a Side Well
To add a panel window to either side well, follow these steps:
1. | Click the title bar and drag it to either side of your screen.
|
2. | Hold
the mouse button down until a vertical blue line appears in the well,
and then release for the panel window to snap into place.
|
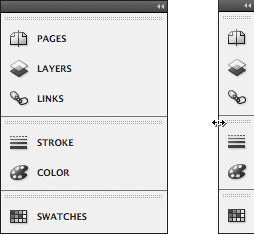
3. | Double-click
the title bar at the top of a docked panel column and the column
collapses to display only small panel icons and panel names (see the
left side of Figure 5).
|
4. | Minimize
the column even further to display just the icons by clicking the gray
area at the top or side of the column and dragging it in toward the side
of the screen (see the right side of Figure 5).
|
Click once on a collapsed panel icon to expand the panel from the side well (see Figure 6).
The expanded window snaps into position next to the well and can be
resized by clicking and dragging the bottom of the panel up or down.
|
Certain panels docked in the well, such as Layers or Swatches, automatically resize vertically to fill the column.
|
Note that you can also add multiple columns of docked panel windows in the side wells at one time (see Figure 7).
To do so, click the title bar and drag it to the side of the screen.
Hold the mouse button down until a vertical blue line appears on the
outside of the column, and then release for the panel window to snap
into place.
Here are some more helpful tips for working with the side panel wells:
You can reposition a
docked panel vertically in the well, whether expanded or minimized to an
icon, by clicking and dragging up or down. When you see a thick blue
horizontal line appear, release the mouse button to drop the panel into
place.
When repositioning an expanded panel into a docked icon group, the panel minimizes to an icon and snaps into place.
You can add more panels to a docked panel group by dragging them over the icons or the expanded panels in the well.
At
any time, docked panels—expanded or minimized—can be undocked and
repositioned anywhere on the screen by clicking and dragging the icon or
panel tab out of the well.