6. Phase 6: Finishing the PageYou’ve covered most of the steps you need to finish this web
page. Now you just need to add a graphic, format the copyright notice,
and provide a little more structure to the appearance of the page. In the “Address” headline, click just before the “A.” This step places the cursor at the beginning of the headline. You’ll insert a graphic here. From the Common category on the Insert panel, click the Image button. You can also choose Insert→Image or use the keyboard shortcut Ctrl+Alt+I (⌘-Alt-I). Browse to the “images” folder in the Chapter01 folder, and double-click the graphics file portland.jpg. Again, the Image Tag Accessibility window appears. You need to provide a good description for this image.
Type “Portland skyline,” and then press OK. Look at the Property inspector. It displays properties specific to this image. In the Property inspector’s lower-right corner, from the Align pop-up menu, choose Right. The image moves to the right edge of the page
and text wraps around its left side. (If you chose the Left option,
Dreamweaver would move the image to the left and wrap text around the
right side.) Look for a
copyright notice at the bottom of the page. It’s not really related to
the content of the page, so you’ll add a line to visually separate it
from the rest of the page.
Note: Although
the Left and Right options for an image’s Align property are quick ways
to force text to wrap around an image, they aren’t valid options for
the “strict” versions of HTML or XHTML, or for HTML5. CSS provides a
more flexible technique—known as a float—to achieve this effect.
Scroll to the bottom of the page, click before the letter “C” in “Copyright 2009,” and then choose Insert→HTML→Horizontal Rule. A gray line appears above the copyright notice. The copyright appears a little big, so you’ll format it next.
Note: You can also add a line above a paragraph of text using the CSS border property.
Select all the text in the copyright paragraph. You can either triple-click inside the paragraph or drag from the beginning to the end of the paragraph. Click the CSS button in the Property inspector, and then, from the Size menu, choose 12. The New
CSS Rule window opens again. This time you want to create a style that
applies only to this one paragraph of text—not every paragraph—so you
need to use what’s called a class style. Leave
the default setting—“Class (can apply to any HTML element)”—for the
Selector Type box, type .copyright in the Selector Name field (Figure 15), and then click OK. Class
names begin with a period—that’s how browsers identify the CSS style as
a class. You can see that the copyright notice text gets smaller. 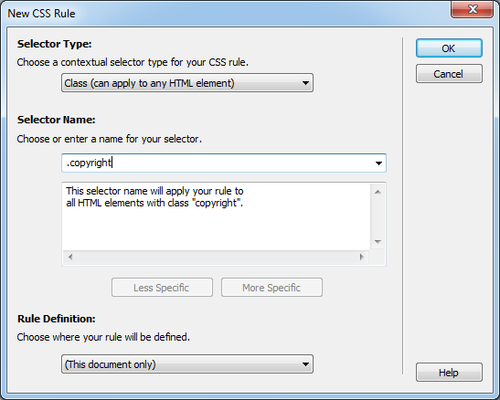
The
legal department of Chia Vet headquarters has decided that every page
on the site must link to an official corporate statement. You’ll add a
link for that next. At the bottom of the page, select the text “Read our full legal statement.” To
create a link, you just need to tell Dreamweaver which page you want to
link to. You can do this several ways. Using the Property inspector is
the easiest. In the Property inspector, click the HTML button, and then click the folder icon that appears to the right of the link field. The Select File dialog box appears. Click
the Site Root button (at the top of the dialog box in Windows, the
bottom of the dialog box on a Mac), and double click the file legal.html. The
Site Root button jumps you right to the folder containing your site.
It’s a convenient way to move quickly to your root folder.
Double-clicking the file tells Dreamweaver to insert the HTML needed to
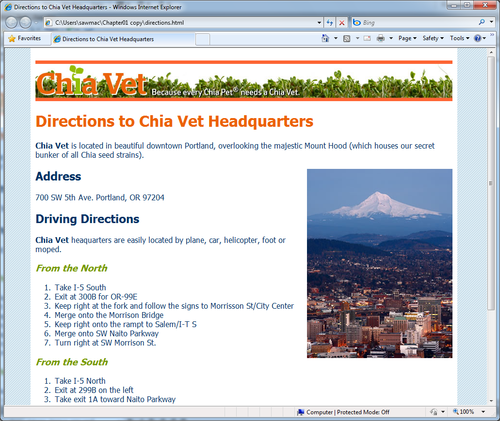
create a link. If you preview the page in a web
browser, it looks all right…well, not really. The text is kind of hard
to read against the blue striped background, it’s too wide if you expand
your web browser on a large monitor, and the photo is hanging way out
on the right-hand side of the browser. To fix these problems, you’ll
create a new layout element—a box to contain all the content on the
page. Click anywhere inside the page, and then choose Edit→Select All or press Ctrl+A (⌘-A on a Mac). You
selected the entire contents of the page. You’ll wrap all the text and
images in a <div> tag to create a kind of container for the page
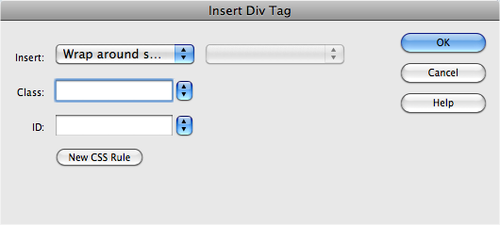
contents. Choose Insert→Layout Objects→Div Tag. The Insert Div Tag window opens (see Figure 16).
A <div> tag simply provides a way to organize content on a page
by grouping HTML—think of it as a box containing other HTML tags. For
example, to create a sidebar of navigation links, news headlines, and
Google ads, you would wrap them all in a <div> tag. It’s a very
important tag for CSS-based layouts.
Next,
you need to create a style that provides the instructions needed to
format this new <div> tag. You’ve already used the Property
inspector to create a style, but that works only for text. To format
other tags, you need to create a style in another way. Click the New CSS Rule button at the bottom of the Insert Div Tag window. The
New CSS Rule window appears (a CSS style is technically called a
“rule”). This window lets you specify the type of style you create, the
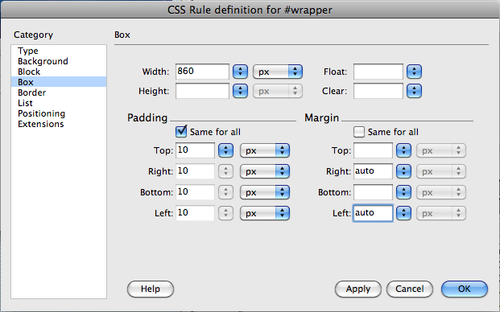
style’s name, and where Dreamweaver should store the style information. From the top menu, choose ID, and then type #wrapper in the “Choose or enter a name” field. Make sure you have “This document only” selected in the bottom menu. Click OK, The “CSS Rule definition” window appears (see Figure 17).
(There’s a lot going on in this box, but don’t worry about the details
at this point.
This
window is the command center for defining the formatting properties,
such as text color, font, and size, for a style. CSS has quite a few
properties, which Dreamweaver divides into eight categories. First,
you’ll add a background color for this <div> element. From
the left-hand list of categories, select Background. Click the color
box that appears to the right of “Background-color,” and then select a
white swatch. This
action adds a white background to the box, making sure the text stands
out. Next you’ll set a width for the box, and center it in the middle of
the browser window. Click the Box category, and then, in the width box, type 860. This
step makes the box 860 pixels wide—the same width as the banner. To
make sure the text doesn’t butt right up against the edge of the box,
you’ll add a little space (called padding) around the inside of this style. In the Top box under Padding, type 10 (make sure the “Same for all” checkbox is turned on). This action adds 10 pixels of space inside the box, essentially pushing the text and the graphics away from the edges of it. Under the Margin settings, uncheck the “Same for all” box, and then, for both the right and left margin menus, select “auto.” Selecting
“auto” here is your way of telling a web browser to automatically
supply the left and right margins—in this case, as you’ll see in a
moment, it has the effect of centering the <div> element in the
middle of a browser window. The “CSS Rule definition” window should now look like Figure 1-33. Click OK to complete the style. The Insert Div Tag window reappears, and the name of the style you just created—“wrapper”—appears in a box labeled ID. In the Insert Div Tag window, click OK. This
inserts the new <div> tag and at the same time applies the style
you just created. Now it’s time to take a look at your handiwork. Choose File→Save. Press the F12 key (Option-F12) to preview your work in your browser (Figure 18). Test
the link to make sure it works. Resize your browser and watch how the
page content centers itself in the middle of the window.
Congratulations! You just built your first web
page in Dreamweaver, complete with graphics, formatted text, and links.
If you want to compare your work with the finished product, go to
Chapter01_finished in the Tutorials folder and load the file directions.html. Much
of the work of building websites involves the procedures covered in
this tutorial—defining a site, adding links, formatting text, placing
graphics, creating styles, and inserting divs. T
|