3. Phase 3: Creating and Saving a Web Page“Enough already! I want to build a web page,” you’re probably saying. You’ll do just that now: Choose File→New. The New Document window opens. Creating a blank web page involves a few clicks. From
the left-hand list of document categories, select Blank Page; in the
Page Type list, highlight HTML; and from the Layout list, choose
<none>. From the DocType menu in the bottom right of the window,
select “HTML 4.01 Transitional.” HTML
(and XHTML as well) actually has two “flavors.” The Transitional type
keeps your pages compatible with older browsers, and gives you a wider
range of HTML properties to work with. If you’ve grown up with regular
HTML, it’s perfectly fine to select HTML 4.01 Transitional. (In fact,
it’s even OK to select XHTML 1.0 Transitional, if you prefer.) You can
even choose HTML5 if you wish—all the steps in this tutorial will create
a valid HTML5 page as well. Click Create. Dreamweaver
opens a new, blank HTML page. Even though the underlying code for an
HTML page differs in slight ways depending on which document type you
chose (HTML 4.01 Transitional, XHTML 1.0 Strict, HTML5, and so on), you have nothing to worry about: Dreamweaver manages all that code so you don’t have to. If
you see a bunch of strange text in the window, you’re looking at the
underlying HTML; you’re in either Code or Split view. At the top left of
the document window, click the Design button to tell Dreamweaver to
display the page in its visual layout mode. Choose File→Save. The Save As dialog box opens. Always
save your page right away. This good habit prevents serious headaches
if the power goes out as you finish that beautiful—but unsaved—creation. Save the page in the Chapter01 folder as directions.html. You could also save the page as directions.htm; both .html and .htm are valid extensions for HTML files. Make sure you save this page in the correct folder. In Phase 2 (Section 1.4.4),
you told Dreamweaver to use the Chapter01 folder as the site’s root
folder—the folder that holds all the pages and files for the site. If
you save the page in a folder outside the Chapter01 folder, Dreamweaver
gets confused and its site-management features won’t work correctly.
Tip: When
you save a file, you can quickly jump to the current site’s root
folder. In the Save As dialog box, click the Site Root button—that takes
you right to the root folder. This little trick also works when you
link to a file or open a file (except on the Mac, which mysteriously
lacks the Site Root button when opening a file…what’s that about,
Adobe?)
If the document window toolbar isn’t already open, choose View→Toolbars→Document to display it. The
toolbar at the top of the document window provides easy access to a
variety of tasks you’ll perform frequently, such as titling a page,
previewing it in a web browser, and looking at the HTML source code. In the toolbar’s Title field, select the text “Untitled Document,” and then type in “Directions to Chia Vet Headquarters.” The
Title field lets you set a page’s title—the information that appears in
the title bar of a web browser. The page title also shows up as the
name of your page when someone searches the web using a search engine
like Bing or Google. In addition, a clear and descriptive title that
identifies the main point of the page can also help increase a page’s
rank among the major search engines. Dreamweaver CS5.5 includes a Browser
Navigation toolbar that appears directly below the Document toolbar.
It’s intended to help web designers working on complex web applications,
like the WordPress blogging system or the Drupal content management
system. However, it mostly just wastes vertical space. You’ll hide it
now. Choose View→Toolbars→Browser Navigation. The toolbar disappears. Now you’ll set some basic properties of the page. On the Property inspector, click the Page Properties button, or choose Modify→Page Properties. The Page Properties dialog box opens (see Figure 4),
letting you define the basic attributes of each web page you create.
Six categories of settings control attributes like text color,
background color, link colors, and page margins. 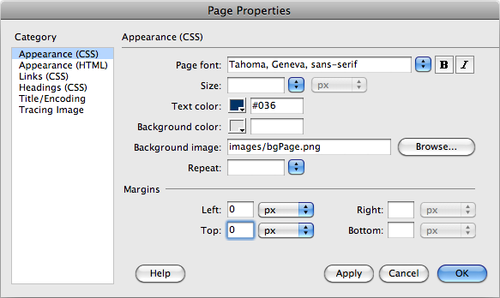
From the “Page font” menu, select “Tahoma, Geneva, sans-serif.” This
sets a basic font (and two backup fonts, in case your visitor’s machine
lacks Tahoma) that Dreamweaver automatically uses for all the text on a page. However, as you’ll see later in this tutorial, you can always specify a different font for selected text. Next, you’ll set a basic text color for the page. Next
to the “Text color” label, click the small gray box. From the pop-up
color palette, choose a color (a dark color like a royal blue works
well). Unless you
intervene, all web page text starts out black; the text on this page
reflects the color you select here. In the next step, you’ll add an
image to the background to liven up the page.
Note: Alternatively, you could type a color value, like #333333, into the box beside the palette square. That’s hexadecimal
notation, which is familiar to HTML coding gurus. Both the palette and
the hexadecimal color-specifying field appear fairly often in
Dreamweaver. Dreamweaver CS5.5 even lets you specify color in other
ways, such as with RGB (red-green-blue) and HSL
(hue-saturation-lightness) values.
The Select Image Source window appears (see Figure 5). Use it to navigate to and select a graphic. 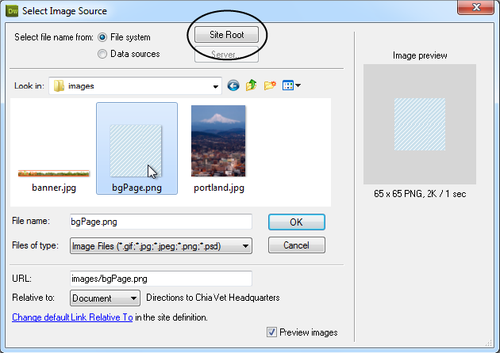
Click
the Site Root button at the top of the window (bottom of the window on
Macs). Open the folder named “images,” select the file named bgPage.png, and then click the OK (Choose) button. In Dreamweaver, you can also just double-click a file to select it and close the selection window. For example, you can select the bgPage.png file and click the OK button—by just double-clicking the file in the Select Image Source window.
Note: Note to Windows Users:
Normally, Windows doesn’t display a file’s extension. So when you
navigate to the images folder in step 13 above, you might see bgPage instead of bgPage.png. Since file
extensions are an important way people (and web servers) identify the
types of files a website uses, you may want Windows to display
extensions. Here’s how: In Windows Explorer, navigate to and select the
MM_DWCS5.5 folder . Then,
if you’re using Windows XP, choose Tools→Folder Options. If you’re on
Vista or Windows 7, choose Organize→“Folder and search options.” In the
Folder Options window, select the View tab, and then turn off the “Hide
extensions for known file types” checkbox. To apply this setting
to the tutorial files, click OK; to apply it to all the files on your
computer, click the “Apply to Folders” button, and then click OK.
In the Left and Top margin boxes, type 0. This
step removes the little bit of space web browsers insert between the
contents of your web page and the top and left sides of the browser
window. The size of this margin varies from browser to browser, so it’s
good to set this value yourself to make sure the page appears
consistently across the different browsers. If
you like, you can change this setting to make the browser add more
space to the top and left side of the page. In fact, you can even add a
little extra empty space on the right
side of a page. (The right margin control is especially useful for
languages that read from right to left, like Hebrew or Arabic.) Note,
however, that the bottom margin has no effect on the page display. Click the Links category, and then add the following properties: in the “Link color” field, type #EC6206; in the “Visited links” field, type #93BD00; in the “Rollover links” field, type #779A00; and in the “Active links” color field, type #CAE0EC (see Figure 6). These hexadecimal codes specify specific web page colors. 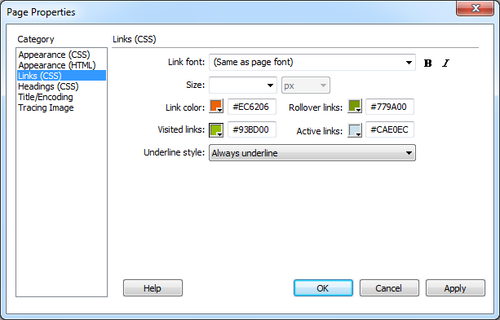
Links come in four varieties: regular, visited, active, and rollover. A regular link is a plain old link, unvisited, untouched. A visited link is one you’ve already clicked, as noted in a browser’s History list. An active link is one you’re currently clicking (you’re pressing the mouse button down as you hover over the link). And finally, a rollover
link indicates how the link looks when you mouse over it without
clicking. You can choose different colors for each of these link states. While
it may seem like overkill to have four different colors for links, the
regular and visited link colors provide useful feedback to web visitors
by telling them which links they’ve followed and which remain to be
checked out. For its part, the rollover link gives you instant feedback,
changing color as soon as you move your cursor over it. The active link
color isn’t that useful for navigating a site since its color changes
so briefly you probably won’t even notice it.
Note: Although Dreamweaver uses the term rollover link, in the world of Cascading Style Sheets, this is called a hover link.
Click OK to close the window and apply the changes to the page. You
return to your document window, where you see an asterisk next to the
file name at the top of the window—that’s Dreamweaver’s way of telling
you that you haven’t saved a page you edited, a nice reminder to save
your file frequently and prevent heartache if the program suddenly shuts
down (see circled image in Figure 7). 
Choose File→Save (or press Ctrl+S [⌘-S]). Save your work frequently. (This isn’t a web technique as much as a computer-always-crashes-when-you-least-expect-it technique.)
|