|
1. Phase 1: Getting Dreamweaver in Shape Before
you start working in Dreamweaver, make sure the program’s set up to
work for you. In the following steps, you’ll double-check some key
Dreamweaver preference settings and organize your workspace using the Workspace Layout feature. First, make sure your preferences are all set: If it isn’t already open, start Dreamweaver. Hey, you’ve got to start with the basics, right? Choose Edit→Preferences (Windows) or Dreamweaver→Preferences (Mac). The Preferences dialog box opens, listing a dizzying array of categories and options (see Figure 1). 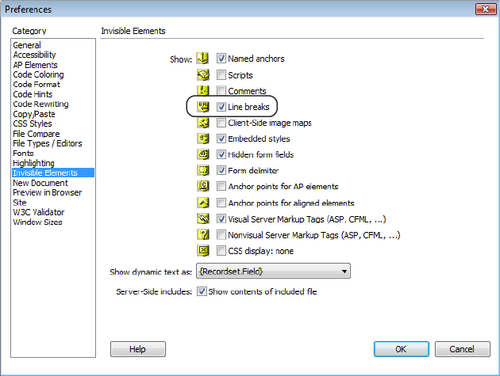
In
the Preferences dialog box, select the Invisible Elements category and
then turn on the fourth checkbox from the top, labeled “Line Breaks”
(cirlcled in Figure 1-17). Sometimes,
when you paste text from other programs, like Microsoft Word or an
email program, Dreamweaver displays separate paragraphs as one long,
single paragraph broken up with invisible characters called line breaks (for you HTML-savvy readers, this is the <br>
tag). Normally, you can’t see the line break character in Dreamweaver’s
Design view. This setting makes the character visible in that
view—represented in the document window by a little gold shield. The
shield gives you an easy way to select a line break and remove it,
either to create a single paragraph by combing the text before and after
the line break, or to create two paragraphs. Click OK. The
Preferences dialog box closes. You’re ready to get your workspace in
order. Dreamweaver offers
many windows to help you build web pages. For this tutorial, though, you
need only three: the Insert panel, the document window, and the
Property inspector. But, for good measure (and to give you a bit of
practice), you’ll open another panel and rearrange the workspace a
little. To get started, have Dreamweaver display the space-saving
Classic workspace. From the “Workspace Switcher” on the Application bar, select Classic (see Figure 2), or go to Window→Workspace Layout from the main menu bar and then select Classic from the drop-down menu. If
you see Classic already selected, choose Reset “Classic”, which moves
any panels that were resized, closed, or repositioned back to their
original locations. The Classic
workspace built into Dreamweaver puts the Property inspector at the
bottom of the screen, turns the Insert panel into an Insert toolbar that
appears either in the Application toolbar or directly below it, opens
the CSS Styles and Files panels on the right edge, and displays two
other groups of closed tabs. 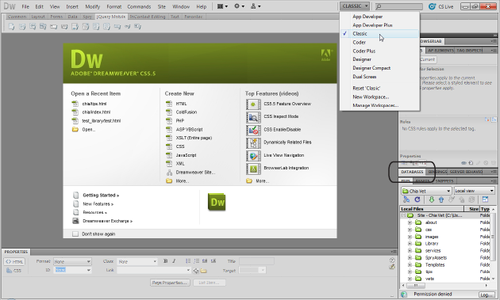
You only need the Databases
panel when you work with database-driven websites, so, even though the
panel is currently closed, there’s no reason to keep its tab (and the
tabs for the other database-related panels) around, so you’ll close that
group of tabs next. Right-click (Control-click) on the Databases tab (circled in Figure 1-18), and choose Close Tab Group from the pop-up menu. The Databases panel and its three tabs disappear (you can always get it back by selecting Window→Databases). The CSS Styles
panel is very useful; it also comprises three panes stacked one on top
of the next, so giving it plenty of vertical room is a good idea. Drag the thick line that appears between the top of the Files panel and the bottom of the CSS Styles panel (circled in Figure 3) until the Files panel is about half the size of the CSS Styles panel. Now
the workspace looks great. It displays most of the panels you need for
this tutorial (and for much of your web-page building). Since this
arrangement of windows is so useful, you’ll want to save it as a custom
layout (OK, maybe you don’t want to save the layout…just play along). 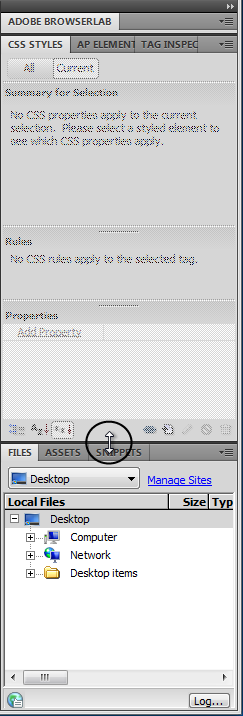
From the Application bar’s Workspace Switcher menu, choose New Workspace. The Save Workspace window appears, waiting for you to name your new layout. Type Missing Manual (or any name you like), and then click OK. You
just created a new workspace layout. To see if it works, switch to
another one of Dreamweaver’s layouts, see how the screen changes, and
then switch back to your new setup. From the Workspace Switcher menu, choose App Developer Plus. This step moves the panels around quite a bit, and even displays some panels in Dreamweaver’s iconic mode . This layout’s a bit too complicated for our needs, so you’ll switch back. From the Workspace Switcher menu, choose Missing Manual (or whatever you named your custom space in step 9). Voilà!
Dreamweaver sets up everything the way you want it. You can create
multiple workspaces for different websites or different types of sites.
2. Phase 2: Creating a WebsiteWhenever you use Dreamweaver to create or edit a website, your first step is always to show Dreamweaver the location of the site folder (also called the root folder)—the master folder for all your website’s files. You do this by setting up a site, like so: Choose Site→New Site. The Site Setup window appears. You only need to provide two pieces of information to get started. Type Test Drive in the Site Name field. The
name you type here is solely for your own reference, so you can
identify the site in Dreamweaver’s Site menu. Dreamweaver also asks
where you want to store the website’s files.
Click the folder icon next to the label “Local site folder.” The Choose Root Folder window opens, so you can choose a folder on your hard drive to serve as your local root folder.
(This is the folder on your computer where you’ll store the HTML
documents and graphics, CSS, and other web files that make up your
site.) Browse
to and select folder located inside the MM_DWCS5.5 folder
you downloaded earlier. Click the Select (Choose) button to set this
folder as the local root folder.
Click the Save button to close the Site Setup window. After you set up a site, Dreamweaver creates a site cache for it .
|