Working with Non-Square Pixels
Images
displayed on a computer monitor are made up of square pixels.
Conversely, an image displayed on a video monitor is not composed of
pixels at all. Non-square pixels are most commonly used by encoding
devices for video production. When importing an image created by a
square-pixel graphics program into a video editing program such as Adobe
Premiere, the square pixels are automatically scaled to non-square
pixels for video encoding. This scaling results in a distorted image. By
default, non-square pixel documents open with Pixel Aspect Ratio
Correction enabled. This enables you to preview how the image will
appear on an output device such as a video monitor, and see how it will
appear when exported to an analog video device. In keeping with an
ever-changing industry, Adobe includes the following Pixel Aspect Ratio
options: DVCPRO HD 1080 (1.5) and HDV 1080/DVCPRO HD 720 (1.33).
Work with Non-Square Pixels
 Click the File menu, and then click New.
|
 On the bottom of the New dialog box, click the Pixel Aspect Ratio list arrow, select any of the non-square pixel settings, and then click OK.
|
 Click the Window menu, point to Arrange, click New Window to create a new window, and then select the new window.
|
 Click the View menu, point to Pixel Aspect Ratio, and then select a pixel aspect ratio that’s compatible with the video format.
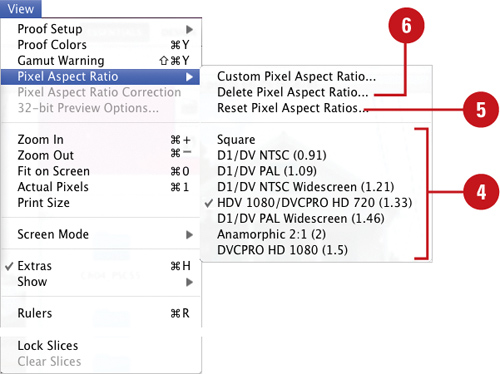
The original window shows the corrected aspect ratio, and the other one shows it without.
 |
 To reset the pixel aspect ratio to the default, click the View menu, point to Pixel Aspect Ratio, click Reset Pixel Aspect Ratios, and then click OK (replaces) or Append (replaces, yet retains any custom values).
|
 To remove the pixel aspect ratio, click the View menu, point to Pixel Aspect Ratio, click Delete Pixel Aspect Ratio, select the aspect ratio, and then click Delete.
 |
Opening Images
Photoshop
lets you open image files created in different formats, such as TIFF,
JPEG, GIF, and PNG, as well as Photoshop documents in the PSD or PSB
(Large Document) formats. If you want to simply open an image or
Photoshop document, the Open dialog box is the most efficient way.
However, if you need to manage, organize, or process files, Adobe Bridge
or Mini Bridge (New!) is the way to go. You open an existing Photoshop document or image file the same way you open documents in other programs.
Open an Image
Click the File menu, and then click Open to display all file types in the file list of the Open dialog box.
Timesaver
Point to the Open Recent command on the File menu to quickly open a recent file.
|
Click the Files of Type (Win) or Enable (Mac) list arrow, and then select a format.
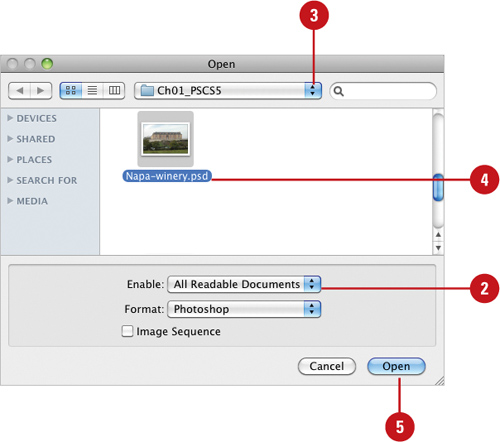 |
Click the the Look In (Win) or Where (Mac) list arrow, and then choose the location where the image you want to open is stored.
|
Click the image file you want to open.
Timesaver
Press and hold the Shift key to select multiple contiguous files to open in the Open dialog box.
|
Click Open.
|
The Open As command on the
File menu allows you to open a file in Photoshop that was saved
incorrectly (with the wrong extension) or is being moved between Windows
and Macintosh systems. Click the File menu, click Open As, select the
file you want to open (if you do not see the file you want, choose the
option to display all files), select the correct format from the Open As
(Win) or Format (Mac) list arrow, and then click Open. If the file does
not open, then the chosen format may not match the file’s real format,
or the file may be damaged.
Inserting Images in a Document
You
can use Photoshop’s Place command to insert artwork into an open
document. To increase your control of the new image information,
Photoshop places the new image into a separate layer. Photoshop lets you
place files saved in PDF, Adobe Illustrator, and EPS formats. When you
first place a vector-based image into Photoshop, you have the ability to
modify the width, height, and rotation while retaining the vector
format of the file. However, since Photoshop is primarily a raster
program, when you finalize your changes, Photoshop rasterizes the file
information (converts the vector data into pixels), and saves it as a
Smart Object, which means you can no longer edit the placed document as
you would a vector shape or path. However, you can still open up the
Smart Object in the original file, and make changes to update it.
Insert an Image in a Document Using the Place Command