3. Viewing the tool tips
What if you forget the
function of a specific tool or you can't tell the difference between the
various tools in Illustrator? No problem! Illustrator comes equipped
with a handy tool tips feature that identifies tools quickly and easily.
When you have tool tips activated (and it is by default), you simply
move your cursor over the element you want to identify, and a yellow
text box pops up and tells you its name. For example, when you place
your cursor over the Type tool, a box appears with the words Type Tool
(T). The letter within the parentheses indicates the keyboard shortcut
for the tool. In this example, if you press T, you activate the Type
tool without clicking it. Illustrator provides tool tips for every tool
in the Tools panel as well as for the panel controls.
If you find the tool tips
annoying or if you know the tips well enough not to need them, you can
disable tool tips in the General screen of the Preferences dialog box.
To open the Preferences dialog box, simply choose Edit (Illustrator) => Preferences => General and then deselect the Show Tool Tips option.
4. Using the panels
Panels are small windows
that are similar to dialog boxes. Panels can float or be docked. To make
the following discussion a little more readable, I'll refer to both as
panels; they're mostly interchangeable terms when discussing how they
work and the contents of each of them, but differences are noted in the
following text.
Panels allow you to control
virtually every aspect of the Illustrator drawing environment.
Illustrator has 34 standard panels and an unlimited number of library
panels (for swatches, symbols, brushes, styles, and more), all of which
can remain open while you work on your document panel. Technically
speaking, a panel is a modeless
window. The big difference between a modeless window and a dialog box
is that you don't have to close the modeless window to perform other
tasks. Therefore, you can work with the features on one panel without
having to close another panel.
Unlike windows, panels
are never really active. Instead, the one you're working in is in the
front. If the panel has editable text fields, Illustrator highlights the
active one or makes the text cursor blink. To bring a panel to the
forefront — that is, bring it into focus — simply click in it anywhere.
Panels are like regular
windows in many ways. Each panel has a title bar that you can click and
drag to move it. The title bar also has buttons for minimizing a regular
panel or zooming (back to regular size) a minimized one and closing the
panel. Each panel also has a tab with the name of the panel within it.
NOTE
You can use the title
tab to toggle between the minimized state (showing only the title tab)
and the maximized state (showing the entire panel) by double-clicking
the title tab.
Occasionally, a panel has a handle on the lower-right corner that looks like a triangle made up of dots, as seen in Figure 3. You can use this handle for changing the panel's size by clicking and dragging the corner containing the handle.
|
For some panels (such as the
Color panel), a double-arrow icon appears to the left of the title name.
Clicking this icon toggles the panel size among several different
sizes.
|
|
4.1. Linking together and tearing apart panels
You can place panels together in different combinations by tabbing and docking
them. Tabbing stacks the tabs for several panels into a single panel.
Docking aligns the panels without stacking them into the same space.
Each panel (except for the
Tools panel) has a tab on it. Clicking the tab of a panel brings it to
the front. Dragging a tab from one panel to another moves that panel
into another panel. Dragging a tab out of a panel makes the panel
separate from the previous panel. Figure 2.4
includes a set of panels that have been tabbed together. When you
create a set of panels like this, it stays grouped together even if you
quit Illustrator and relaunch.
If you drag a floating
panel to the right side of the screen, it becomes a docked panel. If you
drag a docked panel into the document window, it becomes a floating
panel.
NOTE
By default, Illustrator
tabs certain panels together. You can drag them apart and then tab
others together to suit your method of working.
|
To restore the default panel layout, choose Window => Workspace => Default.
|
|
You can dock panels
together by dragging the tab of one panel to the bottom of another
panel. When the bottom of the other panel darkens, releasing the mouse
button docks the moved panel to the bottom of the other one. Then, when
you move the other panel, the docked panel moves with it. To separate a
panel from the others, click and drag the tab away from the original
panel.
4.2. Working with panels
Panels are even more useful
when you can reveal and hide them to suit your needs. Under the Window
menu, you can choose which panels show and which ones hide. Simply click
the check box next to a panel to show it, and deselect the check box
next to the panel to hide it. Some panels use a keyboard shortcut to
access them, and others are accessed through the Window menu. To see the
shortcuts, look to the right of the panel name. Under the Window menu,
you can see what panels are visible by the check mark next to them.
Here are some of the available panels:
Control. This is the panel along the top edge of the document window.
Tools. This panel contains all of Illustrator's tools.
Actions. Use this panel to record a sequence of events to play at any time.
Align. This panel lets you align objects (Shift+F7).
Appearance. Use this panel to check the attributes of a selected object (Shift+F6).
Artboards. Use this panel to view a list of all the artboards in your document.
Attributes. Use this panel to view the overprinting and any URLs associated with the selected object (Ctrl+F11/ +F11).
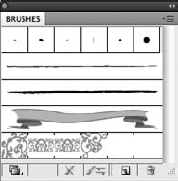
Brushes. Use this panel to choose a brush type (F5).
Color. This panel lets you apply color to your illustrations (F6).
Color Guide. This panel lets you access the Live Color feature (Shift+F3).
Document Info. This panel shows information about the document, such as color mode, artboard dimensions, and other options.
Flattener Preview. Use this to see certain areas of flattened artwork. You can also adjust the Flattener options here.
Gradient. This panel is used for changing and applying gradients (Ctrl+F9/+F9).
Graphic Styles. This panel lists the default graphic styles and lets you save graphic styles (Shift+F5).
Info. This panel displays information on the selected object. It's used for measuring objects or distance (F8), among other things.
Layers. This panel lets you put objects on different layers for easier organization (F7).
Links. This lists the placed objects that are linked to the document.
Magic Wand. Use this to adjust the settings for the Magic Wand tool.
Navigator. Use this to quickly move around a large document.
Pathfinder. Use this to combine, split, divide, and do more to multiple paths (Shift+Ctrl+F9/Shift++F9).
Separations Preview. Use this to view the individual printing plates in your document.
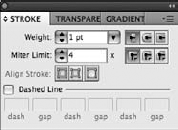
Stroke. This panel lets you adjust the width and style of the stroke (Ctrl+F10/+F10).
SVG Interactivity. Use this panel to set options for Scalable Vector Graphics.
Swatches. This panel houses preset colors, gradients, and patterns.
Symbols. This panel houses preset symbols and lets you define new symbols (Shift+Ctrl+F11/Shift++F11).
Transform. This panel lets you move, scale, and apply other transformations (Shift+F8).
Transparency. Use this panel to adjust the opacity of objects (Shift+Ctrl+F10/Shift++F10).
Type. The following panels are accessed from the Type submenu, including:
Character (Ctrl+T/+T)
Character styles
Glyphs
OpenType (Alt+Shift+Ctrl+T/Option+Shift++T)
Paragraph (Alt+Ctrl+T/Option++T)
Paragraph styles
Tabs (Shift+Ctrl+T/Shift++T)
Variables. This panel is used to set the options for data-driven graphics.
5. Using Illustrator's menus
Although Adobe places
more emphasis on Illustrator's panels and other elements, such as its
Tools panel, you still find many important and useful features in
Illustrator's menus.
Some general rules apply to Illustrator menus:
To choose a menu
item, pull down the menu, choose the menu item you want, and then
release or click the mouse button. If the cursor is not on that item but
is still highlighted, the command can't take effect.
Whenever
an ellipsis appears (three little dots that look like this ...),
choosing that menu item displays a dialog box where you must verify the
current information by clicking OK or by typing more information and
then clicking OK. If the option has no ellipsis, the action you choose
occurs immediately.
When
you see a key command listed on the right side of the menu, you can
press that key instead of using the mouse to pull down a menu. Using key
commands for menu items works just like clicking the menu bar to choose
that item.
If
you see a little triangle next to a menu item, it means the menu
possesses a submenu. You can choose items in the submenu by scrolling
over to the menu and then scrolling up or down to choose the menu item
needed. Submenus usually appear on the right side of the menu, but due
to space limitations on your monitor, submenus may appear on the left
side for certain menus.
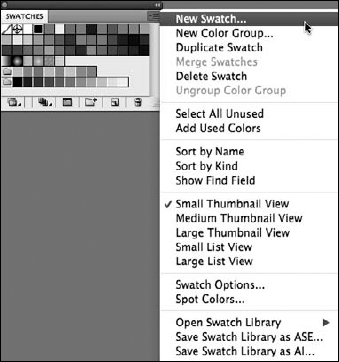
5.1. Panel menus
Not only does the main
document window have menus, but panels have menus, too. You can find a
variety of features and options to meet your creative needs. To open
these menus, simply find and click the triangle located in the top-right
corner of most panels. Figure 5
gives an example of the options you have available when you access the
Swatches panel's menu. These options and features change with each
panel.
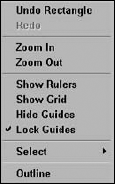
5.2. Context-sensitive menus
Illustrator provides
context-sensitive menus that appear right under your cursor as you work.
Right-click (Ctrl+click) anywhere in a document window to open a
context-sensitive menu. These menus contain commands that relate to the
type of work you're doing and the specific tool you have active. Figure 6
shows a context-sensitive menu that opens in a document when a
rectangle shape is created and selected. This menu looks different if
another object is selected.
NOTE
Context menus in
Illustrator tend to be less useful than other programs that rely heavily
on contextual menus to accomplish tasks. There are very few commands
that only appear in the context-sensitive menus, such as Isolate
selected group and Send to current layer. Don't fall into the trap of
right-clicking to see what you can do; Illustrator relies much more
heavily on panels, tools, and the menu bar options (as well as numerous
keyboard shortcuts) than it ever does on context menus.
5.3. Typing keyboard commands
Keyboard commands are shortcuts for common activities that you perform in Illustrator. These shortcuts typically use the Ctrl ()
key in combination with other keys. Some menu items don't have keyboard
commands; usually, you have to choose those items from a menu.
Keyboard commands are as
important to an Illustrator artist as the mouse is; with a little
practice, you can learn them quickly. Besides, many of the default
keyboard commands are the same from program to program, which makes you
an instant expert in software that you haven't used yet! Good examples
of this are the Cut/Copy/Paste, Select All, and Save commands:
6. Using the status bar
The status bar, located on
the lower left of your document window, has a Zoom popup list and a
button that displays useful and otherwise difficult-to-find information.
To change the item shown in the status bar, click the triangle to the
right of Show and then choose a different item. Although the default for
this button displays the tool that you're currently using, you can
change the information to display one of the following instead:
Version Cue Status.
Choose this to see the Version Cue information for shared files. This
option is available only if you have Adobe Creative Suite installed.
Current Tool. Choose this to show the selected tool's name.
Date and Time. Use this to show the current date and time.
Number of Undos. This is a handy option that shows the number of queued undos and redos.
Document Color Profile. This shows the current Color Profile.
Illustrator requires
the use of a mouse for selecting items, pulling down menus, moving
objects, and clicking buttons. Learning to use the mouse efficiently
requires patience, practice, and persistence.
You use the mouse to perform five basic functions in Illustrator:
Pointing. Move the cursor around the screen by moving the mouse around your mouse pad.
Clicking.
Press and release the left mouse button (or the only button on some Mac
mice) in one step. You click to select points, paths, and objects and
to make windows active.
Dragging.
Press the mouse button and keep it pressed while you move the mouse.
You drag the cursor to choose items from menus, select contiguous
characters of text, move objects, and create marquees (dotted rectangles
used for zooming the view).
Double-clicking.
Quickly press and release the mouse button twice in the same location.
You double-click to select a word of text, highlight a text field with a
value in it, access a dialog box for a tool, and run Illustrator (by
double-clicking its icon).
Right-clicking (Ctrl+clicking).
This displays a context-sensitive menu when you click the right mouse
button (or Ctrl+click on a Mac lacking a two-button mouse).
The cursor is the little
icon (usually an arrow) that moves in the same direction as the mouse.
In Illustrator, the cursor often takes the form of the tool that you're
using. When the computer is busy, an hourglass (Windows) or a spiraling
circle (Mac) takes its place.