Being able to move through a document easily is a key
skill in Illustrator. Rarely can you fit an entire illustration in the
document window at a sufficient magnification to see particular details
within the image. Usually, you're zooming in, zooming out, or moving off
to the side, above, or below to focus on certain areas of the document.
1. Understanding the Zoom tool
The most basic
navigational concept in Illustrator is the ability to zoom to different
magnification levels. Illustrator's magnification levels work like a
magnifying glass. In the real world, you use a magnifying glass to see
details that aren't readily visible without it. In the Illustrator
world, you use the different magnification levels to see details that
aren't readily visible at the 100% view.
Changing the magnification
levels of Illustrator doesn't affect the illustration. If you zoom in to
400% and print, the illustration still prints at the size it would if
the view were 100% (you can adjust the printing size in the Print dialog
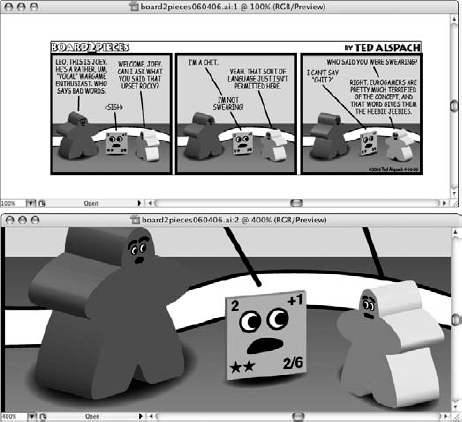
box). It doesn't print four times as large. Figure 1 shows the same Illustrator document at 100% and 400% magnification.
In Illustrator, 100%
magnification means that the artwork you see on the screen has the same
physical dimensions when it prints. If you place a printout next to the
on-screen image at 100% magnification, it appears at about the same
size, depending on your monitor resolution (the higher the resolution,
the smaller the document looks on-screen). Over time, monitor pixels per
inch have increased from the standard 72 pixels per inch (ppi) of 1990s
models to today's 96 ppi to 120 ppi versions, so if you have a
flat-screen monitor, the on-screen version looks noticeably smaller than
the printed version.
|
For those of you who
plan to use Illustrator with Photoshop, remember that in Photoshop, the
100% view is different. In Photoshop, each pixel on-screen is equal to 1
pixel in the image. Unless the ppi of the image matches that of the
screen (and it would if Web graphics were being designed), the 100% view
tends to be larger than the printed dimensions of the image when you're
using Photoshop.
|
|
2. Using the Zoom tool
Perhaps the easiest
way to control the magnification of your artwork is with the Zoom tool.
This tool (which is located in the right column of the Tools panel) can
magnify a certain area of artwork and then return to the standard view.
To use the Zoom tool to
magnify an area, choose it from the Tools panel by clicking it once. The
Zoom cursor takes the place of the Arrow cursor (or whatever tool was
previously selected). It looks like a magnifying glass with a plus sign
in it. Clicking any spot in the illustration enlarges the illustration
to the next magnification level, with the place you clicked centered on
your screen. The highest magnification level is 6400% — which, as all
you math aficionados know, is 64 times (not 6,400 times!) bigger than
the original. Where you click with the Zoom tool is very important:
Clicking the center of the window enlarges the illustration to the next magnification level.
Clicking the edges (top, bottom, left, or right) of the window makes the edges that you didn't click (and possibly some or all of your artwork) disappear as the magnification increases.
Clicking the upper-right corner hides mostly the lower-left edges, and so forth.
If you're interested in seeing
a particular part of the document up close, click that part at each
magnification level to ensure that it remains in the window.
If you zoom in too far, you can
use the Zoom tool while pressing Alt (Option) to zoom out (you see a
minus sign in the middle of the magnifying glass to indicate this).
Clicking with the Zoom tool while pressing Alt (Option) reduces the
magnification level to the next-lowest level. You can zoom out to 3.13%
(1/32 actual size). Releasing Alt (Option) causes the Zoom tool to zoom
in instead of out.
When you use the Zoom tool,
you magnify everything in the document, not just the illustration. You
magnify all paths, objects, the artboard, and the Page Setup boundaries
equally. However, the way certain objects appear (the thickness of path
selections, points, handles, gridlines, guides, and Illustrator user
interface components, such as panels and windows) doesn't change when
you zoom in.
If you need to zoom in to
see a specific area in the document window, use the Zoom tool to draw a
marquee by clicking and dragging diagonally around the objects that you
want to magnify. The area thus magnifies as much as possible so that
everything inside the box just fits in the window that you have open. If
you drag a marquee box as you press and hold Alt (Option), you do the
same thing as if you had just clicked to zoom out.
|
To move a zoom marquee around
while you're drawing it, press and hold the spacebar after you begin
drawing the marquee but before you release the mouse button. When you
release the spacebar, you can continue to change the size of the marquee
by dragging.
|
|
3. Other zooming techniques
You also can zoom in and out by using commands in the View menu. Choose View =>
Zoom In to zoom in one level at a time until the magnification level is
6400%. The Zoom In menu item zooms from the center of the current
window view. Choose View => Zoom Out to zoom out one level at a time until the magnification level is 3.13%.
Although
Illustrator can zoom to any level, it uses 23 default zoom levels when
you click the Zoom tool or when you access the Zoom In and Zoom Out menu
items (or their respective keyboard commands). Table 1 lists each of the default Zoom In and Zoom Out default levels.
Table 1. Zoom In and Zoom Out Default Levels
| Zoom Out | Ratio | Zoom In | Ratio |
|---|
| 100% | 1:1 | 100% | 1:1 |
| 66.67% | 2:3 | 150% | 3:2 |
| 50% | 1:2 | 200% | 2:1 |
| 33.33% | 1:3 | 300% | 3:1 |
| 25% | 1:4 | 400% | 4:1 |
| 16.67% | 1:6 | 600% | 6:1 |
| 12.5% | 1:8 | 800% | 8:1 |
| 8.33% | 1:12 | 1200% | 12:1 |
| 6.25% | 1:16 | 1600% | 16:1 |
| 4.17% | 1:24 | 2400% | 24:1 |
| 3.13% | 1:32 | 3200% | 32:1 |
| | | 4800% | 48:1 |
| | | 6400% | 64:1 |
|
You can quickly zoom in or out
using the scroll wheel on your mouse. Press Alt (Option) and then rotate
the wheel to zoom in and out.
|
|
3.1. Zooming to Actual Size
You can use different
methods to automatically zoom to 100% view. The first method is to
double-click the Zoom tool in the Tools panel. This action changes the
view to 100% instantly. Your other choices are as follows:
Using the Zoom feature in the status bar. To do this, simply click the dropdown arrow in the left corner of the status bar and then choose 100% or type 100 in the field there.
Using the View menu.
This is the best way to zoom to 100% magnification because it not only
changes the image size to 100%, but it also centers the page in the
document window. Simply choose View => Actual Size.
3.2. Zooming to Fit in Window size
Fit in Window
instantly changes the magnification level of the document so that the
entire artboard (not necessarily the artwork, if it isn't located on the
page) fits in the window and is centered in it. You can choose from two
methods to change the document view to the Fit in Window size:
|
You can quickly go to 3.13% by pressing Ctrl ( ) and then double-clicking the Zoom tool in the Tools panel. ) and then double-clicking the Zoom tool in the Tools panel.
|
|
3.3. Zooming to a specific magnification
If you want to view a document
at a specific zoom level, double-click the view area at the bottom-left
corner of the active document window, type the magnification you want to
zoom to, and then press Enter or Return.
NOTE
When you specify a
magnification, you don't change the document. Rather, you change how you
view the document. For this reason, you can never undo any type of
magnification-level change. Choosing Edit =>
Undo after zooming undoes the last change you made to the document
before you changed the magnification level, not the magnification-level
change.
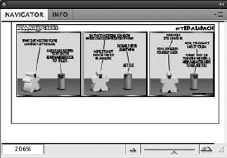
3.4. Zooming with the Navigator panel
Of course, being able to zoom
in very closely to your artwork does have a pitfall. The more you zoom
in on an illustration, the less of that illustration you see at one
time. The Navigator panel (shown in Figure 2), which you access by choosing Window =>
Navigator, helps you out by letting you see the entire illustration as
well as the portion into which you've zoomed (indicated by a red viewing
rectangle). You have several options within the Navigator panel for
changing your view:
The red rectangle.
You can stay zoomed in and move easily to another section by dragging
the red rectangle (which actually scrolls), located in the center of the
Navigator, to another area.
The popup menu.
You access this menu by clicking the triangle located on the
upper-right corner of the panel. The Navigator panel's popup menu
includes a View Artboard Only option. This option sets the thumbnail in
the Navigator panel to show only the extent of the Artboard. If this
option isn't set, the thumbnail shows all objects included in the
document.
The magnification level box. You can type an exact magnification level in the box in the lower-left corner of the Navigator panel.
The slider.
Located at the bottom of the Navigator panel is a slider that gives you
yet another way to zoom in and out by dragging the slider to the left
or right.
The Zoom In and Zoom Out tools.
The Zoom In and Zoom Out tools look like little triangles and big
triangles on either side of the slider triangle. You can zoom in and out
a preset amount (using the same amounts used by the Zoom In and Zoom
Out tools and menu items) by clicking the Zoom In or Zoom Out icons.
|
The Navigator panel can slow
down Illustrator if your artwork contains many patterns, gradients, and
gradient mesh objects. To avoid this slowdown, you can close the
Navigator panel by choosing Window => Navigator.
|
|
5. Using the scroll bars to view your document
Sometimes, after you zoom in to a
high magnification, part of the drawing that you want to see is outside
the window area. Instead of zooming in and out repeatedly, you can use
the scroll bars on the right side and bottom edges of the document
window to move around inside the document. The right scroll bar controls
where you are vertically in the document window. The bottom scroll bar
controls where you are horizontally in the document window.
The scroll bars contain three elements: up and down arrows; a gray area (or bar); and a thumb, also called the elevator box,
which is a gray square (in Windows) or a blue oval (on a Mac) that
rides along the scroll bar. The gray area of the right scroll bar is
proportionate to the vertical size of the work area (the space around
the artboard). If the little elevator box is at the top of the scroll
bar, you're viewing the top edge of the work area. If it's centered,
you're viewing the vertical center of the work area. The techniques are
as follows:
Using the up and down arrows.
When you click the up arrow, you display what is above the window's
boundaries by pushing everything in the window down in little
increments. Clicking the down arrow displays what is below the window's
boundaries by pushing the document up in little increments.
Using the thumbs.
Dragging the thumb up displays what is above the window's boundaries
proportionately by whatever distance you drag it. Dragging the thumb
down displays what is below the window's boundaries proportionately by
whatever distance you drag it.
Using the gray bar.
Clicking the gray bar above the thumb and between the arrows displays
what is above the window's boundaries in big chunks. Clicking the gray
bar below the thumb and between the arrows displays what is below the
window's boundaries in big chunks.
|
Be careful not to drag too far or you preview beyond the top of the artboard.
|
|
NOTE
On a Mac, if you want to
specify how far Illustrator scrolls when you click the gray bar, you can
set this in the System Preferences. Also on a Mac, the default is for
the up and down arrows to be together. You can change this in your
system's General preferences to place the scroll bars together or at the
top and bottom.
6. Scrolling with the Hand tool
The Hand tool improves on the
scroll bars. The Hand tool — which looks like a hand — is located at
the bottom of the first column of the Tools panel, just above the color
options.
Instead of being limited
to only horizontal and vertical movements, you can use the Hand tool to
scroll in any direction, including diagonally. The Hand tool is
especially useful for finding your way around a document when you're
viewing it at a high magnification level. The higher the magnification
level, the more you're likely to use the Hand tool.
|
To quickly access the Hand
tool, press H or press and hold the spacebar. Clicking and dragging the
page moves the document around inside the document window while the
spacebar is pressed. If you release the spacebar, you return to the
previous tool. This works for all tools, but the Type tool works a
little differently. If you're currently using the Type tool in a text
area, press Ctrl+spacebar ( +spacebar) to access the Zoom tool, and release Ctrl ( +spacebar) to access the Zoom tool, and release Ctrl ( ) while keeping the spacebar pressed to gain access to the Hand tool. ) while keeping the spacebar pressed to gain access to the Hand tool.
|
|
When you click in the
document, be sure to click the side that you want to see. Clicking at
the top of the document and then dragging down allows you to scroll down
through almost an entire document at a height of one window. Clicking
in the center and then dragging allows you to scroll through only half a
window's size at a time.
The best thing about the Hand
tool is that it works live. As you drag, the document moves under the
Hand. If you don't like where it's going, you can drag it back, still
live. The second best thing is that accessing it requires only one
keystroke: either pressing H or pressing and holding the spacebar.
NOTE
You can't use Undo to reverse scrolling that you've done with the scroll bars or the Hand tool.
7. Scrolling with the Navigator panel
Use the red rectangle in the
Navigator panel to quickly scroll to another location within a document.
Clicking and dragging within the red rectangle moves the viewing area
around live, whereas clicking outside the rectangle snaps the view to a
new location.
|
You can change the red rectangle to another color by choosing Panel Options from the Navigator panel's popup menu.
|
|
8. Opening a new window
So, now you've learned how
to zoom and pan around the document window, and you probably have many
different sections of your artwork that you want to focus on.
Illustrator lets you create a number of windows for the current artwork
by choosing Window => New Window.
This option creates a new
window that's the same size as the current window. You can then zoom and
pan within this new window while maintaining the previous window. You
can place these windows side by side to see the artwork from two unique
perspectives. Illustrator gives each new window a different reference
number, which appears in the title bar.