Raw
image file formats are available with most mid- to high-end digital
cameras and contain information about how the image was taken. The raw
format turns off all camera adjustments, and saves the image information
to a digital memory card. When you open a raw file, Photoshop opens
Camera Raw, allowing you to adjust image details. If you’re not sure
what to do, you can click Auto to have Camera Raw do it or drag sliders
to adjust options manually. You can adjust color tones, reduce noise (New!), add grain (New!), add sharpening (New!), correct for lens defects, add post-crop vignetting and effects (New!),
and retouch images with the Heal, Clone and Red Eye tools. Raw images
are larger; however, the increase in file size is actually more
information that can be used by Camera Raw. In addition, raw images can
be converted into 16-bit mode, which provides more control over
adjustments such as tonal and color correction. Once processed, raw
images can be saved in the DNG (Digital Negative), TIFF, PSD, PSB, or
JPEG formats. When a raw file is placed as a Smart Object, Photoshop
embeds the raw data within the document, allowing you to change the raw
settings and update the converted layer.
Import a Camera Raw File
 Click the File menu, and then click Open.
- To place a raw file as a Smart Object, click the File menu, and then click Place.
|
 Click the Files of Type (Win) or Enable (Mac) list arrow, and then click Camera Raw.
|
 Select a single raw image file, or Ctrl (Win) or
 (Mac)+ click to select more than one file.
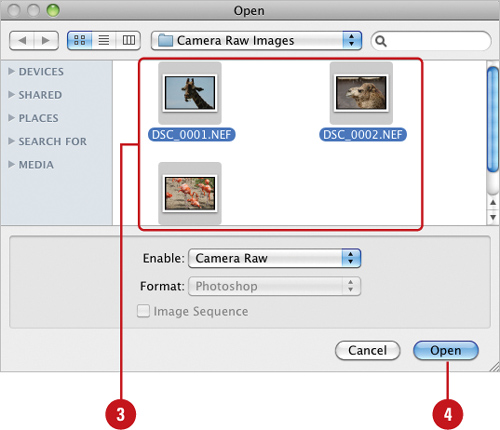 |
 Click Open.
The Camera Raw dialog box opens.
|
 Click any of the tabs—Basic, Tone Curve, Detail (Sharpen & Noise Reduction), HSL / Grayscale, Split Toning, Lens Correction, Effects (New!), Camera Calibrations, Presets, or Snapshots (New!)—to change the options you want.
|
 To automatically make tonal adjustments, click Auto on the Basic tab, and then make any other manual adjustments.
|  Use the following tools to modify the image:
- Use the Zoom, Hand, Rotate, Crop, and Straighten tools to change the size, orientation, and position of the image.
- Use the White Balance tool to set the image white balance or the Color Sampler tool to sample a color from the image.
- Use the Spot Removal or Red Eye Removal tool to fix the image.
- Use the Adjustment Brush or Gradient Filter tool to make adjustments to exposure, brightness, contrast, saturation, clarity, sharpness, and color.
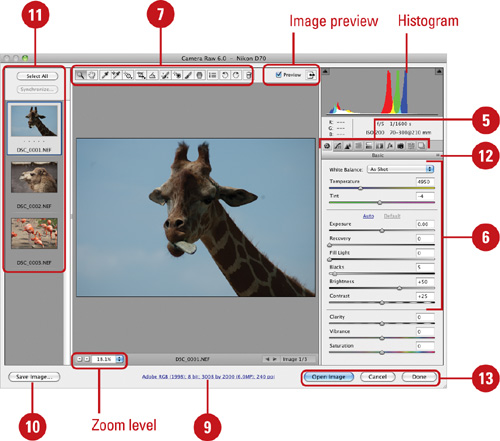 |
 There are two areas of the screen related to image view:
- Image Preview. If checked, displays current version of image with all changes that have been made.
- Zoom Level. Changes to the level of image magnification can be made here.

|
 Click the filename to change the (color) Space, (bit) Depth, Size, and Resolution of the image.
|
 Click Save Image(s) to specify a folder destination, file name, and format for the processed images.
|
 Select the images you want to synchronize (apply settings) in the Filmstrip (if desired, click Select All), and then click Synchronize.
|
 Click the Camera Raw Menu button to Load, Save, or Delete a specific set of Raw settings.
|
 When you’re done, click Done to process the file, but not open it, or click Open Image(s) to process and open it in Photoshop. Hold Alt (Win) or Option (Mac) to use Open Copy or Reset.
 |
|