Customizing Your Workspace
InDesign enables you
to save your workspace environment so that you don’t have to spend time
repositioning panels on the screen every time you launch the
application. You can create and save a custom workspace for every type
of layout work you do. For instance, a production-oriented job might
require a totally different set of panels than a design-oriented one. No
problem! InDesign lets you save a workspace for each.
Saving a Workspace
To save your preferred work environment, follow these steps:
1. | Choose Window, Workspace, New Workspace.
|
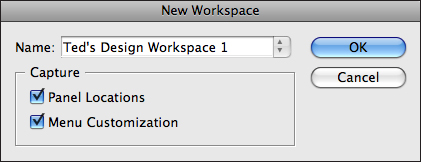
2. | When the New Workspace dialog box appears, enter a name for your workspace and click OK (see Figure 1).

|
3. | You
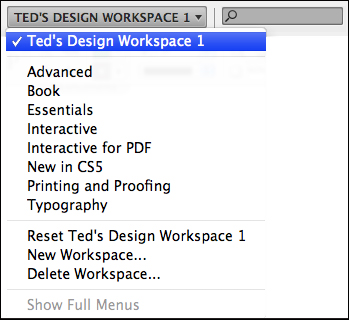
can now restore your workspace whenever you like by selecting it under
the Window, Workspace submenu or from the Workspace drop-down list in
the Application Bar (see Figure 2).

|
4. | To
save changes made to your custom environment, choose Window, Workspace,
New Workspace, and enter the name of the workspace you want to update.
Click OK when the dialog box asks whether you want to replace the
workspace.
|
Deleting a Workspace
Custom workspaces are such a
cool feature, and so easy to use, that you may find yourself saving
dozens of them in no time at all. But after a while, you may realize
that you use only a handful of them. No problem. You can always delete a
saved workspace by choosing Window, Workspace, Delete Workspace. When
the Delete Workspace dialog box appears, select the workspace that you
want to delete from the list (you can only delete one at a time) and
then click Delete.
Working with the Tools Panel
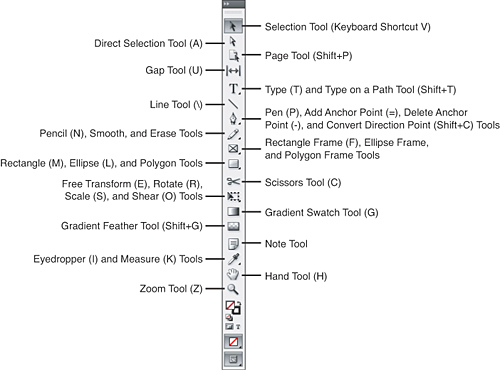
The Tools panel contains all
the tools available to you; each one is represented by a descriptive
icon displayed in the panel (see Figure 3).
Most of these icons are easy to identify, but if you’re ever unsure
what tool you’re viewing, hover the cursor over its icon in the Tools
panel and refer to the ToolTip description that appears.

You can display the Tools
panel on your screen in three ways. The default preference displays it
in single-column format and docked in the left side well. You can change
the default display by choosing InDesign, Preferences, Interface (Mac)
or Edit, Preferences, Interface (Win) and selecting Double Column (see Figure 4) or Single Row (see Figure 5) from the Floating Tools panel drop-down list.


You can activate a tool by
clicking its icon or by typing its assigned keyboard shortcut (which is
also displayed in the ToolTip). Any icon showing a small arrow in the
bottom-right corner indicates an available toolset—more tools are
“hidden” under the one shown. Clicking and holding the icon reveals a
flyout menu of additional tools.
|
To display the Tools Panel
in a single row, it must remain free floating (not docked in a side
well). If you try to dock the single row Tools panel in a side well,
InDesign automatically changes the display to double-column format. Note
also that the Tools panel cannot be docked at the top or bottom of the
screen when displayed in single-row format.
|
You can also change the Tools
panel display by double-clicking the gray title bar or by clicking the
Expand Panel button (the arrows) at the top of the panel. When the Tools
panel is docked in a side well, double-clicking its title bar or
clicking the Expand Panel button only enables you to toggle between
single- and double-column displays. Double-clicking its title bar or
clicking the Expand Panel button when the panel is free floating enables
you to toggle between all three display modes.