The Portable Document Format (.pdf)
Walk
up to just about anyone on the street these days and ask them about
Adobe. Most will reply, “Oh, sure, I have Adobe on my computer.” What
they are probably referring to is the free Adobe Reader file viewer,
which enables just about anyone to view and print PDF files. Now that
Reader has surpassed a billion downloads worldwide, PDF files are
ubiquitous. PDF has become a standard format used not only by designers
and printers but also by governments and enterprise corporations.
Over the past few years, PDF
has become the format of choice for both printers and designers,
replacing EPS and other formats. There are several reasons for this,
including the following:
Smaller file sizes.
PDF supports a variety of image compression techniques, resulting in
smaller file sizes. In addition, users can easily create low-resolution
files to send to clients for review and can create high-resolution files
to send to printers for high-quality output.
Tip
You can instruct clients or users to download the free Reader at http://get.adobe.com/reader/. Reader is available for Mac, Windows, Unix, and a variety of mobile platforms. |
A free universal viewer.
Reader is free and available for nearly every computer platform,
including handheld devices. This means a designer can deliver a PDF file
and be assured that anyone can view the file correctly.
Ability to embed fonts. A
PDF file is a single, self-contained file that includes all necessary
images and fonts. This makes it easier to distribute and reduces the
chance of error.
Easy to create.
Designers can easily create PDF files from any Adobe application.
Additionally, Adobe supplies a utility called PDFMaker, which comes with
Acrobat, that enables users to instantly create PDF files from
Microsoft Office documents or AutoCAD files. (Note that PDFMaker was
dropped for the Mac in Acrobat 9.) A PDF virtual printer also enables a
user to create a PDF file simply by printing a file from any
application.
Security.
PDF files can contain multiple levels of security that can restrict
functionality such as printing or editing. This ensures the integrity of
a file and gives designers the ability to protect their work.
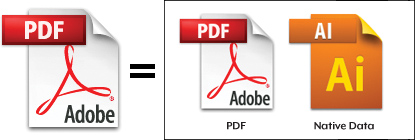
By default, a PDF saved from Illustrator is also a dual-path file, containing both PDF data and native Illustrator data (Figure 7).
In fact, if you think about it, saving a native Illustrator file and an
Adobe PDF file is quite similar. When you save a PDF file from
Illustrator, though, you can control a variety of settings in the
resulting PDF data of the file.
To save your file as a PDF
file, choose File > Save, and select Adobe PDF from the pop-up menu.
When you click Save, you are presented with the Save Adobe PDF dialog
box where you can specify settings for how your file should be saved.
Different Uses of PDF Files
Before we discuss all the
different options available when saving a PDF file, it’s important to
realize that PDF files have many uses. For example, you might create a
PDF file to send to a client so that they can approve a design, or you
might create a PDF file to send to a printer for final output.
Alternatively, you might even create a PDF file to upload to a website
so that anyone can view the content. Each of these PDF files serves a
different purpose, and therefore
each can have very different settings. Just because you create a PDF
file doesn’t mean you can use it for any and all purposes.
Note
PDF presets are similar to Distiller Job Options, which are simply a captured set of PDF settings. |
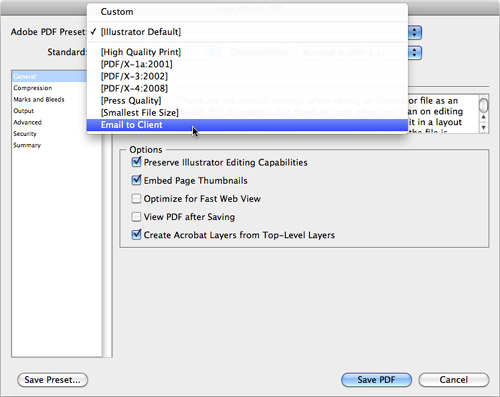
Instead of having to
manually specify PDF settings each time you want to create a file for a
specific purpose, Illustrator offers to let you create Adobe PDF
presets, which capture all the settings a PDF can have. At the top of
the Save Adobe PDF dialog box, a pop-up menu lets you choose from some
presets that ship with Illustrator (Figure 8), or you can define your own by clicking the Save Preset button at the bottom left of the dialog box.
Acrobat Version Compatibility
When PDF was first
introduced, it had limited support (spot colors weren’t supported until
version 1.2), but as each new version of Acrobat has been introduced,
Adobe has updated the PDF language specification (called PDFL for short)
to include more advanced functions and to feature new capabilities.
Adobe released PDFL version
1.3 when it introduced Acrobat 4.0, which was the first mainstream
version of Acrobat and the free Reader. With each new version of
Acrobat, Adobe has also revised the PDFL version (Acrobat 5 = PDF 1.4,
Acrobat 6 = PDF 1.5, and so on), although trying to remember all of
these different numbers can prove quite confusing. An easy way to figure
it out is to remember that if you add up the numbers in the PDFL version, it equals the corresponding version of Acrobat (1 + 4 = 5).
In any case, when you save a
PDF file from Illustrator, you can specify which version of Acrobat you
want your file to be compatible with in the Save Adobe PDF dialog box (Figure 9).
Although saving a file using a newer version compatibility setting
offers more options when saving, anyone who wants to view that PDF file
needs to use a newer version of Acrobat or Reader to see and print the
file correctly.

The most important point to
remember is that from a print perspective, there’s a line in the sand
between PDF 1.3, which doesn’t support transparency, and all later PDF
versions, which do support live transparency (Table 1).
Table 1. Acrobat Version Compatibility
| Version of Acrobat | PDFL Version | Transparency Support | Main Features Introduced |
|---|
| Acrobat 4 | PDF 1.3 | No | Smooth shading, digital signatures |
| Acrobat 5 | PDF 1.4 | Yes | Transparency, XML tagging, and metadata |
| Acrobat 6 | PDF 1.5 | Yes | Layers, JPEG2000 compression |
| Acrobat 7 | PDF 1.6 | Yes | Object-level metadata, AES encryption |
| Acrobat 8 | PDF 1.7 | Yes | Enhanced 3D support, PDF packages |
The PDF/X Standard
Imagine
the following scenario: A designer submits a PDF file to a printer for
final printing. When the job is complete, the designer is horrified to
find that the wrong fonts printed and that the colors weren’t anywhere
near close to those that appeared on the screen when the designer
designed the job. How did this happen? After all, didn’t the printer say
they accept PDF files? For designers, and especially for printers, this
is a scenario that unfortunately happens too often.
This happens because PDF
is a “garbage in, garbage out” file format. Whatever you put into it,
that’s what you can expect to get out of it. If you don’t embed your
fonts when you create a PDF file, a printer can’t print your file unless
they also have your fonts. If you embed RGB images when a printer needs
CMYK, you will see color shifts in your output (some devices may not
print RGB images at all).
With so many other possible
things that could go wrong with a PDF file, printers and publishers
realized that they needed a way to ensure that a PDF file meets certain
requirements before it is submitted for final printing or publication.
One way to do that was by
providing designers with a detailed list of the settings they needed to
use whenever they created a PDF file. Although this was a nice idea in
concept, printers and publishers soon realized that designers use a
variety of different programs, and each has different ways of creating
PDF files. They also realized this meant that each time a new version of
software was introduced, a designer would need to learn new settings.
Instead, an International Organization for Standardization (ISO) standard was created, called PDF/X.
A PDF/X file is not a new kind of file format but rather a regular PDF
file that simply meets a list of predefined criteria. Now, when a
designer submits a PDF/X file for final printing, a printer can assume
that the file meets the minimum requirements to reproduce it correctly.
By choosing a standard from
the Standard pop-up menu in the Save Adobe PDF dialog box, you are
embedding an identifier in the PDF file that says, “I am a
PDF/X-compliant file.” Certain scripts and preflight utilities can read
these identifiers and validate PDF/X-compliant files in a prepress or
publishing workflow. See the sidebar “Understanding Supported PDF Standards in Illustrator” for an explanation of the different kinds of PDF/X versions.
General PDF Settings
The General panel of the
Save Adobe PDF dialog box contains several important settings that
determine how your PDF file is saved:
Preserve Illustrator Editing Capabilities.
The Preserve Illustrator Editing Capabilities option embeds a full
native Illustrator file in your PDF file. This allows Illustrator to
reopen and edit the file with no loss in editability.
This option is turned on in the default preset, but turning this option
off effectively cuts your file size in half and also reduces how long
it takes to save a PDF file (Figure 10).
If you want to send a file to a client for approval, for example, you
can take this approach to create a smaller PDF file (which is also not
as editable should they try to open it in Illustrator). If you do
deselect this option, make sure to always save a copy of your file,
because you won’t be able to reopen the smaller PDF and edit it as a
fully editable file.
Embed Page Thumbnails.
With the Embed Page Thumbnails option selected, Illustrator creates
thumbnails for each page. You can display these in Acrobat by choosing
to view the Pages tab. Be aware that the thumbnails increase the file
size somewhat, however.
Optimize for Fast Web View.
Selecting the Optimize for Fast Web View option enables streaming,
allowing those who view the file online to view parts of the document
while other parts are still loading.
View PDF after Saving.
It’s always a good idea to take a look at a PDF on your screen to make
sure it’s okay before you release it to a printer or to a client.
Selecting the View PDF after Saving option launches Acrobat and opens
the file after the PDF file is created.
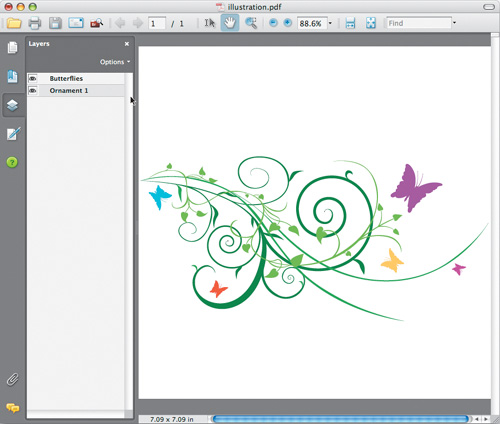
Create Acrobat Layers from Top-Level Layers.
If you choose to save your file with Acrobat 6 (PDF 1.5), Acrobat 7
(PDF 1.6), or Acrobat 8 (PDF 1.7) compatibility, you can have
Illustrator convert all top-level layers to PDF layers. You can view a
document with PDF layers in either Acrobat or the free Reader, versions
6.0 and newer (Figure 11). In addition, Acrobat layers can be turned on and off when the PDF is placed in an InDesign document.
PDF Compression Settings
The
Compression panel of the Save Adobe PDF dialog box offers a variety of
settings for compressing the images and art that appear in your file (Figure 12).
One of the benefits of using PDF is that you can specify a variety of
image settings for each need. For example, when you send a file to a
client for review, you want to create a small file that transmits
quickly via email and you might set all images to resample at 72 ppi.
However, that same file, when transmitted to the printer for final
output, needs to contain high-resolution images, which you might set to
at least 300 ppi.
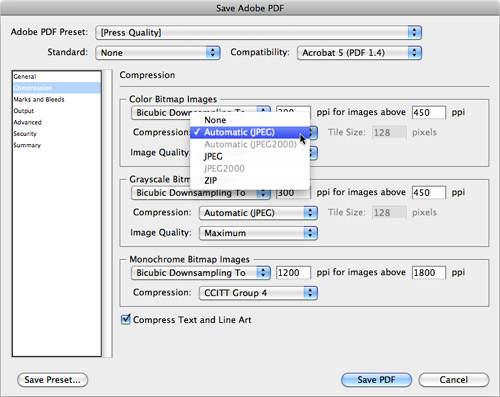
When you create a PDF, Illustrator has the ability to resample an image. Resampling is a method used to change the resolution of a raster image. Although upsamplingdownsampling
removes pixels from a file, resulting in a lower resolution and a
smaller file size. Obviously, downsampling an image results in loss of
image detail and is therefore inappropriate for final output to a
printer. adds new pixels to a file,
Resampling settings.
Illustrator can apply different settings to raster images that appear
in your file, according to image type and resolution. You can specify
these settings for color, grayscale, and monochrome bitmap images. More
importantly, you can define a threshold for when images will be
resampled. The Do Not Downsample option leaves images at their native
resolutions. Alternatively, you can choose from three different types of
downsampling (Average, Bicubic, and Subsampling), which reduce the
resolution of any raster images in your file according to the threshold
settings. The first value is for the resolution to which you want images
to be downsampled. The second value determines which images in your
file get downsampled. For example, if you set the first value to 72 ppi
and the second value to 150 ppi, then any image in your file that
exceeds 150 ppi is downsampled to 72 ppi. However, if your file contains
an image that’s set to 100 ppi, that image is not downsampled and
remains at 100 ppi because it falls below the threshold.
Compression and Image Quality. In
addition to resampling raster images, PDF also uses compression
techniques to further reduce the size of a file. Different methods are
used for compression, or you can choose None to disable compression
completely (see the sidebar below).
Compress Text and Line Art.
To achieve smaller file sizes, select the option to compress text and
line art. This uses a lossless method of compression and doesn’t
sacrifice quality in your file.
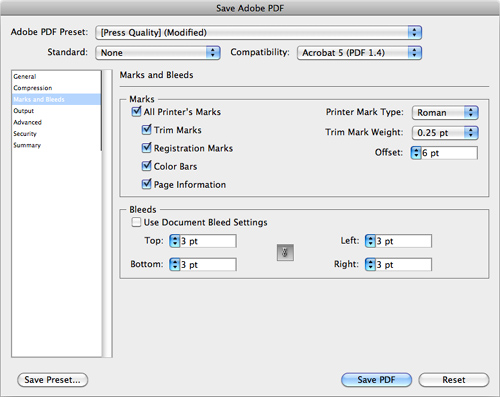
PDF Marks and Bleeds Settings
Note
The Bleed settings you specify in the Marks and Bleeds panel define the bleed box values in the resulting PDF. |
The Marks and Bleeds panel of the Save Adobe PDF dialog box (Figure 13)
is strikingly similar to the Marks and Bleeds panel you’ll find in the
Print dialog box. Here you can specify whether your PDF should have
printer’s marks and whether the document will have bleed space added. If
you already set a bleed setting when you created your document or in
the Document Setup dialog box, you can set Use Document Bleed Settings
to use those values.
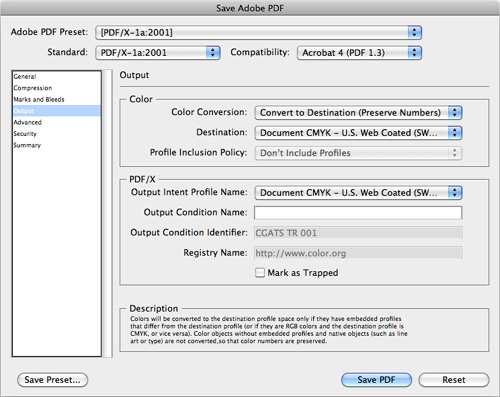
PDF Output Settings
The Output panel of the Save Adobe PDF dialog box (Figure 14,
on the next page) gives you control over what color space your PDF is
saved in and whether you want to include image color management profiles
in your PDF. Additionally, you can specify color management settings
for files that will be saved using one of the PDF/X standards.
Color.
When you create a PDF file, you can specify a color conversion for the
file. In the Color Conversion pop-up, you can choose No Conversion, in
which case the color values and color space will remain untouched, or
you can choose Convert to Destination and choose from the Destination
pop-up options to convert the color values or color space using a color
profile of your choice. You can also specify when Illustrator will
include color profiles in the PDF file.
PDF/X.
When you create a PDF/X file, you must specify a color profile intent;
with PDF/X-1a, this is usually set to SWOP. You can also choose to mark
the file as being already trapped, which is useful in workflows where
trapping may occur in the RIP. If you trapped a file in Illustrator
(either manually or via a plug-in such as Esko-Graphics’ DeskPack),
identifying the file as already trapped prevents the file from being
trapped again in the RIP.
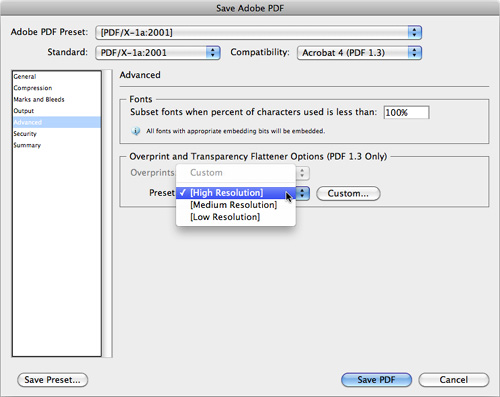
PDF Advanced Settings
The Advanced panel of the Save Adobe PDF dialog box (Figure 15) allows you to specify how fonts are embedded in your PDF file and how transparency is flattened, if necessary.
Fonts.
By default, Illustrator embeds subsets of fonts when saving a PDF file.
A subset simply means that Illustrator includes only the parts of a
font that are required to view and print the text you have in your
document. If a font is protected, however, Illustrator does not embed
the font. See the sidebar “Font Embedding and Permissions” for more information.
Overprint and Transparency Flattener Options.
If your document contains overprint settings, you can choose to
preserve or discard them. Additionally, if your file contains
transparency, you can choose a transparency flattener preset to control
how the transparency is flattened. For more information on both
overprinting and transparency.
It’s important to note that these two settings are applicable only when
you’re saving a PDF file with Acrobat 4 (PDF 1.3) compatibility because
all other versions support transparency and don’t require flattening.
PDF Security Settings
In
today’s world, security has become a priority—not only in airports but
with regard to electronic communications and documentation as well. One
of the benefits of using PDF files is the ability to password-protect
them so that you can control who can view or edit your file.
The Security panel of the Save Adobe PDF dialog box (Figure 16) allows you to specify two kinds of passwords to protect the content of your PDF file:
Document Open Password. A document open password, also referred to as a master password,
controls who can open your PDF file. If a user attempts to view the
PDF, they are prompted for a password. Upon entering the password, the
user is able to view the file. The file will not open if the password is
incorrect.
Permissions Password.
A permissions password controls what a user can do with a PDF file once
it is open on their screen. For example, a user who has the
Professional version of Acrobat or a variety of Acrobat plug-ins, such
as Enfocus PitStop, has the ability to edit a PDF file. Even if a file
has a master password, once a user opens the file, they are free to do
with the file as they please. By specifying a permissions password, you
can restrict what a user can do with a file, even once they’ve opened
the file in Acrobat Professional. For a detailed explanation of the
different permissions settings, see the sidebar “Did You Ask for Permission?”
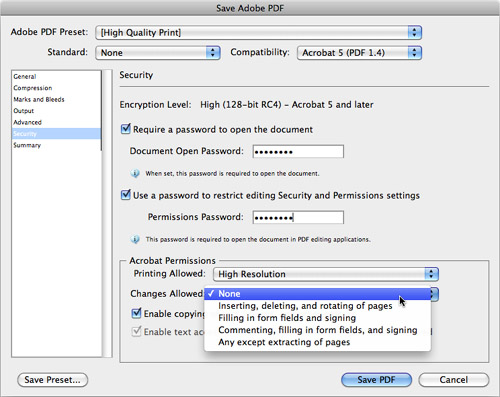
The
permissions settings in Illustrator give you control over the actions a
user can take with your PDF file once they’ve opened it. You can find
these options in the lower portion of the Security panel in the Save
Adobe PDF dialog box:
Printing.
Choosing None disallows the printing of your file. Users are able to
view the file in its entirety on their computer screens, but their Print
command is dimmed (Figure 17).
Choosing High Resolution enables full printing of the file. When using a
compatibility setting of Acrobat 6 or newer, you can also choose the
Low Resolution setting, which forces all pages to print only as raster
images at 150 dpi.
Changing/editing.
Choosing None disallows all editing of your file. Users are able to
view the file in its entirety on their computer screens, but all of
Acrobat’s editing tools are disabled. Four additional settings restrict
specific types of edits. For example, by choosing the Filling in Form
Fields and Signing setting, you allow users to fill out PDF form fields
and to digitally sign the file, but this setting disables all other
editing features.
Copying.
If you want to prevent users from copying content from your PDF file
and pasting that data into other applications, deselect the “Enable
copying of text, images, and other content” option. However, by doing
so, you may affect the accessibility of your document, especially for
users who rely on screen readers to speak the content of files. These
screen readers copy the text and paste the data into an application that
reads the words to the user. When you select the option to enable text
access to screen readers, Acrobat allows the copying of text if it
senses that the application that’s copying the data is a screen reader.
You can also enable a user to copy the metadata from a file.