Pixel-based
applications like Painter and Photoshop provide several tools for
selecting portions of the canvas to accept painted strokes or effects.
Whatever isn’t selected is, by definition, masked. You can make
selections based on geometric shapes or draw freehand selections around
an irregular area using the Lasso tool. A sophisticated selection tool
that has no counterpart in traditional media is the Magic Wand, which
selects all pixels in a defined color range. Figure 1
shows where the Selection tools are located on the Toolbox. The
Rectangular Selection tool is currently active. Its roommates are the
Oval Selection tool and the Lasso. Notice the Selection Adjuster tool,
which allows you to move or resize a selection marquee.

The Select menu
offers handy commands for altering and managing selections. There is
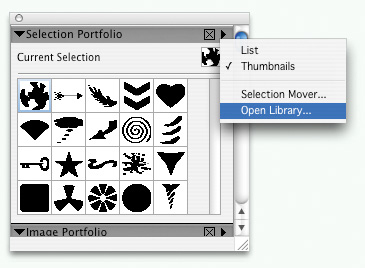
also a special Library Palette, the Selection Portfolio, with a
collection of common (and not-so-common) selections you can simply drag
to the canvas. Open the Selection Portfolio by selecting Window >
Show Selection Portfolio and load the Lettering selections from the
Extras folder in the Painter X application folder. If you’re using an
earlier version, choose the heart or star selection from the default
portfolio shown in Figure 2.

|
An active selection of whatever shape has a moving marquee like an animated dashed line. The cute nickname for this is marching ants.
You might want to turn off the marching ants (without losing the
selection) to see your work better. The Hide Marquee command in the
Select menu has a keyboard shortcut: Shift+Cmd/Ctrl+H.
|
Once
you have a selection, you can paint in it without the need to be
careful at the edges—there’s no way you’ll go outside the lines. You can
also fill a selection instantly with a solid color, a gradient, or a
pattern, using either the Paint Bucket tool or the Fill command in the
Effects menu. An especially useful command in the Select menu is Stroke
Selection. This will automatically paint the edges of your selection
with the current color, using the current brush variant. Yes, that
sounds a bit like the Align to Path option.
Fancy Schmancy
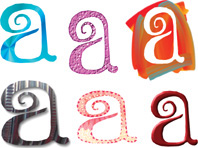
Figure 3
has a sampler of creative ways to work with a selection. Here are the
techniques used, top row from left to right, then bottom row.

- Gradient fill.
- Fill with current color (pink), then Stroke Selection with Impasto > Acid Etch brush.
- Select
> Invert (this makes the selection a mask so it is protected) then
paint freely around the letterform with an Artists’ Oil variant.
- Fill
with the current Pattern (Silver Tubing Pen). Then copy and paste to
make the item a new layer. Apply Effects > Objects > Create Drop
Shadow.
- Choose Lotus Petals as the current pattern, then
Stroke Selection with Pattern Pen Masked (the Pattern Pen category will
be discussed shortly).
- Fill with solid red. For the 3D bevel use Effects > Surface Control > Apply Surface Texture, using Image Luminance.
There hasn’t been much
drawing and painting in this lesson, and your mouse would have worked
fine for most tasks. Now it’s time to pick up your Wacom pen again to
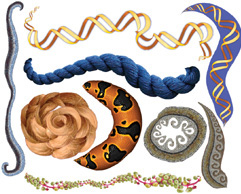
explore the amazing Pattern Pen category. Take a look at the strokes in Figure 4.
With only two exceptions, all these strokes were made with the Pattern
Pen Masked variant. The difference between the masked and the “not
masked” variant is demonstrated with the two Double Helix strokes. The
blue background that is part of the Double Helix pattern is masked out
when you use Pattern Pen Masked. In the lower right of the figure, Wave
Mosaic is also painted both masked and—the other way. (“Unmasked” can’t
be the right word for a stroke that includes a strip of background
color. It makes me think of somebody being forced to reveal his or her
true identity.) The potential for decorative, expressive, and whimsical
uses of Pattern Pens will be explored in the next lesson.
