Fine-tuning spacing
A
distinguishing factor of good typography is expert spacing, with no
gaps in justified text, a smooth edge on left-aligned paragraphs, no
awkward hyphens or line breaks, no large gaps between letters, and more.
With attention to detail and a few QuarkXPress features—including
hyphenation, justification, kerning, tracking, special spaces, and
hanging characters—you can achieve this expert spacing. As with other
typography features, select characters and paragraphs for spacing
adjustments with the Text Content tool  .
.
Specifying hyphenation and justification
The spacing within a
paragraph is largely controlled by hyphenation and justification
settings—even for text that is not justified. In QuarkXPress,
hyphenation and justification settings are saved as styles called
H&Js that can be specified in paragraph style sheets and shared
among projects through File > Append. Prior to version 7 of
QuarkXPress, it was important to create your own H&Js and experiment
with all the settings. Recent versions of QuarkXPress, including
version 8, include a variety of expert H&Js that may suit all your
needs.
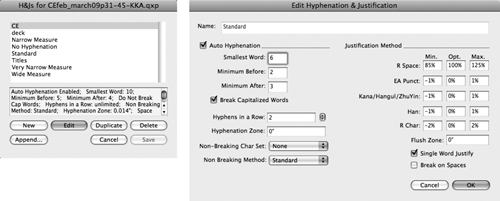
To create H&Js, choose Edit > H&Js. The H&Js dialog box lists all the H&Js for use in the project (Figure 1). Click New or Edit to display the Edit Hyphenation & Justification dialog box and adjust the H&J (Figure 5.18).

Auto Hyphenation controls: If
you check Auto Hyphenation, consult editors on hyphenation settings:
While hyphenation affects how text looks, it also affects how it reads.
Consult an editor on topics such as whether to hyphenate capitalized
words, how many words in a row to hyphenate, and how many characters
should remain before or after a hyphen. The final H&J may be a
compromise that produces clean spacing and legible text.
Justification Method controls:
The controls in the Justification Method area control the amount of
space added and removed between characters and words, particularly in
justified text. Due to the esoteric nature of these controls, you may be
better off starting with one of the default H&Js included with
QuarkXPress and adjusting it. The H&J names indicate usage: No
Hyphenation is appropriate for body text that is not hyphenated; Titles
is used for headings that are not hyphenated; and Narrow Measure, Very
Narrow Measure, and Wide Measure are fine-tuned for different column
widths.
Tip: Append New H&Js
During
the development of QuarkXPress 7, Quark product managers consulted with
expert type setters—including Brad Walrod, renowned for typesetting the
Harry Potter books—to adjust the default Standard H&J and create
several new H&Js, including Narrow Measure, No Hyphenation, Titles,
Very Narrow Measure, and Wide Measure. The adjustments to Standard and
new H&Js will not be included in projects created prior to version
7. If that is the case, you can append the new H&Js from a project
created in QuarkXPress 7 or later (File > Append).
Applying H&Js
To apply an
H&J to selected paragraphs, choose an option from the H&J menu
in the Formats tab of the Paragraph Attributes dialog box or the Edit
Paragraph Style Sheet dialog box. The default H&J is Standard, which
hyphenates text and provides expert spacing within standard column
widths. Experiment with the different default H&Js and your own to
get the best look for the font size, alignment, leading, column width,
and content in use (Figure 2).

Tip: Adjusting Line Breaks
Settings
in the H&J applied to a paragraph and the hyphenation exceptions
specified for the project largely control the spacing and line endings
in a paragraph. You can further perfect line endings by manually
breaking lines with the New Line character (Shift+Return). Since manual
line breaks remain if text reflows, it’s a good idea to do this after
the formatting and text are final.
Tip: Preventing Widows
To
prevent one line of a paragraph from ending up alone at the top or
bottom of a column, use the Keep Lines Together controls in the Formats
tab of the Paragraph Attributes dialog box. To keep subheads with
accompanying text or keep the bulleted paragraphs in a list together,
use the Keep With Next ¶ control.