1. Cropping
If you want to print only part of a picture, you
have the option of cropping the graphic file using an image-editing
program. But an easier option—and one that doesn’t actually delete
anything from the original graphic file—is to crop imported pictures
within QuarkXPress. Although the Item tool lets you crop pictures, the
Picture Content tool is generally better for this task because you’re able to see what’s being cropped as you drag the mouse.
When you click a picture box with the Picture
Content tool, any cropped areas of the picture are lightened to
distinguish them from the live area. Click and drag any of the eight
square resizing handles to crop the picture within. As you drag handles,
the onscreen display is continually updated to show you what portion of
the picture is inside the picture box and what areas are getting
cropped. Figure 1 shows a before, during, and after example of cropping.

Cropping a picture with the Picture
Content tool gets a little tricky when the small, square resizing
handles of a picture box overlap the rounded blue resizing handles of a
picture. When this occurs, clicking a box’s resizing handle will
actually select the picture resizing handle, and if you drag, you’ll
change the scale of the picture. The trick here is to first press the
Command key (Mac) or Control key (Windows), click a box resizing handle,
release the Command or Control key, and then drag. If you don’t release
the Command or Control key before you drag, you’ll scale both the
picture and the box. Unfortunately, when you use a modifier key, only
the portion of the picture within the box is visible as you drag.
2. Positioning a picture within its box
If you want to move a picture box—and the picture within—simply click and drag the box with the Item tool ; however, if you want to move a picture
within its box, use the Picture Content tool. When this tool is selected and you move the pointer over a picture box that contains a picture, the hand pointer ( )
is displayed. Click and drag when this pointer appears to move the
picture. Press the Shift key as you drag to constrain movement to
vertical and horizontal. A live preview is displayed as you drag, with
cropped areas lightened.
)
is displayed. Click and drag when this pointer appears to move the
picture. Press the Shift key as you drag to constrain movement to
vertical and horizontal. A live preview is displayed as you drag, with
cropped areas lightened.
The arrow keys offer a useful alternative to
moving a picture with the mouse. When you select a picture with the
Picture Content tool, each click of an arrow key nudges the picture one
point. Hold down the Option key (Mac) or the Alt key (Windows) to reduce
the nudge increment to one-tenth of a point.
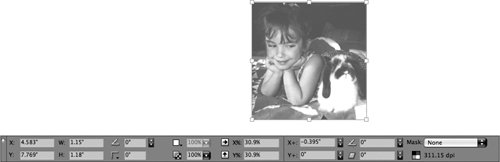
If you’re fond of using the Measurements palette
to make changes to items, you can click the increase/decrease arrows
next to the Offset Across (X+) and Offset Down (Y+) fields in the
Classic tab to move a selected picture in one-point increments. Hold
down the Option key (Mac) or the Alt key (Windows) to reduce the nudge
increment to one-tenth of a point. Figure 2
shows the Offset Across and Offset Down controls in the Measurements
palette. Of course, you can also specify offset values in the fields. If
you want to place the upper-left corner of the picture in the
upper-left corner of the box (the default position), enter 0 in these
fields, which are also available in the Picture pane of the Modify
dialog box (Item > Modify).

3. Scaling pictures
As with cropping, you have several options for
scaling pictures. The quickest and easiest way to scale both a picture
box and the picture within is to select the box with the Item tool, and
then drag a resizing handle while holding down Shift+Command (Mac) or
Shift+Control (Windows). Holding down the modifier keys maintains the
proportions of both the picture and the box. If you hold down only the
Command or Control key, you can disproportionately scale the picture and
the box.
If you’ve selected a picture with the Picture
Content tool, you can drag any of its resizing handles to scale the
picture without affecting the box. Hold down Shift+Command (Mac) or
Shift+Control (Windows) as you drag to maintain the proportions
of the picture. If you hold down only the Command or Control key as you
drag, the picture is disproportionately scaled.
The Scale Across (X%) and Scale Down (Y%) fields
in the Classic tab of the Measurements palette provide another option
for scaling pictures, as do the same fields in the Picture pane of the
Modify dialog box (Item > Modify).
To return a picture to its original scale, set the Scale Across (X%) and Scale Down (Y%) values to 100%.
Tip: Context Menu Commands for Scaling Pictures and Resizing Picture Boxes
If you Control+click
(Mac) or right-click (Windows) a picture box with either the Item tool
or the Picture Content tool, the context menu offers two commands for
picture boxes. Choose Scale Picture to Box to resize the picture so that
it fits completely within the box (that is, with no cropping) while
maintaining the picture’s original proportions. (If the dimensions of
the picture are not proportional with the dimensions of the box, the box
background will be visible between the edge of the picture and the top
and bottom edges or left and right edges of the picture box.) Choose Fit
Box to Picture to resize a picture box so that its edges align with the
edges of the picture.
4. More options for working with pictures
Cropping and scaling are probably the two most
common changes you’ll make to pictures, but other options—like rotation,
skew, and opacity—let you make more dramatic changes. Nearly all of the
controls for modifying pictures are available in the Picture pane of
the Modify dialog box (Figure 3). Most of these controls are also available in the Classic tab of the Measurements palette (Figure 4).
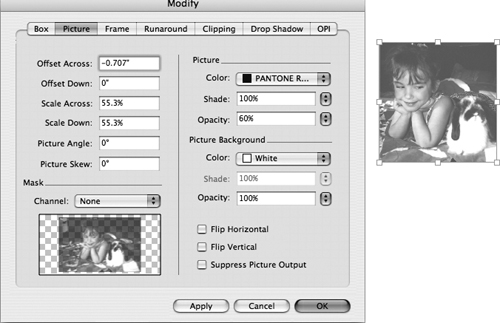
Here’s a quick description of the options:
Offset Across/Offset Down: Move a picture within its frame.
Scale Across/Scale Down: Scale a picture horizontally and vertically.
Picture Angle: Rotate a picture (but not a picture box).
Skew: Slant a picture so that it tilts to the left (negative values) or right (positive values).
Picture: The controls in this section let you apply color, shade, and opacity to black-and-white and grayscale pictures.
Picture Background:
The controls in this section let you apply color, shade, and opacity to
the background of black-and-white and grayscale pictures.
Flip Horizontal/Flip Vertical: Lets you create a mirror image of a picture along a horizontal or vertical axis.
Suppress Printout:
Prevents a picture (but not a frame, if the picture box has one) from
printing. Choosing this option can reduce print time and save ink if you
don’t need to include a particular picture.
Tip: Determining the Print Resolution of Scaled Pictures
When
a bitmap picture (.tif, .jpg, .psd, and so on) is selected, the
Effective Image Resolution control at the bottom-right of the
Measurements palette displays the resolution at which the currently
selected picture will print. It calculates the effective resolution
using the picture’s original resolution and the current scale values.