2. Mix and Match
I really like the colors in the scarf, and I can
make them into a color set by dragging a lasso selection loosely around
that area (nobody wants a tight scarf) and then using the Color Sets
menu option to make a New Color Set from Selection. I added a couple of
useful colors that are not present in the scarf (white and bright red)
by choosing each of them in the color wheel and clicking the Add Color
icon at the bottom of the Color Sets Palette. Figure 4
shows this color set, as well as a great Painter feature we haven’t
worked with yet, the Color Mixer. Incidentally, if the color set looks a
bit different, it’s because I turned off the grid of white lines that
normally separate the color swatches. Just toggle the Show Grid command
in the Color Sets menu.
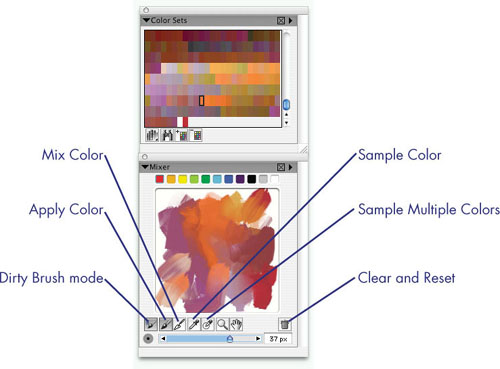
The
Color Mixer is available as part of the Colors Palette in the Window
menu. It functions much like a traditional mixing area on an artist’s
palette: blobs of paint are placed next to each other, and a brush or
palette knife is used to mix them partially or blend them completely.
Then the brush is loaded with a color or a combination of colors that
can be applied to the canvas. Most of the tools at the bottom of the
Color Mixer will be familiar to you, but a couple of them need to be
explained. The Brush icon can apply the current color and also mix
colors already on the mixer pad. If Dirty Brush mode is enabled, the
mixing brush will begin with the current color and blend it with the
colors on the pad. The Eyedropper tool, as expected, samples a color
from the mixer pad and makes it the current color for painting. Now
here’s the interesting part: the eyedropper with the circle at its tip
can sample more than one color. For maximum effect, click it on a part
of the pad where two or more colors meet. So why is this exciting? There
are a couple of Brush categories that can paint with more than one
color at a time. I’m talking about Artists’ Oils and (new in Painter X)
RealBristle Brushes.
Take a few minutes to play around with the Color
Mixer and some of the Artists’ Oils and RealBristle Brush variants. Did
I mention you can save not only the colors created on the mixer, but
also the entire mixer pad? Load the mixer pad I’ll be using for this
project from the Palettes and Libs folder on the CD. It’s called
PurpleRedOrange. While you’re at it, help yourself to the custom palette
I made for this project, called Ink-Oil-Real, shown in Figure 5. It includes, from left to right, the following variants (category names are also shown):
Calligraphy > Dry Ink
Pens > Scratchboard Tool (smooth pen and ink for details)
Artists’ Oils > Clumpy Brush
RealBristle Brushes > Real Oils Short
Impasto > Smeary Varnish (back by popular demand from the JohnG painting)
RealBristle Brushes > Real Flat (all RealBristle Brush variant names start with “Real”—I don’t think this name means it’s very flat)
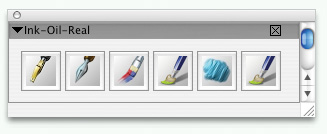
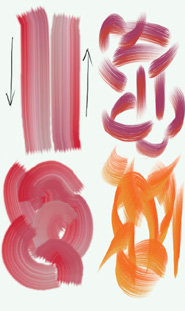
Figure 6
has some test strokes made with the Artists’ Oil and RealBristle
variants from my custom palette. The two vertical strokes in red and
mauve were made with the Clumpy Brush. I like the random variation in
spacing of the bristles. That’s what “clumpiness” means in Painter’s
terminology. Notice that the position of colors in a stroke depends on
the direction used to apply it. Also notice in curved strokes that the
width of the brush is unchanged. The RealBristle Brush variants, on the
other hand, are capable of a variety of stroke shapes, based not only on
the shape of the brush but also on response to the tilt and bearing of
your Wacom pen. The purple and brown strokes were made with Real Oils
Short. The orange and yellow strokes were done with Real Flat.
|
Before you begin working with a brush category
or variant that’s unfamiliar to you, create a new document for testing
it under a variety of situations: paint over different backgrounds using
different colors, pressure, and direction. Make some long strokes to
see if pigment fades out. Drag a stroke over changing colors to observe
the smeariness of the brush. See what happens when you change the value
of controls in the Property Bar, then use Restore Default Variant in the
Brush Selector Bar menu.
|
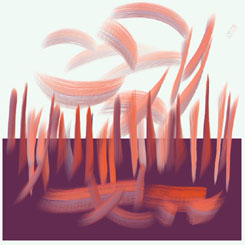
I made the test canvas in Figure 7
to explore the behavior of RealBristle Brush strokes when dragged
across different colored backgrounds in different directions. Both of
the variants I’m using pick up color at the beginning of the stroke and
carry it along. The effect is stronger with Real Oils Short, due to its
much higher values for Bleed and Blend. I’m quite liking the look of
this test canvas and thinking it could come in handy when we create some
abstract paintings in a later lesson.