IT tutorials
 
Graphics
 

CorelDraw 10 : Complex Shapes - Creating Spirals, Drawing Grids

5/18/2013 7:52:45 PM
- Free product key for windows 10
- Free Product Key for Microsoft office 365
- Malwarebytes Premium 3.7.1 Serial Keys (LifeTime) 2019

1. Creating Spirals

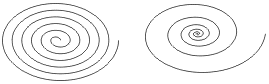
You can create two types of spirals: symmetrical and logarithmic (Figure 1). The space between revolutions of a symmetrical spiral is constant, while the spacing in a logarithmic spiral increases with each new revolution.

Figure 1. You can draw two kinds of spirals: symmetrical (left) and logarithmic (right). Press as you drag to create a concentric/perfect spiral.


To create a spiral:

1.
Select the Spiral Tool from the Object flyout in the toolbox or press.

The pointer changes to a cross-hair with a tiny spiral attached to it.

2.
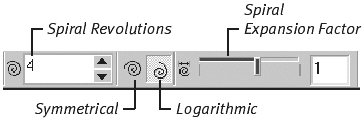
Select a symmetrical or logarithmic spiral by clicking the appropriate button on the property bar (Figure 2).

Figure 2. Prior to drawing a spiral, choose the desired settings from the property bar.


3.
Indicate the desired number of revolutions by entering a number in the Spiral Revolutions text box.

4.
If you've chosen a logarithmic spiral, set a revolution expansion factor by dragging the slider or by entering a number in the Spiral Expansion Factor text box.

5.
To create the spiral, left-click and drag diagonally. Release the mouse button when the spiral is the desired size.

Tips

  • Unlike drawing polygons and stars, you must specify spiral settings on the property bar before you draw. Settings changed afterward won't modify a selected spiral; they apply to the next spiral drawn.

  • The manner in which a spiral is displayed depends on the diagonal direction that you drag. Try all four possibilities.
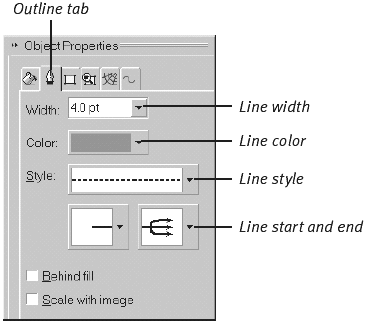
  • To set a different line width, type, color, or end effect (such as arrows), select the previously drawn spiral, choose Edit > Properties, and click the Outline tab of the Object Properties docker (Figure 3).

    Figure 3. You can also alter a drawn spiral by setting options in the Object Properties docker.


2. Drawing Grids

If you want to create an object that looks something like graph paper or a spreadsheet grid, you can use the new Graph Paper Tool.

1.
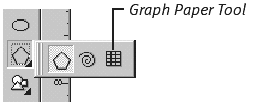
Select the Graph Paper tool from the Object toolbox flyout (Figure 4).

Figure 4. Select the Graph Paper Tool from the Object toolbox flyout.


The pointer changes to a cross-hair with a tiny grid attached to it.

2.
In the property bar text boxes, specify the number of columns and rows for the grid (Figure 5).

Figure 5. Set the number of columns and rows in these property bar text boxes.


3.
To draw the grid, click and drag.

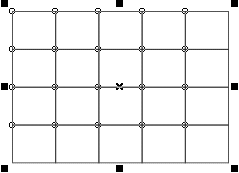
Release the mouse button when the grid is completed. The grid is selected (Figure 6).

Figure 6. A finished, selected grid with five columns and four rows.


Tips

  • To draw a grid with a square outline, press as you drag.

  • A grid is actually composed of a series of grouped rectangles. If you want to modify any of the individual grid cells (to remove a cell or selectively color it, for example), you must first ungroup the grid. Select the grid, and then choose Arrange > Ungroup (or press).

  • You must specify the number of grid rows and columns before drawing. Settings changed afterward won't modify a selected grid; they apply to the next grid drawn.

 
Others
 
- CorelDraw 10 : Complex Shapes - Polygons and Stars
- Adobe Dreamweaver CS5 : Working with Web Page Tables - Inserting a Table in Standard Mode
- Adobe Dreamweaver CS5 : Working with Tables, Switching Between Table Modes
- Adobe Illustrator CS5 : Working with Objects - Duplicating Objects
- Adobe Illustrator CS5 : Working with Objects - Saving and Editing Selections, Moving Objects
- Adobe Illustrator CS5 : Working with Objects - Selecting Similar Objects
- Adobe Photoshop CS5 : Camera Raw—Beyond the Basics - Editing Multiple Photos at Once
- Adobe Photoshop CS5 : Camera Raw—Beyond the Basics - Double-Processing to Create the Uncapturable
- Adobe Flash Catalyst CS5 : Modify the Contents of a State
- Adobe Flash Catalyst CS5 : Creating States in the Main Application
 
 
Top 10
 
- Microsoft Visio 2013 : Adding Structure to Your Diagrams - Finding containers and lists in Visio (part 2) - Wireframes,Legends
- Microsoft Visio 2013 : Adding Structure to Your Diagrams - Finding containers and lists in Visio (part 1) - Swimlanes
- Microsoft Visio 2013 : Adding Structure to Your Diagrams - Formatting and sizing lists
- Microsoft Visio 2013 : Adding Structure to Your Diagrams - Adding shapes to lists
- Microsoft Visio 2013 : Adding Structure to Your Diagrams - Sizing containers
- Microsoft Access 2010 : Control Properties and Why to Use Them (part 3) - The Other Properties of a Control
- Microsoft Access 2010 : Control Properties and Why to Use Them (part 2) - The Data Properties of a Control
- Microsoft Access 2010 : Control Properties and Why to Use Them (part 1) - The Format Properties of a Control
- Microsoft Access 2010 : Form Properties and Why Should You Use Them - Working with the Properties Window
- Microsoft Visio 2013 : Using the Organization Chart Wizard with new data
Technology FAQ
- Is possible to just to use a wireless router to extend wireless access to wireless access points?
- Ruby - Insert Struct to MySql
- how to find my Symantec pcAnywhere serial number
- About direct X / Open GL issue
- How to determine eclipse version?
- What SAN cert Exchange 2010 for UM, OA?
- How do I populate a SQL Express table from Excel file?
- code for express check out with Paypal.
- Problem with Templated User Control
- ShellExecute SW_HIDE
programming4us programming4us