IT tutorials
 
Graphics
 

Adobe Dreamweaver CS5 : Working with Tables, Switching Between Table Modes

5/18/2013 7:42:32 PM
- Free product key for windows 10
- Free Product Key for Microsoft office 365
- Malwarebytes Premium 3.7.1 Serial Keys (LifeTime) 2019

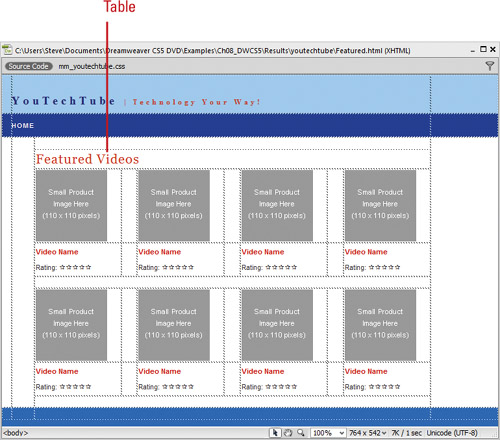
1. Working with Tables

Tables are basically grids that allow the designer to precisely control the content of a Web page. The three main mechanisms of a table are rows, columns, and cells. A row extends across the entire table from left to right. Columns extend vertically from the top to the bottom of the table. A cell is the area where a row and column intersect. By default, table cells will expand to fit the content inserted into them.

If you’re working in the design window, Dreamweaver will visually display the table, and allow you to expand or contract the table or individual rows or columns with a simple click and a drag.

Creating a table in Dreamweaver is basically a three-step process: Step one: insert the table, Step two: modify the table to fit the specific design requirements of the current page, and Step three: add the content (text, graphics, etc.) to the individual cells. Be advised, that since tables can display differently in different and older browsers, it’s important to test your pages to make sure what you see is what you’re visitors are seeing. The following examples illustrate how a Web page might appear in different browser windows.


2. Switching Between Table Modes

You can create tables using two different modes: Standard and Expanded Tables. Each mode has its strengths and weaknesses. Standard mode is useful for creating and displaying a table as it will appear in a Web browser and adding and editing content. Expanded Tables mode adds cell padding and spacing to all the tables in a document and increases borders to make editing easier. For example, you might use Expanded Tables mode to position the insertion point to the left or right of an image, without inadvertently selecting the image or table cell, and then switch back to Standard mode to make your changes. By default, Dreamweaver starts you out in Standard mode.

Switch Between Table Modes

1.  Create a new Web page or open the Web page you want to view.


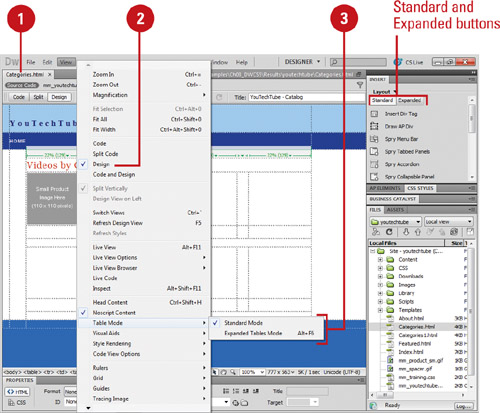
2. Click the View menu, and then click Design or click the Design button to display the page in Design mode.

3. Click the View menu, point to Table Mode, and then select from the following modes:

  • Standard. Use to display a table as it will appear in a Web browser and edit it.

    Timesaver

    To quickly return to Standard mode, click the [Exit] link in Expanded Tables, located at the top center of the Document window.

  • Expanded Tables. Use to edit a table. This mode adds cell padding and spacing, and increases border.

    Timesaver

    Press F6 to switch to Expanded Tables mode.

  • You can also click the Standard or Expanded button on the Layout tab on the Insert panel.


Others
 
- Adobe Illustrator CS5 : Working with Objects - Duplicating Objects
- Adobe Illustrator CS5 : Working with Objects - Saving and Editing Selections, Moving Objects
- Adobe Illustrator CS5 : Working with Objects - Selecting Similar Objects
- Adobe Photoshop CS5 : Camera Raw—Beyond the Basics - Editing Multiple Photos at Once
- Adobe Photoshop CS5 : Camera Raw—Beyond the Basics - Double-Processing to Create the Uncapturable
- Adobe Flash Catalyst CS5 : Modify the Contents of a State
- Adobe Flash Catalyst CS5 : Creating States in the Main Application
- Adobe After Effects CS5 : Animating Text - Animating text opacity, Using a text animator group
- Adobe After Effects CS5 : Animating Text - Animating type tracking
- Adobe After Effects CS5 : Animating Text - Animating text using a path animation preset
 
 
Top 10
 
- Microsoft Visio 2013 : Adding Structure to Your Diagrams - Finding containers and lists in Visio (part 2) - Wireframes,Legends
- Microsoft Visio 2013 : Adding Structure to Your Diagrams - Finding containers and lists in Visio (part 1) - Swimlanes
- Microsoft Visio 2013 : Adding Structure to Your Diagrams - Formatting and sizing lists
- Microsoft Visio 2013 : Adding Structure to Your Diagrams - Adding shapes to lists
- Microsoft Visio 2013 : Adding Structure to Your Diagrams - Sizing containers
- Microsoft Access 2010 : Control Properties and Why to Use Them (part 3) - The Other Properties of a Control
- Microsoft Access 2010 : Control Properties and Why to Use Them (part 2) - The Data Properties of a Control
- Microsoft Access 2010 : Control Properties and Why to Use Them (part 1) - The Format Properties of a Control
- Microsoft Access 2010 : Form Properties and Why Should You Use Them - Working with the Properties Window
- Microsoft Visio 2013 : Using the Organization Chart Wizard with new data
Technology FAQ
- Is possible to just to use a wireless router to extend wireless access to wireless access points?
- Ruby - Insert Struct to MySql
- how to find my Symantec pcAnywhere serial number
- About direct X / Open GL issue
- How to determine eclipse version?
- What SAN cert Exchange 2010 for UM, OA?
- How do I populate a SQL Express table from Excel file?
- code for express check out with Paypal.
- Problem with Templated User Control
- ShellExecute SW_HIDE
programming4us programming4us