The Tools panel contains
several basic vector shapes, which include the Line tool, the Rectangle
tool, the Ellipse tool, and the Polygon tool. To create one of these shapes, select the appropriate tool, and then
click and drag on the canvas. These basic shapes can be scaled, skewed,
and distorted using the Transform tools in the Tools panel. You can use
the Properties panel to change the fill and stroke and even add a
texture for a more realistic look.
With a bit of practice, you’ll be creating your own
custom vector shapes and masks before you know it.
Note
Text is also a vector, but you’re focusing on shapes and paths in this lesson.
Deleting shapes
1. | Choose File > Open, and navigate to the Lesson05 folder.
|
2. | Select the watch_promo.fw.png file, and click Open.
|
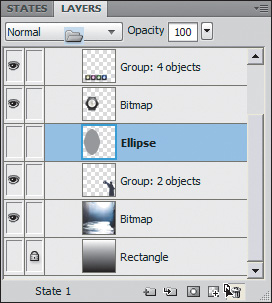
3. | Click the lock icon next to the ellipse in the Layers panel to unlock the object.
|
4. | If it’s not already selected, select the ellipse in the Layers panel.
|
5. | Drag the layer to the Delete Selection (trash can) icon in the Layers panel.
|
Adding guides
Guides are great tools for aligning and placing
objects on the canvas. To help place the new shape, you will set up
guides on the canvas.
1. | If rulers are not already visible, choose View > Rulers.
|
2. | Move your cursor over the left ruler.
|
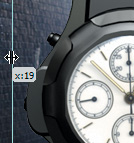
3. | Click
and drag toward the canvas. You will see a vertical guide appear. You
will also see a tooltip appear beside the guide, with an x value. This
value is the horizontal position of the vertical guide, as measured in
pixels.
Note
Tooltips are visible only if View > Tooltips is selected.
|
4. | When the tooltip displays x:19, let go of the mouse. The guide drops at that location.
Tip
If you want a higher degree of accuracy, double-click on the guide and then set the location numerically.
|
5. | Drag another vertical guide, and place it at 255 pixels.
Tip
To quickly toggle grids on or off, use keyboard shortcuts: Command+ ; (Mac) or Ctrl+ ; (Windows)
|
6. | Drag
guides from the top ruler to these positions: 125 pixels and 362
pixels. If you need to reposition guides, you can simply select them
with the Pointer tool and drag them to a new position.
|
Measuring distances between guides
Once guides are drawn, you can easily measure the distance between guides.
1. | Select the Pointer tool and then place your cursor over the watch.
|
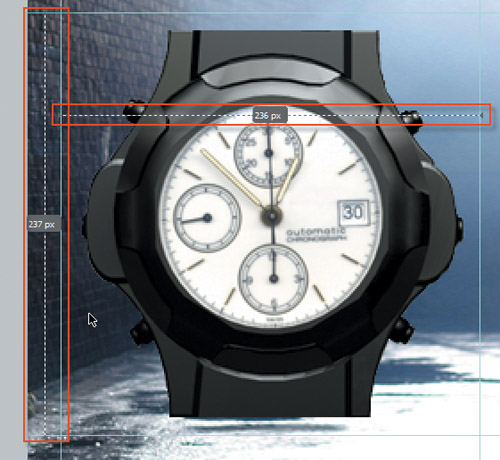
2. | Hold
down the Shift key. Note the distances that appear along with dashed
lines and arrowheads (the areas highlighted in red in the following
figure). These are guide
measurements, and they can be invoked any time you have guides on the
canvas. The guide dimensions should be 236 × 237 pixels.
 |
3. | Move the cursor around the canvas. The guide measurements will update based on the nearest guides.
|
Placing an object using guides
Once guides have been placed, you can accurately draw the new shape, as long as objects are set to snap to guides.
1. | Choose View > Guides, and make sure that Snap To Guides is selected.
|
2. | Select the Rectangle tool from the Tools panel.
|
3. | Move
the cursor onto the canvas, near the upper-left intersection of the
guides that box in the large watch. Click and drag to draw a rectangle.
When you come within 5 pixels of the guides on the right and bottom, the
rectangle snaps to those guides, giving you an exact dimension, placed
exactly where you want it to be.
|
4. | Before
releasing the mouse, press the Up Arrow key four times. If you pay
close attention to the rectangle you are drawing, you will see the
corners become rounded.
|
5. | Release the mouse. The shape appears, with all of the Fill properties that were used last. It will also cover the watch.
|
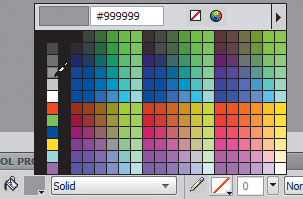
6. | In the Properties panel, set the Fill Category to Solid and the color to medium gray (#999999).
|
7. | If necessary, expand the Layers panel so that you can see both the new rectangle and the watch layers.
|
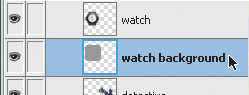
8. | Double-click the new rectangle name, and change it to watch background.
|
9. | Drag the watch background object below the watch in the Layers panel to change the stacking order.
|
Resizing vectors
Early in the creation of the watch_promo.fw.png file,
you added a grouped vector shape in the form of a silhouetted detective
pointing a rather exaggerated gun. You are going to resize this vector
object, with the added side benefit of seeing how this resizing
affects—or doesn’t affect—the quality of a vector.
1. | Select the detective silhouette using the Pointer tool.
|
2. | Select the Scale tool, and drag the object inward from any corner to make it proportionately smaller.
|
3. | Press
Enter or Return to accept the new size. Note that other than the
reduced size, the object does not appear damaged or altered. The edges
and overall shape have not been distorted.
|
4. | Select the Scale tool again.
|
5. | Drag the upper-left corner of the scale handles up and to the left, until the tooltips read approximately w:250, h:369.
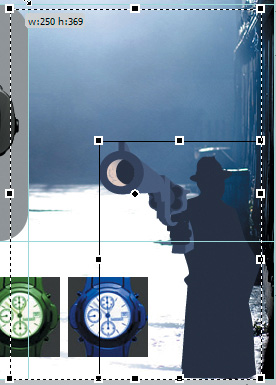
|
If you had treated a bitmap
image in this manner (sizing down, and then sizing up beyond the
original size), the image quality of the bitmap would have decreased
noticeably. The edges could become jagged and the image itself would
become pixelated. This vector shape, however, remains undamaged.